

Camera Obscura
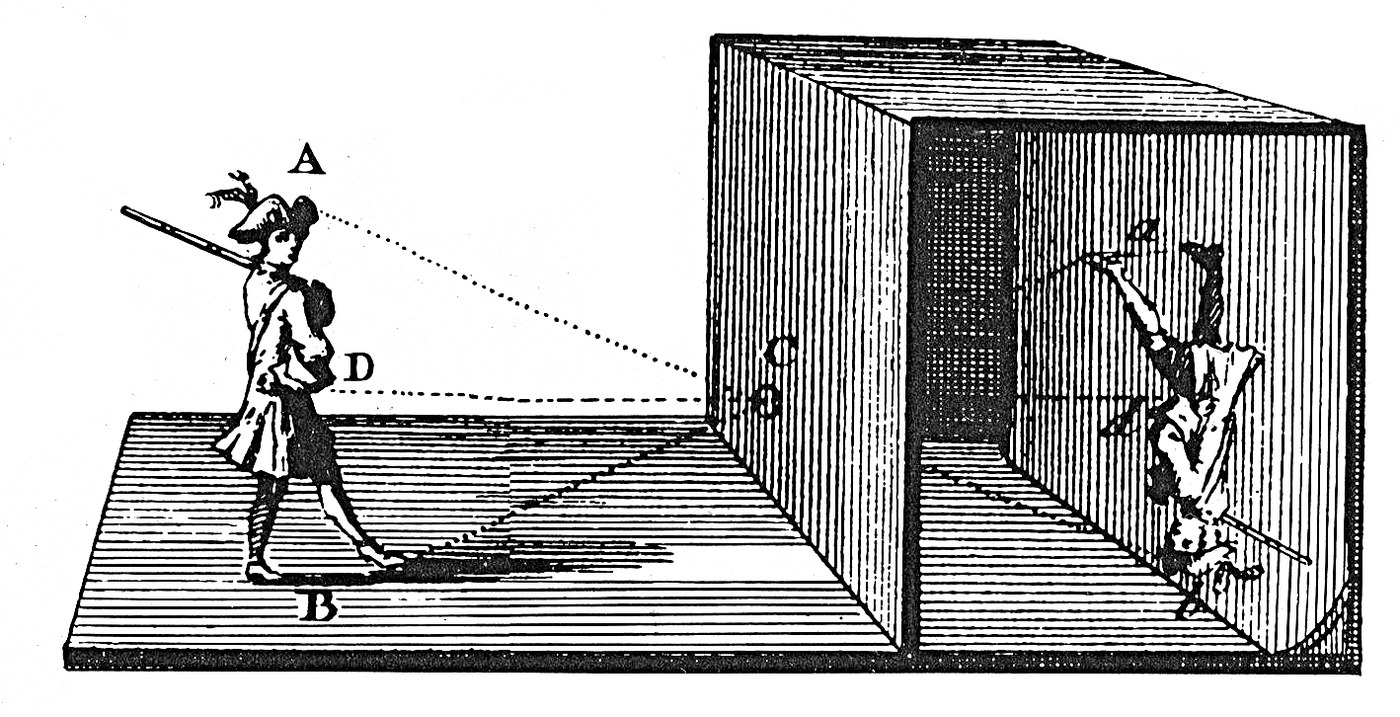
Make a room dark, put one small hole in the wall, and the world outside appears on the opposite wall — upside down, the right way round in colour, and moving. No lens, no film, no electricity. It is the oldest optical instrument, and it is nothing but a hole and a dark space.
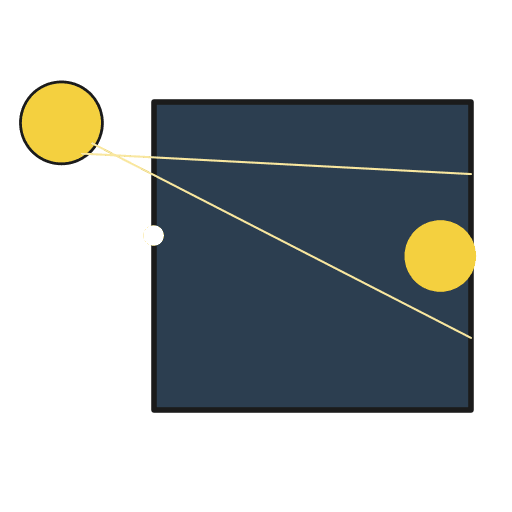
The reason it works is that light travels in straight lines. Without the hole, light from every point outside reaches every point on the wall and everything washes to grey. Restrict the light to a single small aperture and only one narrow ray from each outside point can reach the wall — so each point outside maps to one point inside. Rays from the top of a tree arrive at the bottom of the image, which is why it is inverted.
This is a build-and-measure project. Make the box, then change the hole size and measure what happens to sharpness and brightness. The trade-off you find with a ruler is the same one that governs every camera ever made.
手順
Find a long box
Find a long box
Take a cardboard box at least 300 mm long. A longer box gives a larger but dimmer image — that relationship is one of the things you will measure.
このステップの材料:
 段ボール箱1 個
Black out the inside
Black out the inside
Paint or line the entire interior matt black. Any pale surface bounces stray light around inside and washes out a very faint image. This step does more for contrast than anything else.
このステップの材料:
 黒の塗料100 ml
Fit the screen at one end
Fit the screen at one end
Cut a window in one end and tape tracing paper flat across it. This is the screen — you will view the image from behind it.
このステップの材料:
 型紙用トレーシングペーパーのロール1 巻
Make the aperture plate
Make the aperture plate
Cut a 50 mm window in the opposite end and tape a square of aluminium foil over it. Foil takes a clean, burr-free hole in a way cardboard cannot.
このステップの材料:
 アルミ箔1 枚
Pierce a 1 mm hole
Pierce a 1 mm hole
Push a pin through the centre of the foil to make a hole about 1 mm across. Turn the pin rather than tearing — a ragged hole gives a ragged image.
必要な工具:
 まち針
まち針Seal every other light leak
Seal every other light leak
Tape every seam and corner. One unnoticed gap along a flap will out-light the pinhole completely and you will see nothing at all.
Aim it at something bright
Aim it at something bright
Point the pinhole at a bright, well-lit scene — a window, a sunlit street, a lamp — and shade the screen end with your body or a cloth. An inverted image appears on the tracing paper.
Measure the image
Measure the image
Measure the height of the image on the screen, the box length, and the distance to the object. Record all three. The ratio image height / object height should equal box length / object distance.
必要な工具:
 定規
定規Enlarge the hole and measure again
Enlarge the hole and measure again
Widen the hole to about 3 mm and look again. Brighter, and noticeably softer. Then try a hole near 0.5 mm: sharper up to a point, then softer again as diffraction takes over. Record brightness and sharpness for each.
必要な工具:
まち針Swap in a lens and compare
Swap in a lens and compare
Replace the foil with a convex lens and slide the screen until the image snaps into focus. Far brighter and far sharper than any pinhole — and now it only works at one screen distance. That is the trade the Renaissance made.
必要な工具:
 凸レンズ
凸レンズTurn the image upright with a mirror
Turn the image upright with a mirror
Angle a flat mirror at 45° behind the lens to throw the image onto a horizontal surface. Now it is the right way up and you can lay paper on it and trace — exactly how artists used it.
必要な工具:
 平面鏡
平面鏡History & Context
History & Context
Why the image is upside down. Light travels in straight lines. A ray leaving the top of a tree and passing through the hole must continue in a straight line, so it lands low on the screen; a ray from the base lands high. The image inverts because the rays cross at the aperture. Everything else about the device follows from that one fact.
The trade-off you just measured. A smaller hole means each object point maps to a smaller patch on the screen, so the image is sharper — but less light gets through, so it is dimmer. Shrink the hole too far and diffraction, the bending of light at an edge, spreads the light out again and sharpness gets worse. There is an optimum, and every camera aperture since is a negotiation with the same three-way trade between sharpness, brightness and diffraction.
Ibn al-Haytham. The first full scientific explanation of the effect came from Ibn al-Haytham (c. 965–1039), the Arab physicist known in Latin as Alhazen, who showed how light entering a dark room through a small opening produces a sharp inverted image. The phenomenon had been noticed earlier; the explanation is his, and it is one of the foundations of optics as an experimental science.
Adding the lens — get the credit right. The lens is a Renaissance addition and the sequence is often muddled. Girolamo Cardano documented a convex glass lens in the opening of a darkened chamber in 1551. Giambattista della Porta described using a concave mirror to project the image as a drawing aid in his Magia Naturalis of 1558 and did much to popularise the device. Daniele Barbaro, in La pratica della perspettiva of 1568, recommended a biconvex lens made from spectacle glass, discussed adjusting the lens-to-screen distance for focus, and added an adjustable diaphragm — an aperture control. Della Porta is frequently credited with the lens; he was not first.
The artist's tool argument. Once you have added the mirror in step 11 you have a tracing device, and whether painters used one is a live and sometimes heated art-historical debate — Vermeer's name comes up most often. The honest position is that the technology plainly existed and was described as a drawing aid, while proving that a specific painting was made with one is very hard. Build it, trace with it, and you will at least understand what the argument is about.
この設計図で作るもの
CC0 パブリックドメイン
このブループリントはCC0で公開されています。許可を求めずに、自由にコピー、修正、配布、あらゆる目的で使用できます。
メイカーを応援するには、ブループリント経由で製品を購入してください。メイカーには メイカーコミッション がベンダーにより設定されています。または、このブループリントの新しいイテレーションを作成し、自分のブループリントにコネクションとして含めて収益を共有できます。