コラボレーション
アート
美容とウェルネス
工芸
文化と歴史
エンターテインメント
環境
食品と飲料
リバースエンジニアリング
科学
スポーツ
テクノロジー
ウェアラブル
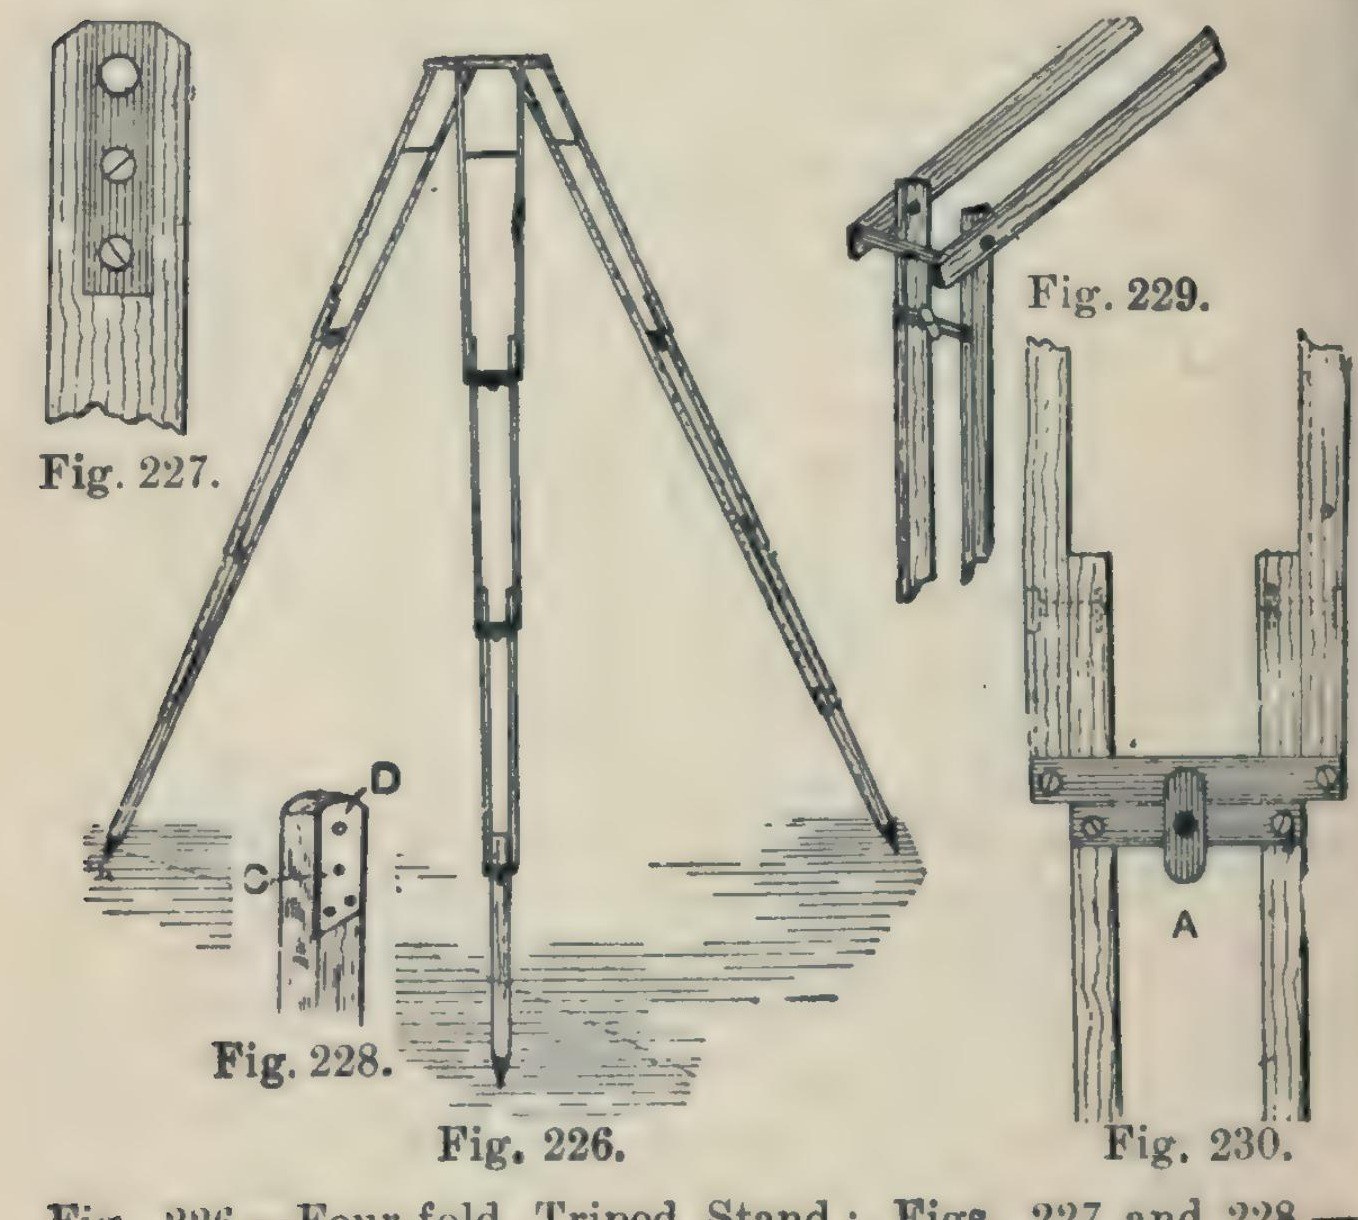


Camera Tripod: a Four-Fold Ash Tripod Stand (Hasluck, 1902)
A light, compact folding camera stand: three legs, each of seven ash laths riveted so it folds in four, locked open by brass buttons, on a triangular ash top with brass pins and a hole for the camera screw.
Hasluck says the same method makes stands that fold in three or two.
Source: Paul N. Hasluck, Photographic Cameras and Accessories (1902), pp. 153-157. Picture: Figs. 226-230 of the book.
中級者
Unknown
手順
1
1
Cut the ash laths
Cut the ash laths
Cut laths of good ash, true and square or the stand won't be rigid, and round the edges slightly: six 17 1/4 x 5/8 x 3/8 in, six 16 x 5/8 x 3/8 in, six 15 1/2 x 5/8 x 3/8 in, and three 14 x 5/8 x 5/8 in.
このステップの材料:
 トネリコの板1 21 laths
必要な工具:
 背金鋸
 小鉋
2
2
Fit the top ends and stretcher
Fit the top ends and stretcher
On each 17 1/4 in lath let in flush a 1/16 in brass plate, 1 1/4 in long, with a 3/16 in hole 1/4 in from the top, held by two countersunk brass screws; bore the wood to match and take off the top corners. On one lath of each pair cut a groove inside, about 3/16 in deep and 3 1/2 in long, starting 2 in from the top, and hinge a 1/8 in brass rod stretcher in it on a pin. On the other lath cut a curved groove 1 1/2 in long, 3/16 in wide, with a small hole at the bottom where the rod catches.
このステップの材料:
 真鍮板1 1/16 in plates
 木ねじ1 small brass screws
 真鍮棒1 1/8 in stretcher
必要な工具:
 金切りのこフレームと替刃
 金工ヤスリ
 ハンドドリル
 のみ
 マイナスドライバー
3
3
Bore and rivet the legs
Bore and rivet the legs
Bore the rivet holes: in the long laths 1 3/4 in from the lower end, counterbored so the copper rivet head sits flush, then 1/8 in through; in the 16 in and 15 1/2 in laths 1/2 in and 1 3/4 in from the ends; in each 14 in piece 1/2 in from one end, and taper its other end for a pointed iron shoe or a steel point and ferrule. Rivet the 21 laths into three legs with 1/8 in copper rivets and washers: a 16 in lath inside each 17 1/4 in one, a 15 1/2 in lath inside that, the 14 in foot between the last pair. Rivets flush, just tight enough to fold but not loose.
このステップの材料:
 銅リベット1 1/8 in, with washers
 不明な金属3 iron shoes or steel points
必要な工具:
 曲柄錐と錐先ハンドドリル
 リベットハンマー
4
4
Add cross strips and lock buttons
Add cross strips and lock buttons
Screw 1/16 in brass strips across the bottom ends of each pair of laths (Fig. 229). Under them screw strips carrying a small brass button riveted at the centre; turned, the button hooks over the strip above and locks the joint open (Fig. 230).
このステップの材料:
真鍮板1 cross strips, buttons木ねじ1 個必要な工具:
金切りのこフレームと替刃金工ヤスリマイナスドライバーリベットハンマー5
5
Make the top
Make the top
Plane ash to 1/2 in and draw an equilateral triangle with 8 1/2 in sides. Bisect the angles; 2 in from each corner draw a line at right angles, go 1/2 in in along the sides, and mark three rectangles 2 7/8 x 3/4 in; cut the outline (Fig. 231). Fix a 3/16 in brass rod, one end tapered, across each rectangle, bored 3/8 in from the outer edge and projecting about 1/2 in, for the legs to hang on. Bore a 1/4 in hole in the centre for the camera screw and glue felt on top.
このステップの材料:
トネリコの板1 top真鍮棒3 3/16 in pins ウールフェルト1 個
 動物膠1 個
必要な工具:
小鉋背金鋸曲柄錐と錐先ハンドドリル6
6
Finish
Finish
Glasspaper and varnish the wood, and lacquer the brass.
このステップの材料:
 シェラックニス1 varnish
 不明な材料1 brass lacquer
必要な工具:
 紙やすり
材料
10- 1 topプレースホルダー
- 1 cross strips, buttonsプレースホルダー
- 1 個プレースホルダー
- 3 3/16 in pinsプレースホルダー
- 1 1/8 in, with washersプレースホルダー
- 3 iron shoes or steel pointsプレースホルダー
- 1 個プレースホルダー
- 1 個プレースホルダー
- 1 varnishプレースホルダー
- 1 brass lacquerプレースホルダー
この設計図で作るもの

CC0 パブリックドメイン
このブループリントはCC0で公開されています。許可を求めずに、自由にコピー、修正、配布、あらゆる目的で使用できます。
メイカーを応援するには、ブループリント経由で製品を購入してください。メイカーには メイカーコミッション がベンダーにより設定されています。または、このブループリントの新しいイテレーションを作成し、自分のブループリントにコネクションとして含めて収益を共有できます。