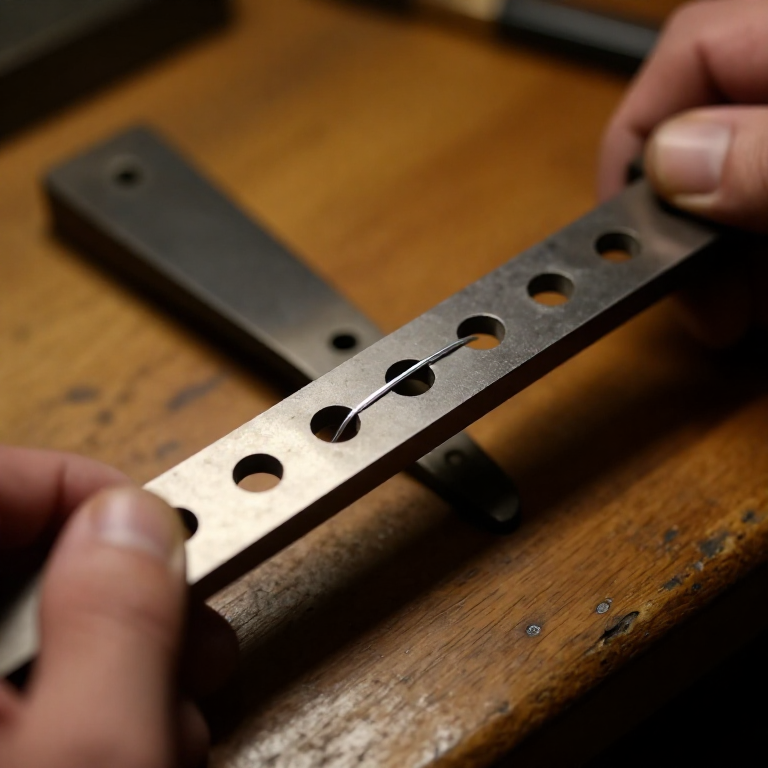


Drawing Wire with a Drawplate
Before wire could be drawn, it was made by cutting a strip from a sheet and rolling it round, or by twisting and hammering a rod — slow, uneven, and never truly round. The drawplate changed that. A steel plate pierced with a graded row of tapered holes lets you pull a thick wire through a slightly smaller hole, then a smaller one again, until it is exactly the gauge you want, perfectly round along its whole length.
It is one of the quietest revolutions in metalwork. Uniform wire is the prerequisite for chain, for filigree, for granulation, for wound settings, for mail, for strings. Every jewellery technique that depends on repeatable stock depends on this plate.
What makes it work is that metal flows rather than breaks — but only up to a point. Pull too hard, skip too many sizes, or forget to anneal, and the wire snaps or scores. The craft is in the patience: one hole at a time, wax before every pass, and soften the metal before it fights you.
手順
Clamp the drawplate in the vice
Clamp the drawplate in the vice
Clamp the drawplate upright in the bench vice with the tapered (wide) side facing you. Wire is fed into the wide side and pulled out the narrow side — that taper is what guides it in.
必要な工具:
 鋼製ダイス板
 万力(ベンチバイス)
Anneal the starting wire
Anneal the starting wire
Heat 300 mm of 16 gauge sterling wire on the firebrick to a dull cherry red — 600 to 650 °C — in dim light. Air-cool 10 seconds, then quench. Drawing hard wire is how plates get scored and wire gets snapped.
このステップの材料:
 スターリングシルバー線0.3 メートル
必要な工具:
 プロパントーチ
 耐火れんが
耐火れんがPickle off the firescale
Pickle off the firescale
Pickle 5 minutes in citric acid at 1 part acid to 5 parts water. Oxide left on the surface is abrasive and will drag through the holes.
このステップの材料:
 クエン酸100 g
File a taper on the leading end
File a taper on the leading end
File the first 30 mm of the wire down to a long, gradual taper thin enough to pass freely through the target hole and stick out 20 mm on the far side. Too short a taper and the draw tongs have nothing to grip.
必要な工具:
 精密ヤスリ(針ヤスリ)セット
Find the starting hole
Find the starting hole
Find the smallest hole the annealed wire still passes through unforced. Start one hole below that. Every draw from here goes down exactly one hole — skipping sizes is what breaks wire.
必要な工具:
鋼製ダイス板Wax the wire
Wax the wire
Rub beeswax along the whole length before every pass. The wax cuts friction at the hole, stops the wire galling and picking up the plate's surface, and carries away the heat the deformation makes.
このステップの材料:
 蜜蝋ペレット5 g
Draw the first pass
Draw the first pass
Feed the taper through from the wide side, grip the protruding end with the draw tongs, and pull in one steady horizontal movement. Do not jerk and do not stop mid-hole — a restart leaves a visible step in the wire.
必要な工具:
 引き抜き用やっとこ鋼製ダイス板
Feel the wire between passes
Feel the wire between passes
Wax and repeat, one hole at a time. Every 3 to 4 passes the wire stops flexing easily and the pull gets noticeably harder — that is work hardening, and it is the signal to stop.
このステップの材料:
蜜蝋ペレット5 g必要な工具:
引き抜き用やっとこRe-anneal and carry on
Re-anneal and carry on
Anneal again at dull red, air-cool 10 seconds, quench, pickle, re-wax. Repeat the whole draw-anneal-pickle cycle until the wire reaches its target gauge.
このステップの材料:
クエン酸100 g必要な工具:
プロパントーチ耐火れんがTake the last pass without annealing
Take the last pass without annealing
Draw the final pass and stop — do not anneal after it. That leaves the wire half-hard, which holds its shape, springs back cleanly and gives crisp bends and coils. Annealed wire at final gauge goes limp.
必要な工具:
引き抜き用やっとこ鋼製ダイス板Clean and coil
Clean and coil
Wipe the wax off with a rag. Coil the wire loosely — a tight coil sets a curve into half-hard wire that you will fight later.
History & Context
History & Context
Wire before drawplates. Early wire was not drawn at all. It was cut as a narrow strip from hammered sheet and rolled between two flat surfaces, or made by twisting a strip into a spiral and then rolling it smooth — the technique that leaves the faint diagonal seam you can see on much ancient wire under magnification. It worked, but the diameter wandered and the length was limited by the sheet.
Why drawn wire mattered. A drawplate gives you metres of stock at one exact gauge. That is the difference between making one ornament and making chain — and chain, mail, filigree, granulation and wound settings all need many identical elements. When a technique in the historical record suddenly starts appearing in quantity, uniform wire is often the reason.
The physics. Pulling metal through a converging die makes it flow plastically: the cross-section reduces and the length increases, conserving volume. The metal work-hardens as its crystal grains deform and tangle, which is why it gets stiffer and stronger with each pass, and why annealing — heating to let the grains recover — is what lets you keep going. Draw too far without annealing and the wire fails suddenly, usually right at the plate.
Why the plate is harder than the wire. The whole method depends on the die staying its own shape while the wire changes shape. That means the plate must be substantially harder than the material drawn through it — which is why drawplates are hardened steel, and why the holes are polished. A scored hole prints its score into every centimetre of wire that follows.
Half-hard on purpose. The choice to skip the last anneal is not laziness. Work-hardened wire resists deformation in a finished piece, so a clasp stays sprung and a coil stays coiled. Jewellers speak of dead soft, half-hard and hard wire, and pick deliberately — the same alloy behaves like a different material depending on how it was finished.
この設計図で作るもの
CC0 パブリックドメイン
このブループリントはCC0で公開されています。許可を求めずに、自由にコピー、修正、配布、あらゆる目的で使用できます。
メイカーを応援するには、ブループリント経由で製品を購入してください。メイカーには メイカーコミッション がベンダーにより設定されています。または、このブループリントの新しいイテレーションを作成し、自分のブループリントにコネクションとして含めて収益を共有できます。