The Lock Stitch Sewing Machine — Mechanized Garment Construction
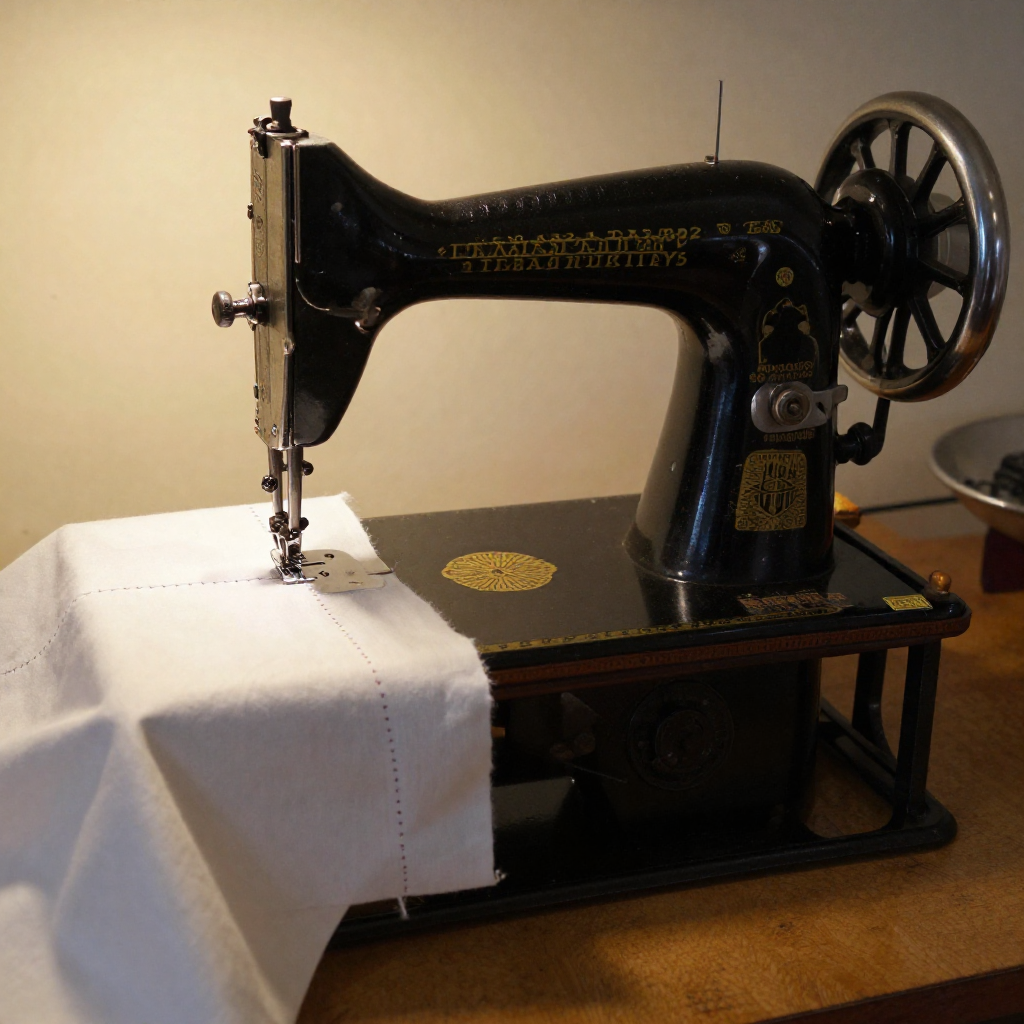
In 1846, Elias Howe of Massachusetts patented the lock stitch sewing machine — the first practical machine for joining fabric with thread. The lock stitch uses two threads: an upper thread carried by a needle and a lower thread wound on a bobbin. The needle pushes the upper thread through the fabric, forming a loop on the underside. A rotating hook catches this loop and wraps it around the bobbin thread, creating an interlocked stitch that will not unravel from either side. This is fundamentally different from a chain stitch, which uses only one thread and can be pulled apart by tugging the free end.
Howe's machine was crude and required the fabric to be held vertically, but Isaac Singer, Allen Wilson, and others rapidly improved the design. Singer added the foot treadle (freeing both hands for fabric guidance), the presser foot (holding fabric flat against the feed dogs), and the vertical needle bar. By 1860, Singer's factory in New York produced 13,000 machines per year. Singer also pioneered installment payment plans — the first major consumer product sold on credit — making the machine accessible to working-class households.
The sewing machine transformed the economics of clothing. A man's dress shirt that took 14 hours and 20 minutes to sew by hand could be completed in 1 hour and 16 minutes by machine. Factory-made ready-to-wear clothing became affordable for the first time. The sewing machine also became the first widely purchased complex mechanical device for the home — a precursor to the washing machine, vacuum cleaner, and every domestic appliance that followed.
手順
Understand the lock stitch principle
Understand the lock stitch principle
The lock stitch requires two threads. The upper thread passes through the eye of a needle that moves up and down through the fabric. On the downstroke, the needle pushes a loop of upper thread below the fabric. A hook mechanism on the underside catches this loop and passes it around the bobbin case, which holds the lower thread. As the needle rises, the two threads interlock — upper thread loops around lower thread at every stitch. The result is identical on both sides and will not unravel.
Wind the bobbin with thread
Wind the bobbin with thread
Place an empty bobbin on the machine's bobbin winder spindle. Thread the sewing thread through the bobbin winding tension disc and secure the end to the bobbin. Engage the bobbin winder and run the machine — the spindle spins the bobbin, winding thread evenly across its width. Stop when the bobbin is full (approximately 50–70 meters of thread). The bobbin thread becomes the lower thread of the lock stitch.
このステップの材料:
 Sewing Thread1 個
必要な工具:
 Sewing Machine
Install the bobbin in the bobbin case
Install the bobbin in the bobbin case
Drop the wound bobbin into the bobbin case beneath the needle plate. The thread must pull off the bobbin in the correct direction (clockwise or counter-clockwise, depending on the machine) and pass through the bobbin case tension spring. This spring provides resistance that balances against the upper thread tension, ensuring both threads pull evenly to form a centered lock stitch.
Thread the upper thread path
Thread the upper thread path
Place a spool of thread on the spool pin. Guide the thread through the machine's upper threading path: first through the thread guide at the top, down through the tension discs, up around the take-up lever, and down through the thread guides on the needle bar, finally threading it through the eye of the needle from front to back. Each point in this path serves a purpose — the tension discs control how tightly the upper thread is held; the take-up lever pulls slack thread after each stitch.
Bring up the bobbin thread
Bring up the bobbin thread
Hold the upper thread tail with your left hand. Turn the hand wheel one full revolution toward you. The needle descends through the needle plate, catches the bobbin thread, and pulls a loop up through the plate. Pull both thread tails — upper and bobbin — toward the back of the machine. Both threads should now lie behind the presser foot, ready to begin stitching.
Select fabric and cut the pieces
Select fabric and cut the pieces
Choose a medium-weight cotton fabric for practice — cotton calico or muslin, tightly woven, without stretch. Cut two rectangular pieces approximately 20 cm by 30 cm. Mark a seam line 1.5 cm from one long edge on each piece with chalk or pencil. Place the two pieces with right sides facing together, aligning the seam lines. This is a basic seam — the foundation of all garment construction.
このステップの材料:
 Cotton Cloth Sheet1 メートル
必要な工具:
 Sharp Scissors
Set stitch length and thread tension
Set stitch length and thread tension
Set the stitch length to 2.5 mm — a standard setting for medium-weight cotton. Shorter stitches (1.5 mm) are stronger but harder to unpick; longer stitches (4 mm) are for basting (temporary joins). Set the upper tension dial to the middle position (usually 4 on a scale of 0–9). Correct tension produces stitches where the threads interlock exactly at the center of the fabric thickness — visible on neither the top nor the bottom surface.
Position the fabric under the presser foot
Position the fabric under the presser foot
Raise the presser foot lever. Slide the aligned fabric pieces under the presser foot with the seam line aligned to the 1.5 cm guide on the needle plate. Lower the presser foot — it presses the fabric firmly against the feed dogs (toothed metal plates below the fabric that advance it forward with each stitch). The fabric is now held securely between the presser foot above and the feed dogs below.
Sew a straight seam
Sew a straight seam
Press the foot pedal (or turn the hand wheel on a hand-crank machine) to begin sewing. The needle descends and rises 800–1,200 times per minute on a domestic machine (industrial machines reach 5,000–9,000 stitches per minute). Guide the fabric gently — the feed dogs advance it; you only steer. Keep the fabric edge aligned with the 1.5 cm guide line. Do not push or pull — let the machine control the feed rate.
Backstitch at the start and end
Backstitch at the start and end
At the beginning of the seam, sew 3–4 stitches forward, then press the reverse lever and sew 3–4 stitches backward over the same line. Release the lever and continue forward. This backstitching locks the thread ends and prevents the seam from unraveling. Repeat at the end of the seam. Without backstitching, the first and last stitches can pull free under tension.
Turn a corner
Turn a corner
To sew an L-shaped seam, stitch to the corner point and stop with the needle in the down position (embedded in the fabric). Raise the presser foot. Pivot the fabric 90 degrees around the needle. Lower the presser foot and continue sewing in the new direction. The needle acts as the pivot point, keeping the corner precise. This technique produces the sharp corners needed for collars, cuffs, and pockets.
Diagnose tension problems
Diagnose tension problems
Examine the stitch line on both sides. If loops of upper thread show on the bottom, the upper tension is too loose — increase the tension dial. If loops of bobbin thread show on the top, the upper tension is too tight — decrease the dial. If the thread bunches and jams under the fabric (called 'bird nesting'), the upper thread was not properly seated in the tension discs — re-thread the machine completely from scratch.
Press the seam open
Press the seam open
Remove the sewn fabric from the machine by raising the presser foot and pulling the fabric toward the back, leaving 10 cm thread tails. Cut the threads. Open the fabric and press the seam allowances flat with an iron — either both to one side (for strength) or split open (for a flatter finish). Pressing is as important as stitching: unpressed seams look amateur regardless of stitch quality.
Change the needle for different fabrics
Change the needle for different fabrics
Sewing machine needles come in sizes matched to fabric weight: size 9/65 for sheer silk, size 11/75 for lightweight cotton, size 14/90 for medium-weight fabric, size 16/100 for denim and canvas, and size 18/110 for heavy upholstery. Using the wrong needle causes skipped stitches, broken threads, or fabric damage. Needles are consumable — they dull after 6–8 hours of sewing and should be replaced regularly.
Understand the sewing machine's impact on society
Understand the sewing machine's impact on society
The sewing machine compressed the labor of clothing production by a factor of ten. A man's shirt: 14 hours by hand, 1 hour by machine. A pair of trousers: 16 hours by hand, under 3 hours by machine. This made factory-produced ready-to-wear clothing affordable for the working class for the first time. By 1871, Singer alone had sold over 2 million machines worldwide. The sewing machine was also the first complex mechanical device marketed to households — Singer's installment plan (five dollars down, the rest in monthly payments) became the model for all consumer credit that followed.
材料
2- プレースホルダー
- 1 メートルプレースホルダー
必要な工具
2- プレースホルダー
- プレースホルダー
接続ブループリントの材料


関連ブループリント
これらのブループリントは知識を共有しています — 技術、材料、原理


CC0 パブリックドメイン
このブループリントはCC0で公開されています。許可を求めずに、自由にコピー、修正、配布、あらゆる目的で使用できます。
メイカーを応援するには、ブループリント経由で製品を購入してください。メイカーには メイカーコミッション がベンダーにより設定されています。または、このブループリントの新しいイテレーションを作成し、自分のブループリントにコネクションとして含めて収益を共有できます。