アート
美容とウェルネス
工芸
文化と歴史
エンターテインメント
環境
食品と飲料
グリーンフューチャー
リバースエンジニアリング
科学
スポーツ
テクノロジー
ウェアラブル
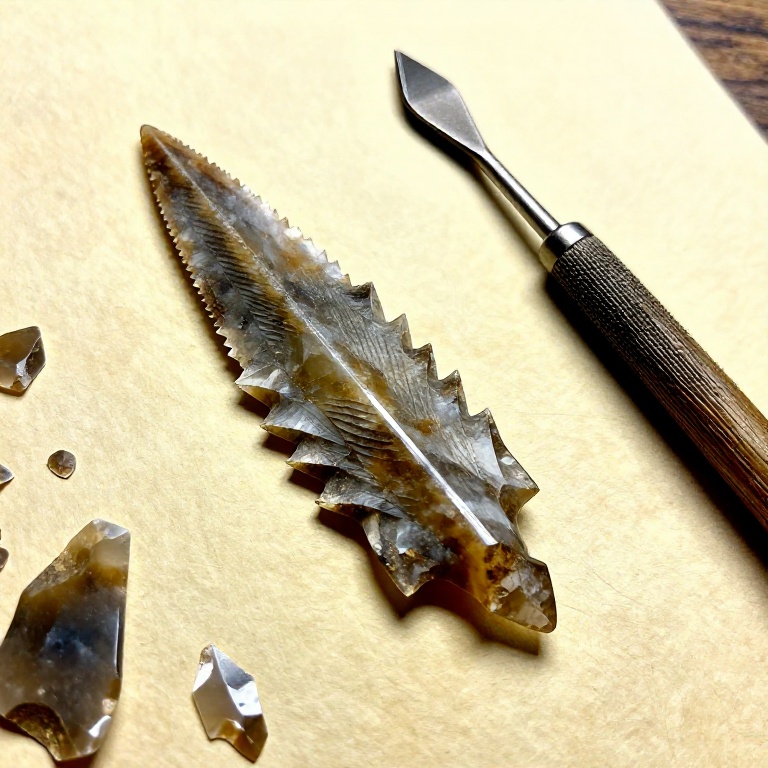
Knapping a Stone Arrowhead — Pressure-Flaked Projectile Point
The stone arrowhead is the definitive projectile point of the Upper Palaeolithic and Neolithic periods, enabling hunters to bring down game at distances impossible with thrusting spears. Pressure flaking — the technique of pressing small flakes off a stone blank with a pointed tool rather than striking them off — allowed prehistoric knappers to create thin, symmetrical, razor-sharp points with controlled edges. Archaeological sites worldwide contain millions of pressure-flaked points dating from at least 75,000 years ago in South Africa (Blombos Cave) to the historic period. The process begins with selecting a suitable cryptocrystalline silica stone — flint, chert, jasper, or obsidian — and reducing it through percussion to a rough preform, then refining the shape and thinning the cross-section through careful pressure flaking. A finished point should be no thicker than 5 to 7 millimetres, with edges sharp enough to slice skin on contact. This blueprint teaches the complete sequence from raw nodule to hafting-ready arrowhead using only tools available to prehistoric knappers.
中級者
1-2 hours
手順
1
1
Select a Suitable Flint Nodule
Select a Suitable Flint Nodule
Choose a flint, chert, or jasper nodule approximately 8 to 12 cm across with a fine, uniform grain and no visible fractures or inclusions. Tap the nodule with another stone — good knapping stone rings with a clear, high-pitched tone. A dull thud indicates internal flaws or coarse grain that will not flake predictably. The stone must be cryptocrystalline: its crystal structure is too fine to see with the naked eye, which allows fractures to propagate smoothly in any direction (conchoidal fracture). Avoid any nodule with frost cracks, white chalky patches through the interior, or visible fossils embedded in the matrix.
このステップの材料:
 Flint Nodule1 個
2
2
Prepare a Leather Pad and Work Surface
Prepare a Leather Pad and Work Surface
Place a thick piece of folded animal hide on your thigh to protect against sharp flakes. You will hold the stone blank against this pad during pressure flaking. Work over bare ground or a hide drop cloth — tiny razor-sharp flakes will scatter in all directions. Wear eye protection if available. Prehistoric knappers sat cross-legged with the work held on the padded thigh of their dominant-hand side, providing a stable platform that absorbs the force of each press.
このステップの材料:
 Raw Hide1 個
3
3
Strike Off an Initial Flake Blank
Strike Off an Initial Flake Blank
Using a hammerstone weighing 400 to 600 grams, strike the flint nodule at approximately 45 degrees to detach a large, flat flake roughly 6 to 8 cm long, 3 to 4 cm wide, and 8 to 12 mm thick. This flake is your preform — the starting blank from which the arrowhead will be shaped. Strike decisively with a sharp, glancing blow directed through the platform edge. The flake should have a relatively flat ventral surface and a slightly convex dorsal surface. If the first strike produces a flake that is too thick or irregular, strike additional flakes until you obtain a suitable blank.
必要な工具:
 Hammerstone
4
4
Rough Out the Preform Shape by Percussion
Rough Out the Preform Shape by Percussion
Hold the flake blank against the leather thigh pad and use the hammerstone to knock off large, unwanted projections around the perimeter. Work the blank into a rough leaf or triangular shape approximately 5 cm long. At this stage, focus only on the overall outline — do not try to thin or straighten the edges. Remove material by striking the edge at about 60 degrees. Rotate the blank frequently, working both faces alternately to maintain a roughly symmetrical cross-section. The preform should be no thicker than 8 to 10 mm when roughing is complete.
必要な工具:
Hammerstone5
5
Prepare the Antler Pressure Flaker
Prepare the Antler Pressure Flaker
Select a section of deer or elk antler tine 10 to 15 cm long with a blunt, rounded tip approximately 4 to 6 mm in diameter. The tip must be dense and slightly rough — antler grips stone better than bone or wood because of its microscopic porous structure. If the tip is too sharp, grind it on a sandstone slab to create a small, slightly convex contact area. Some knappers prefer to set the antler tine into a short wooden handle for better grip, binding it with sinew wrapping. The pressure flaker is the primary tool for all subsequent refinement steps.
このステップの材料:
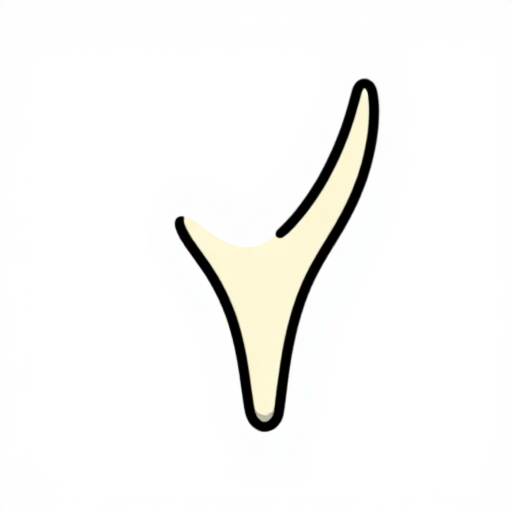 Antler Tine1 個
必要な工具:
 Sandstone
6
6
Prepare the Edge Platforms for Pressure Flaking
Prepare the Edge Platforms for Pressure Flaking
Before pressure flaking, the edge of the preform must have a slight bevel or platform for the flaker tip to engage. Use the edge of a small abrading stone (sandstone or quartzite) to lightly grind a tiny flat platform along the edge where you intend to remove the next flake. This platform should be about 1 mm wide — just enough for the antler tip to catch without slipping. Grinding the platform also strengthens the edge, preventing it from crumbling when pressure is applied. This step is repeated before each pressure flake.
必要な工具:
Sandstone7
7
Begin Pressure Flaking the Outline
Begin Pressure Flaking the Outline
Hold the preform firmly against the leather thigh pad with your non-dominant hand, edge facing away from your body. Place the antler tip on the prepared platform and press inward and downward simultaneously with a steady, increasing force. The flake should detach cleanly, travelling 5 to 10 mm across the face of the stone. Work around the entire perimeter, removing one flake at a time and rotating the piece frequently. Each flake should overlap slightly with the scar of the previous one. Always flake from both faces alternately — this is called bifacial flaking and it creates the thin, lenticular cross-section that defines a well-made point.
必要な工具:
Antler Tine8
8
Thin the Cross-Section
Thin the Cross-Section
Once the outline is established, focus on thinning. The goal is to reduce the thickness from 8 to 10 mm down to 5 to 7 mm while maintaining a smooth, even profile. Apply pressure from slightly further back on the platform, directing the force at a lower angle (about 30 degrees to the face). This sends longer flakes across the surface, removing material from the centre of the piece. Alternate faces with every flake to keep the cross-section symmetrical. If a high ridge develops on one face, target it from the opposite face on the next pass. Thinning is the most demanding step — patience and controlled force are essential.
必要な工具:
Antler Tine9
9
Shape the Tip
Shape the Tip
Narrow the distal end to a sharp, symmetrical point by removing small, carefully directed pressure flakes from both faces. The tip should be centred on the longitudinal axis of the point — an off-centre tip causes the arrow to fly erratically. Use very light pressure and tiny platform preparations. Remove only one or two flakes at a time, checking symmetry after each. If the tip breaks during shaping, it can sometimes be recovered by shortening the point and reshaping, though a severely broken tip means starting over with a new preform.
必要な工具:
Antler Tine10
10
Create the Hafting Notches
Create the Hafting Notches
At the base of the point, create two small notches on opposite sides — these are the hafting notches that lock the arrowhead onto the split end of the arrow shaft. Place the antler tip at the desired notch location (approximately 3 to 5 mm from the base) and press inward to pop out a small notch flake. Alternate sides, deepening each notch to 2 to 3 mm. The notches should be roughly symmetrical and angled slightly toward the base. This creates a stemmed or corner-notched point — the most common prehistoric hafting style. The notch shoulders prevent the arrowhead from pulling forward out of the shaft binding.
必要な工具:
Antler Tine11
11
Final Edge Refinement
Final Edge Refinement
Examine the entire edge under good light. Remove any remaining irregularities — humps, step fractures, or blunt spots — with very light pressure flakes. The final edge should be continuously sharp from tip to notch on both sides. Run your thumbnail gently along the edge: it should catch uniformly at every point. A finished arrowhead of this size (3 to 5 cm long, 2 to 3 cm wide, 5 to 7 mm thick) weighs approximately 3 to 8 grams and should be thin enough to see light through the thinnest sections when held to the sun.
必要な工具:
Antler Tine12
12
Test Fit the Arrowhead to a Shaft
Test Fit the Arrowhead to a Shaft
Split the end of an arrow shaft 1 to 2 cm deep with a flint knife. Insert the base of the arrowhead into the split so the notches sit flush against the wood. The fit should be snug without forcing — if too tight, widen the split slightly. If too loose, the binding will not hold under impact. Once the fit is confirmed, the arrowhead is ready for permanent hafting using sinew wrapping and pine resin adhesive, as described in the hafting stone tools blueprint.
このステップの材料:
 Hardwood Sapling1 個
必要な工具:
 Flint Knife
材料
4- 1 個プレースホルダー
- 1 個プレースホルダー
- プレースホルダー
接続ブループリントの材料
関連ブループリント
これらのブループリントは知識を共有しています — 技術、材料、原理
Knapping a Flint Hand Axe — Bifacial Reduction TechniqueMary著
Knapping an Obsidian Blade — Pressure-Flaked Volcanic GlassMary著
Hafting Stone Tools — Attaching Blades to Handles with Pitch and SinewMary著
Making an Antler Pressure Flaker — Precision Flint-Knapping ToolMary著
Collecting and Preparing Feathers for Arrow Fletching — Stabilising Projectiles in FlightSpartan著
Related blueprints
Other builds that share materials, tools, or techniques with this one.

Making a Leather Sling — The Shepherd's Projectile Weaponsurvival
Collecting and Preparing Feathers for Arrow Fletching — Stabilising Projectiles in Flightsurvival
Making a Fire-Hardened Hunting Spear — The Oldest Weaponsurvival
Making a Fishing Spear (Leister) — Multi-Pronged Fish Gigsurvival
Carving a Toggling Bone Harpoon — Detachable-Head Hunting Pointsurvival
Building a Prehistoric Smokehouse — Semi-Permanent Pole Frame for Meat and Fish Preservationsurvival
CC0 パブリックドメイン
このブループリントはCC0で公開されています。許可を求めずに、自由にコピー、修正、配布、あらゆる目的で使用できます。
メイカーを応援するには、ブループリント経由で製品を購入してください。メイカーには メイカーコミッション がベンダーにより設定されています。または、このブループリントの新しいイテレーションを作成し、自分のブループリントにコネクションとして含めて収益を共有できます。