コラボレーション
アート
美容とウェルネス
工芸
文化と歴史
エンターテインメント
環境
食品と飲料
リバースエンジニアリング
科学
スポーツ
テクノロジー
ウェアラブル
English


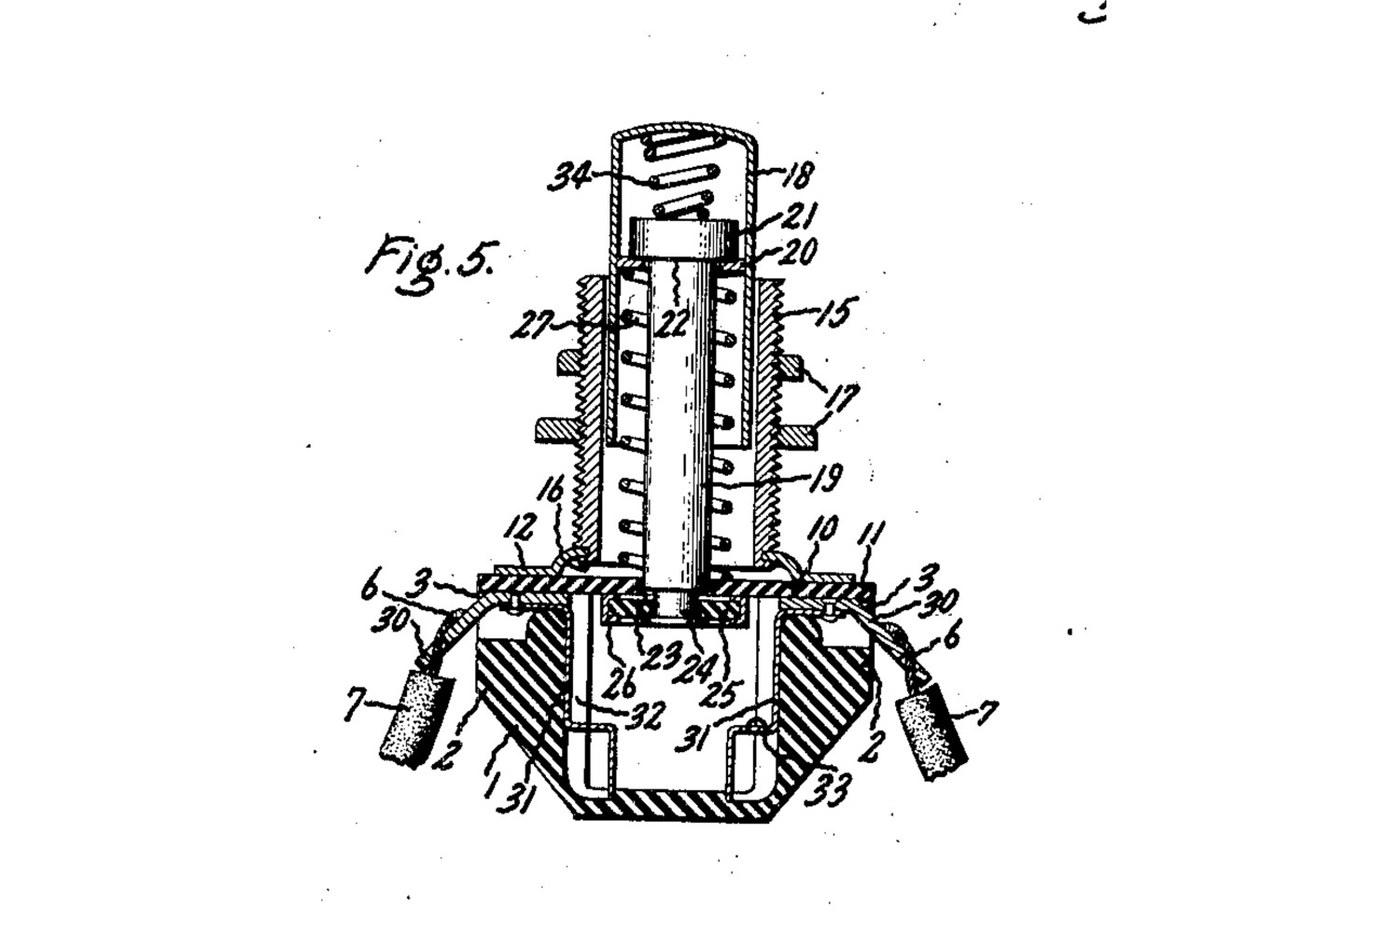
Push Button: Normally Open Momentary Switch with a Cushioned Contact (De Reamer, GE 1939)
A panel push button that closes a circuit only while you press it. A spring holds the button out, and a metal rim on the end of its rod sits clear of two contacts. Press it and the rim bridges both contacts. A second spring inside the button lets the rod give, so the contacts never take more than that spring's force.
Source: Frank C. De Reamer, US 2,166,803 (General Electric, 1939), Fig. 5. Unknown: the insulating material, the metals and every size. De Reamer gives none of them, so they are linked to unknown heads. The tools are ours. Picture: the patent's Fig. 5.
上級者
2 days
手順
1
1
Mould the housing
Mould the housing
Mould a cup-shaped housing of insulating material, with a boss on each of two opposite sides, a recess in the top of each boss, a groove inside below each boss, and a bead round the top. Unknown: the material, the sizes and the moulding.
このステップの材料:
 不明な絶縁材料1 as required
必要な工具:
 圧縮成形金型
 不明な寸法
2
2
Make the terminals and contacts
Make the terminals and contacts
Bend two angled metal strips. The upper end of each sits in a boss recess, and the lower end is a solder lug. Fix each upper end to a contact that fits the groove inside the housing, stepped at its bottom end. Unknown: the metal.
このステップの材料:
 不明な金属1 as required
必要な工具:
 金切りばさみ
 平やっとこ不明な寸法
3
3
Make the sleeve, plate and cover
Make the sleeve, plate and cover
Turn a threaded sleeve and cut its thread. Spin its lower end over onto a metal plate with tangs. Cut a cover of insulating sheet with ears that reach over the bosses and a hole in the middle to guide the rod.
このステップの材料:
不明な金属1 as required不明な絶縁材料1 as required必要な工具:
 金属旋盤
 旋盤工具セット(HSS)
 ダイスハンドル金切りばさみ
 ノギス不明な寸法
4
4
Make the push button
Make the push button
Make a drawn metal tube closed at the top, and a rod with a head. Put a small coil spring in the top of the tube, then the rod's head. Wedge a washer into the tube under the head. Leave clearance so the rod can swivel a little. Turn the rod's lower end down to a smaller diameter. Unknown: the metal.
このステップの材料:
不明な金属1 as required 圧縮ばねセット1 spring
必要な工具:
金属旋盤旋盤工具セット(HSS)ノギス不明な寸法5
5
Assemble
Assemble
Set the terminals in their recesses and the contacts in their grooves. Slide the button into the sleeve, with a coil spring round the rod between the cover and the wedged washer. Pass the rod's end through the cover's hole. Put on it a loose insulating washer with a metal rim round its edge. Hammer the rod's end over into a flange. Lay the cover on the housing, so its ears clamp the terminals, and bend the plate's tangs over the bead.
このステップの材料:
不明な絶縁材料1 as required不明な金属1 as required圧縮ばねセット1 spring必要な工具:
 万力(ベンチバイス)
 片手ハンマー(球頭)平やっとこ
 保護めがね
6
6
Mount and wire it
Mount and wire it
Put the sleeve through a hole in the panel and clamp the panel between two nuts on the thread. Solder the bared wire ends to the two lugs.
このステップの材料:
 六角ナット2 pcs
 はんだ線1 as required
必要な工具:
 はんだごて平やっとこ
7
7
Check it
Check it
At rest, the rim sits against the underside of the cover and the circuit is open. Pressed, the rim meets the stepped ends of both contacts and closes it. The checking is ours: the meter reads open, then closed while pressed.
必要な工具:
 マルチメーター
材料
5- 1 as requiredプレースホルダー
- 1 as requiredプレースホルダー
- 1 springプレースホルダー
- 2 pcsプレースホルダー
- 1 as requiredプレースホルダー
この設計図で作るもの
関連ブループリント
これらのブループリントは知識を共有しています — 技術、材料、原理

CC0 パブリックドメイン
このブループリントはCC0で公開されています。許可を求めずに、自由にコピー、修正、配布、あらゆる目的で使用できます。
メイカーを応援するには、ブループリント経由で製品を購入してください。メイカーには メイカーコミッション がベンダーにより設定されています。または、このブループリントの新しいイテレーションを作成し、自分のブループリントにコネクションとして含めて収益を共有できます。