コラボレーション
アート
美容とウェルネス
工芸
文化と歴史
エンターテインメント
環境
食品と飲料
リバースエンジニアリング
科学
スポーツ
テクノロジー
ウェアラブル
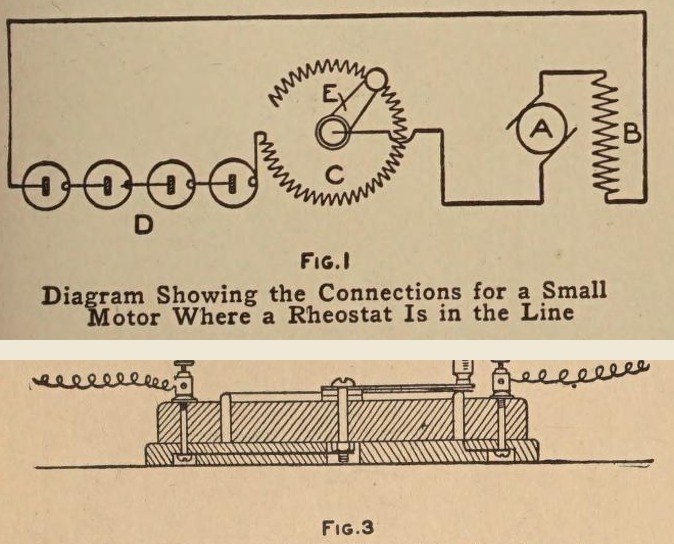


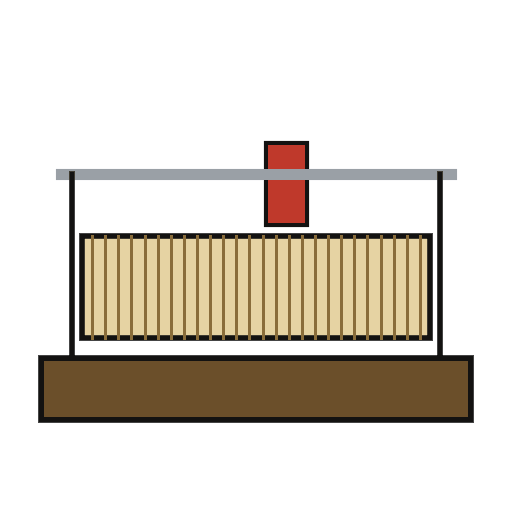
Rheostat: a Small Ring Rheostat for Toy Motors (Boy Mechanic, 1915)
A small variable resistor to set the speed of a toy motor: resistance wire wound on a fibre strip bent into a ring, set in a groove in a hardwood base, with a brass arm that slides round the bared top of the winding.
Wired in series with the motor, it works like a valve in a water pipe.
Source: The Boy Mechanic, Book 2 (1915), pp. 393-394. Unknown: wire alloy. Picture: Figs. 1 and 3 of the book.
中級者
Unknown
手順
1
1
Wind the resistance strip
Wind the resistance strip
Smooth a strip of thin fibre about 1/16 in thick, 1/2 in wide and 10 in long. Wind it with No. 22 cotton-covered resistance wire, close turns from 1/4 in from one end to 1/4 in from the other, securing the ends through small drilled holes and leaving 3 to 4 in free. Bend the strip into a ring round a round object, winding outward, and note its inside and outside diameters.
このステップの材料:
 不明な材料1 fibre strip
 洋白抵抗線1 No. 22
必要な工具:
 ハンドドリル
2
2
Make the base
Make the base
Round the corners and top edges of a seasoned hardwood block 1/2 x 4 1/2 x 4 1/2 in, mark the ring's two diameters from the centre, and saw out the circles so the ring fits between them. Screw this onto a second board 1/4 x 4 3/4 x 4 3/4 in from below with countersunk screws. Drill a hole for one wire end, fit two back-connected binding posts in the corners, and cut grooves underneath for the leads; one post goes to the winding, the other to the centre bolt.
このステップの材料:
 堅木の板2 1/2 and 1/4 in
 木ねじ1 個
 バインディングポスト2 個
必要な工具:
 ディバイダー(両脚規)
 背金鋸ハンドドリル
 マイナスドライバー
3
3
Make and mount the arm
Make and mount the arm
Cut the arm from 1/16 in sheet brass, 2 in long, 1/2 in wide at one end and 1/4 in at the other. Under the narrow end solder thin spring brass to bear on the ring; fit a small handle on top. Mount it on a 1/8 in brass bolt about 1 in long through the centre, with washers under it, the base hole countersunk underneath 1/2 in wide and 1/4 in deep. Solder a short brass strip to the nut, set in a recess, and lock with a second nut or a spring washer.
このステップの材料:
 真鍮板1 arm, spring
 不明な金属1 1/8 in brass bolt
 平ワッシャー3 個
 Spring Washer1 個
 錫鉛はんだ1 個
必要な工具:
 金切りばさみハンドドリル
 電気はんだごて
4
4
Bare the track and finish
Bare the track and finish
Set the ring in its groove. Sand the insulation off the top edge of the winding so the spring contact touches the wire. Give the wood a coat of shellac.
このステップの材料:
 シェラックニス1 個
必要な工具:
 紙やすり
 細い筆
材料
11- 1 fibre stripプレースホルダー
- 1 No. 22プレースホルダー
- 2 1/2 and 1/4 inプレースホルダー
- 1 個プレースホルダー
- プレースホルダー
- 1 arm, springプレースホルダー
- 1 1/8 in brass boltプレースホルダー
- 3 個プレースホルダー
- プレースホルダー
- 1 個プレースホルダー
- 1 個プレースホルダー
この設計図で作るもの
CC0 パブリックドメイン
このブループリントはCC0で公開されています。許可を求めずに、自由にコピー、修正、配布、あらゆる目的で使用できます。
メイカーを応援するには、ブループリント経由で製品を購入してください。メイカーには メイカーコミッション がベンダーにより設定されています。または、このブループリントの新しいイテレーションを作成し、自分のブループリントにコネクションとして含めて収益を共有できます。