アート
美容とウェルネス
工芸
文化と歴史
エンターテインメント
環境
食品と飲料
リバースエンジニアリング
科学
スポーツ
テクノロジー
ウェアラブル
Reading a Soft Potentiometer — SIK Circuit 10
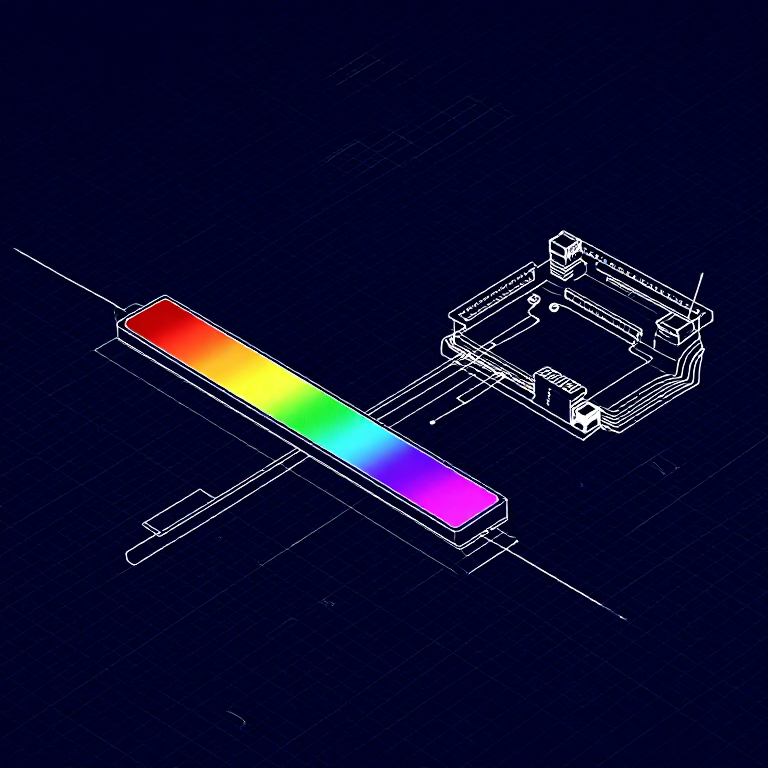
Use a soft potentiometer (touch strip) to control RGB LED color. Slide your finger along the strip to smoothly transition through the color spectrum.
手順
1
1
Parts & Introduction
Parts & Introduction
A soft potentiometer is a thin, flexible strip that acts as a variable resistor based on where you press. Combined with an RGB LED, you can create an intuitive color picker — slide your finger to change colors!
Parts Needed
- 1x Arduino Uno + USB cable
- 1x Breadboard
- 1x Soft Potentiometer
- 1x RGB LED (Common Cathode)
- 3x 330Ω Resistors
- 1x 10KΩ Resistor (pull-down)
- 9x Jumper Wires
このステップの材料:
 SparkFun Inventors Kit - V3.21 キット
Arduino Uno R31 個
Breadboard1 個
Soft Potentiometer1 個
 RGB LED (Common Cathode)1 個
 330 Ohm Resistor3 個10K Ohm Resistor1 個
 Jumper Wires8 個
必要な工具:
Computer with Arduino IDE
2
2
Hardware Hookup
Hardware Hookup
Wiring Instructions
Soft Potentiometer
- Connect the middle pin to Analog Pin A0.
- Connect one side pin to 5V.
- Connect the other side pin to GND.
- Add a 10K pull-down resistor from Analog Pin A0 to GND.
RGB LED (pin order from flat edge: Red, GND, Green, Blue)
- Connect Red through 330Ω resistor to Pin 9.
- Connect GND (longest pin) to GND rail.
- Connect Green through 330Ω resistor to Pin 10.
- Connect Blue through 330Ω resistor to Pin 11.
このステップの材料:
Soft Potentiometer1 個
RGB LED (Common Cathode)1 個330 Ohm Resistor3 個10K Ohm Resistor1 個Breadboard1 個
Jumper Wires8 個3
3
Arduino Code
Arduino Code
Open the Arduino IDE and upload the following sketch to your Arduino board.
soft_potentiometer.inoarduino
このステップの材料:
Arduino Uno R31 個
必要な工具:
Computer with Arduino IDE
4
4
Test & Experiment
Test & Experiment
What You Should See
The RGB LED changes color as you slide your finger along the soft potentiometer strip. The color smoothly transitions through the spectrum: red → green → blue → red.
Troubleshooting
- LED dark or wrong color: Four pins close together are easy to misplace. Verify each RGB LED connection.
- Bizarre color jumps: Pressing the soft pot in multiple spots simultaneously gives unpredictable results. Use one finger.
Experiments to Try
- Add Serial output to see the raw sensor values as you slide.
- Map the soft pot to servo position instead of color.
材料
8- ¥164
- プレースホルダー
見積もり合計
¥238CC0 パブリックドメイン
このブループリントはCC0で公開されています。許可を求めずに、自由にコピー、修正、配布、あらゆる目的で使用できます。
メイカーを応援するには、ブループリント経由で製品を購入してください。メイカーには メイカーコミッション がベンダーにより設定されています。または、このブループリントの新しいイテレーションを作成し、自分のブループリントにコネクションとして含めて収益を共有できます。