アート
美容とウェルネス
工芸
文化と歴史
エンターテインメント
環境
食品と飲料
リバースエンジニアリング
科学
スポーツ
テクノロジー
ウェアラブル
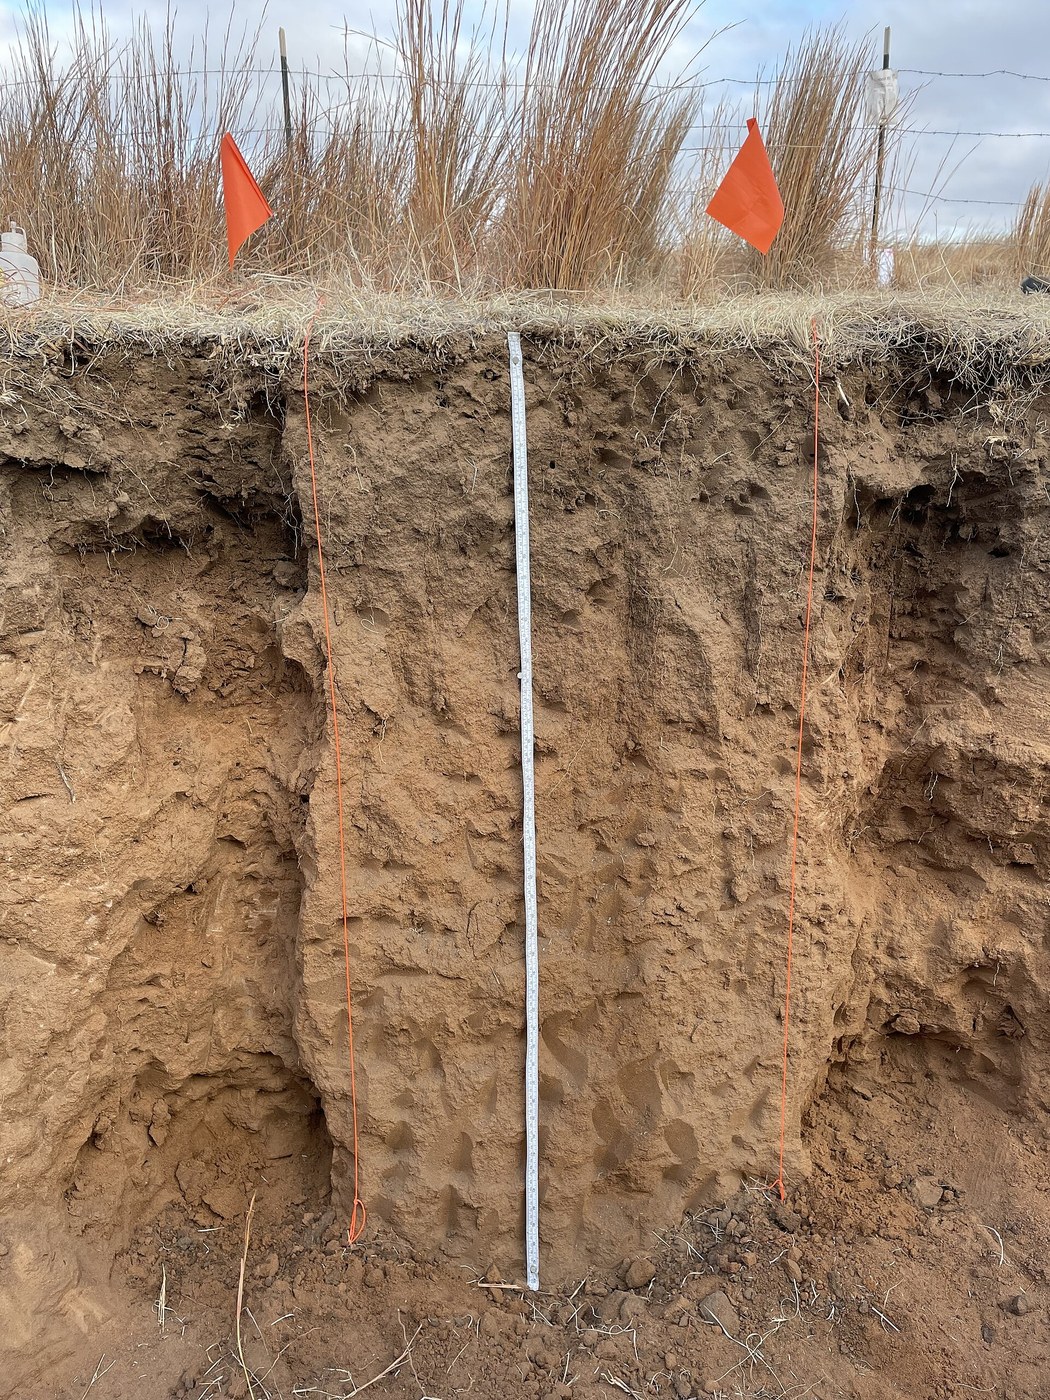


The Soil Pit: Texture, Structure and What It Will Grow
A soil test, already published here, tells you the chemistry of a scoop of earth. It cannot tell you that there is a compacted pan at 25 centimetres stopping every root, or that the water table rises into the rooting zone each winter — and those decide far more than pH does.
The answer is to dig a hole and look at the side of it. A soil profile shows the layers, their colours, where the roots stop and why, and how the structure crumbles in your hand. Every one of those is read by eye and finger, with no equipment beyond a spade.
It is the cheapest diagnostic in land management and the most consistently skipped. An hour with a spade routinely explains a problem that three seasons of fertiliser did not.
初心者
1 day
手順
1
1
Dig a pit with one clean vertical face
Dig a pit with one clean vertical face
Dig down to at least 60 cm — deeper if you can — keeping ONE face vertical, clean and undisturbed, and stack the soil from each depth separately so you can put it back in order.
Work in the shade of your own body and face the light. Never dig a pit deeper than waist height without battering the sides back, and never work in a deep narrow hole alone: soil collapses without warning and a pit is heavy. For most questions 60 cm answers them.
必要な工具:
 角スコップ
角スコップ ニトリル手袋
2
2
Find the horizons by colour and feel
Find the horizons by colour and feel
Scrape the face lightly with a trowel and look for changes in colour and texture. Mark each boundary with a nail and measure its depth.
Typically you will see dark topsoil rich in organic matter over paler subsoil, over weathered parent material. Record the depth of each boundary and whether it is sharp or gradual. A sharp, flat boundary at a spade's depth is usually a PLOUGH PAN — man-made, not natural — and it is often the whole answer to a drainage or rooting problem.
このステップの材料:
 亜鉛めっき釘10 個
必要な工具:
 移植ごて
移植ごて メジャー(巻尺)
 野帳
野帳3
3
Determine texture by hand, the standard way
Determine texture by hand, the standard way
Take a walnut-sized lump from each horizon, moisten it to a putty, and work it: does it stain the fingers, does it feel gritty or silky, will it roll into a thread, will the thread bend into a ring without cracking?
Gritty and will not roll is SAND. Silky and rolls a little is SILT. Sticky, polishes when rubbed and rolls into a ring is CLAY. This hand texturing is the field standard worldwide and an experienced hand matches laboratory results closely — the notebook gives the full decision sequence.
このステップの材料:
 蒸留水1 リットル
必要な工具:
野帳4
4
Read the roots, and the colours they sit in
Read the roots, and the colours they sit in
Note the depth roots reach, whether they turn sideways at a layer, and whether they are fine and branched or few and thick.
Roots turning abruptly horizontal mark a barrier. Grey or blue-grey soil with orange mottles means water sits there for long periods and the iron has been chemically reduced — a record of waterlogging that persists even in a dry summer. The plants have already surveyed the soil for you; the pit lets you read their answer.
必要な工具:
 虫眼鏡野帳
虫眼鏡野帳5
5
Texture, water and what will actually grow
Texture, water and what will actually grow
Jupyter ノートブックを読み込み中…
このステップの材料:
 ガラス瓶2 個
 メスシリンダー1 個
必要な工具:
 定規
定規6
6
Fill it back in, in order
Fill it back in, in order
Return the soil in the reverse order you removed it — subsoil first, topsoil last — and tread it back firmly in layers.
Tipping the heap back mixed puts subsoil on the surface and buries the biologically active topsoil, and that patch will be visibly different for years. Photograph the clean face before you fill, with a tape in shot for scale: the photograph is the permanent record, and the hole is not.
必要な工具:
角スコップメジャー(巻尺)関連ブループリント
これらのブループリントは知識を共有しています — 技術、材料、原理

CC0 パブリックドメイン
このブループリントはCC0で公開されています。許可を求めずに、自由にコピー、修正、配布、あらゆる目的で使用できます。
メイカーを応援するには、ブループリント経由で製品を購入してください。メイカーには メイカーコミッション がベンダーにより設定されています。または、このブループリントの新しいイテレーションを作成し、自分のブループリントにコネクションとして含めて収益を共有できます。