Constructing a Wooden Ard Plow — The Scratch Plow
Maagizo
Select and Shape the Main Components
Select and Shape the Main Components
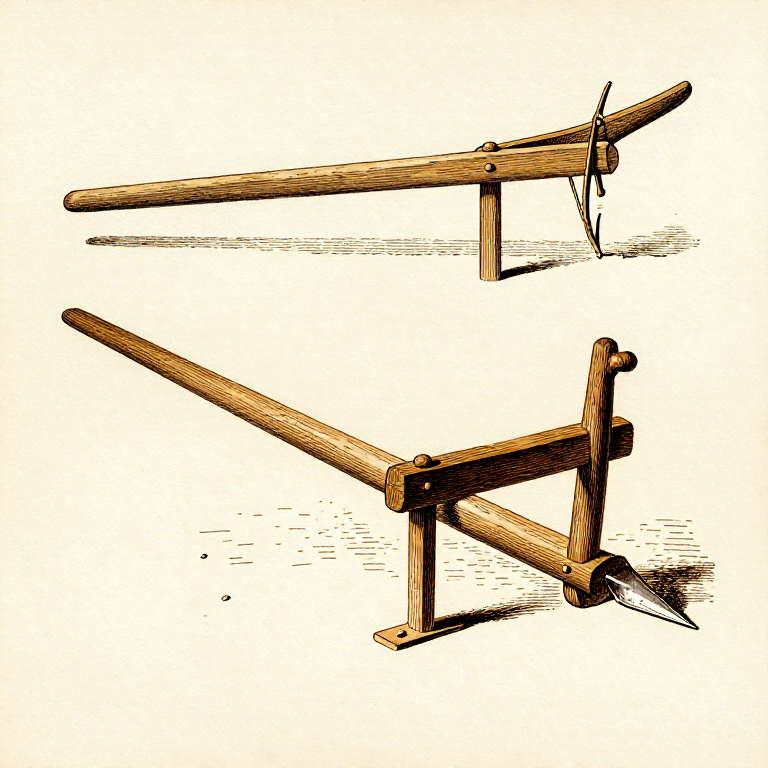
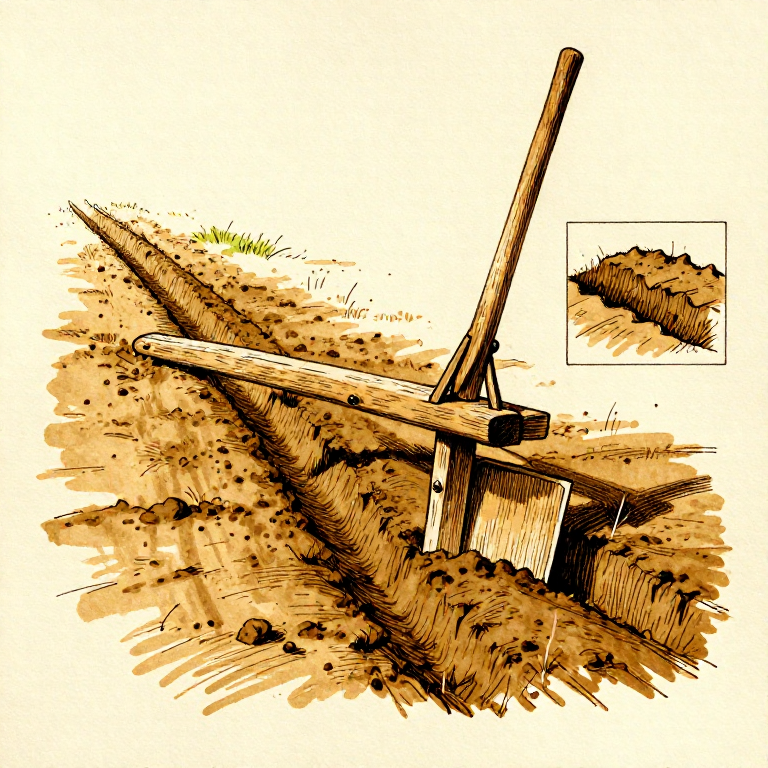
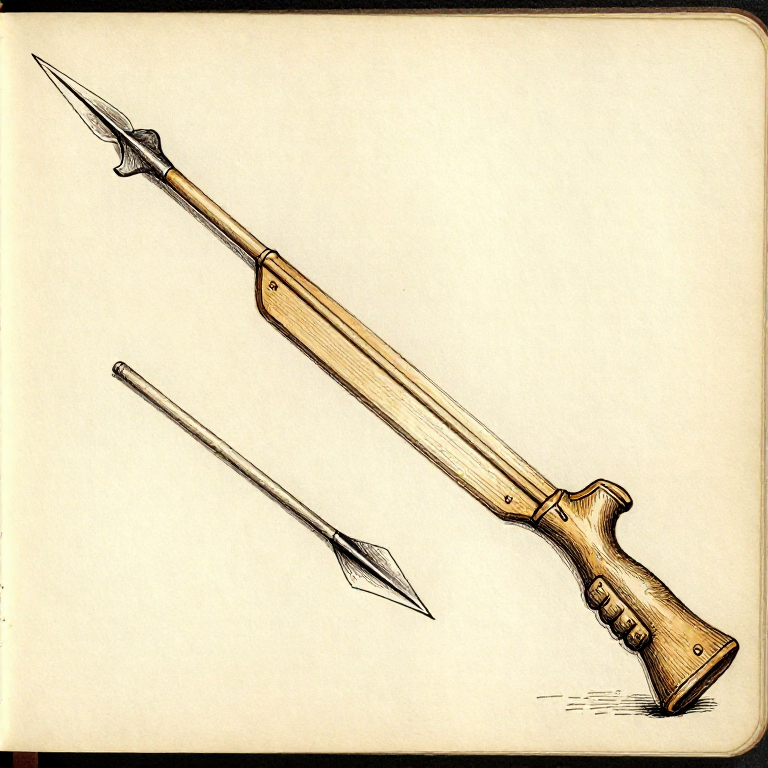
The ard has three main components: the beam (which connects to the yoke and draft animal), the stilt or handle (which the plowman holds to guide the plow), and the share or sole (the pointed piece that penetrates the ground). The simplest ard is made from a single naturally forked branch where the fork provides the junction between beam and share. Select a sturdy hardwood branch with a natural Y-fork at roughly 30-40 degrees. The longer arm becomes the beam (2-3 metres), and the shorter arm becomes the share (40-60 cm). Trim and shape both arms with a stone adze.
Vifaa kwa hatua hii:
 Hardwood Ash1 large branching piece or 3 separate pieces kipande
 Cordage3-5 m m
 Hardwood Handhold1 piece kipande
Zana zinazohitajika:
 Adze
Adze Drawknife
Shape the Share
Shape the Share
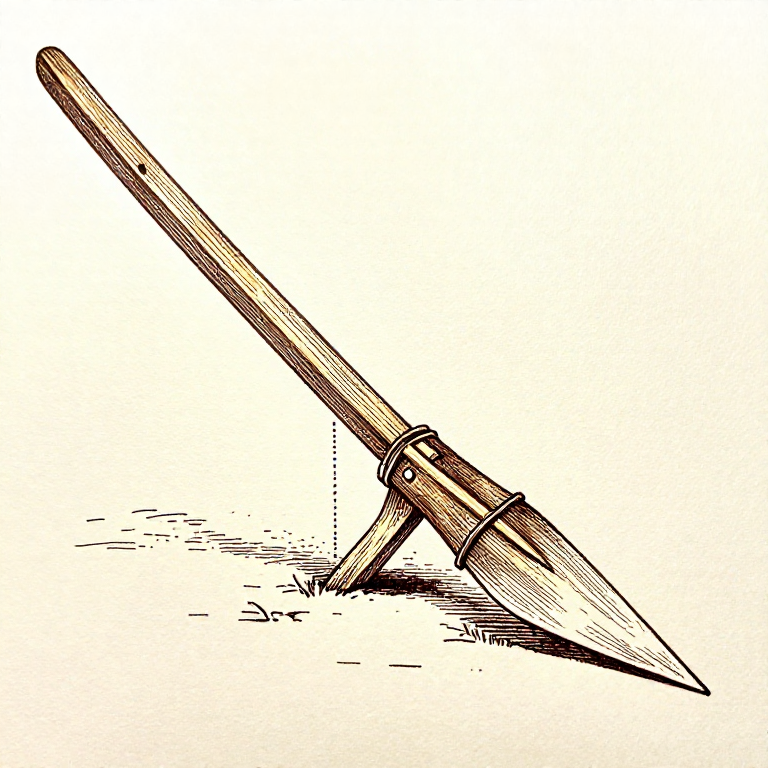
The share is the working end that cuts through the soil. Shape it to a pointed or chisel-like tip that penetrates hard ground. For durability, fire-harden the tip by charring it lightly over coals — this drives out moisture and cross-links the wood polymers, significantly increasing surface hardness. Alternatively, tip the share with a stone or (in later periods) a bronze or iron shoe. The share should angle downward at approximately 15-25 degrees from horizontal when the plow is in working position — too steep and it digs in and stalls; too shallow and it rides over the surface without cutting.
Attach the Stilt Handle
Attach the Stilt Handle
The stilt (handle) rises upward from the junction of beam and share, allowing the plowman to press down on the share and guide its direction. If your forked branch has only two arms, add a separate stilt by drilling or burning a mortise hole through the beam near the fork and inserting a straight handle, lashing it securely with rawhide or sinew. The stilt should rise to a comfortable working height (approximately waist to chest height on the plowman). Some ards have two stilts for better control. The stilt must be sturdy — the plowman applies significant downward force through it to keep the share engaged in the soil.
Attach the Draft Connection
Attach the Draft Connection
The front end of the beam connects to the draft animal (oxen were the primary draft animals in the ancient Near East). Drill a hole through the beam tip and insert a peg or pin that connects to the yoke via a rope or leather strap. The connection must allow some lateral movement so the plow can adjust to uneven ground without breaking. The beam length (2-3 metres) keeps the plowman at a safe distance behind the animals. The yoke sits across the necks of a pair of oxen, distributing the draft force. The connection angle between beam and ground should allow the share to maintain its cutting angle during steady forward motion.
Vifaa kwa hatua hii:
Hardwood Ash1 large branching piece or 3 separate pieces kipandeCordage3-5 m mHardwood Handhold1 piece kipandePlowing Technique
Plowing Technique
To plow, the draft animals pull the ard forward while the plowman walks behind, pressing down on the stilt to maintain the share's penetration depth (typically 10-15 cm for an ard). The ard cuts a narrow V-shaped furrow without turning the soil. Cross-plow the field in two passes at right angles — this breaks the soil into small blocks suitable for seeding. This cross-plowing technique is specifically suited to the light, dry soils of the Mediterranean and Near East. Sumerian administrative texts from the third millennium BCE describe teams of oxen plowing assigned field areas with specific seed-planting quotas, demonstrating sophisticated agricultural management. The ard remained the dominant plow type in the Mediterranean until the Roman period.
Vifaa
3- 1 large branching piece or 3 separate pieces kipandeKishikilia Nafasi
- 1 piece kipandeKishikilia Nafasi
Related blueprints
Other builds that share materials, tools, or techniques with this one.
CC0 Umma Wote
Mchoro huu umetolewa chini ya CC0. Uko huru kunakili, kubadilisha, kusambaza, na kutumia kazi hii kwa madhumuni yoyote, bila kuomba ruhusa.
Saidia Mtengenezaji kwa kununua bidhaa kupitia Mchoro wao ambapo wanapata Kamisheni ya Mtengenezaji iliyowekwa na Wachuuzi, au unda marudio mapya ya Mchoro huu na uiunganishe kama kiungo katika Mchoro wako kuchangia mapato.