Cutting and Tooling a Leather Belt — Medieval Leatherwork
Maagizo
Cut and Prepare the Belt Strap
Cut and Prepare the Belt Strap
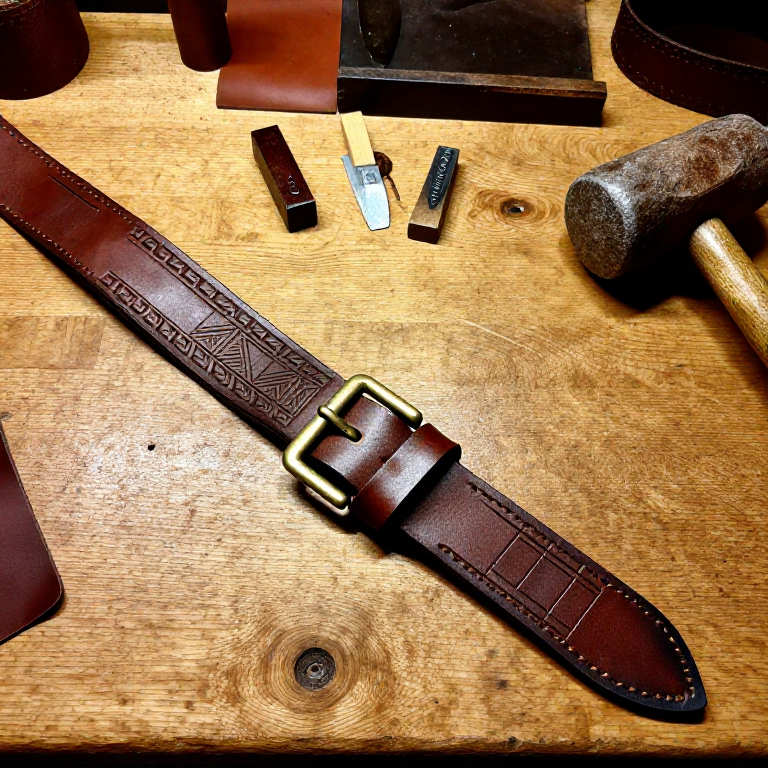
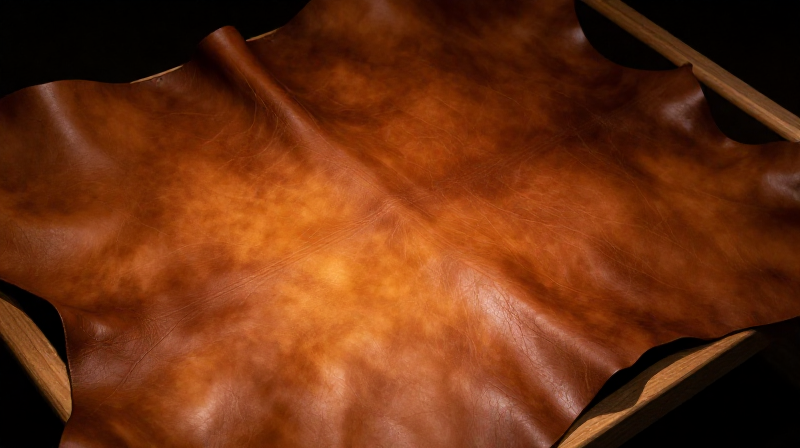
Using a sharp leather knife or strap cutter, cut a straight strip from the cowhide hide, 3 to 4 cm wide and long enough to wrap around the wearer's waist plus approximately 25 cm extra for the buckle fold and belt tip. The leather should be vegetable-tanned (not chrome-tanned), as only vegetable-tanned leather holds tooled impressions permanently. Trim both long edges straight and parallel. Bevel the top edges of both long sides with an edge beveller — this rounds the sharp corners and gives the belt a finished appearance. Cut the tip end to a pointed shape. At the buckle end, thin the last 5 cm of leather by shaving the flesh side with a sharp knife to reduce bulk where it will fold around the buckle bar.
Vifaa kwa hatua hii:
 Leather Dyesmall amount kipande
 Beeswax (Optional)small amount kipande
Zana zinazohitajika:
 Wooden Mallet
 Awl
AwlDampen and Tool the Decoration
Dampen and Tool the Decoration
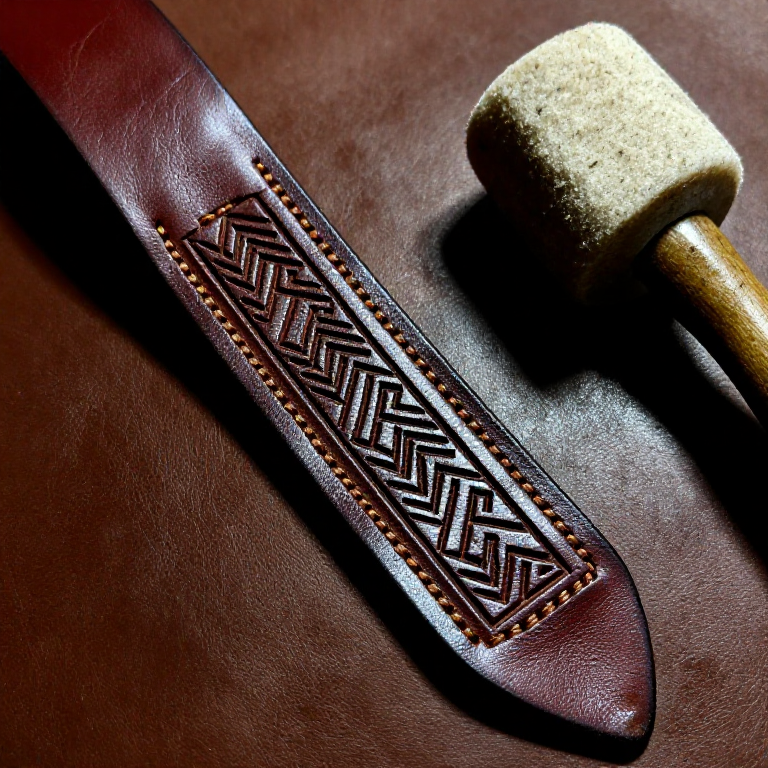
Sponge the grain (smooth outer) side of the leather with water until it is evenly damp but not soaking wet — properly cased leather is dark and pliable, and a thumbnail impression leaves a clear mark that does not spring back. Use a straightedge and a pointed modelling tool to incise border lines approximately 5 mm from each edge, creating a decorative frame. Between these border lines, stamp a repeating geometric pattern using leather stamps and a mallet — common medieval patterns include rope twists, running chevrons, interlocking circles, and botanical vine scrolls. Space the stamps evenly by eye or by marking intervals. Strike each stamp with a single firm blow of the mallet — striking twice in the same spot will create a double impression. Work along the entire length of the belt. The stamped impressions will be permanent once the leather dries.
Dye and Finish the Surface
Dye and Finish the Surface
Allow the tooled belt to dry partially (still slightly damp), then apply leather dye with a dauber or sponge, working it evenly into the surface. Medieval leather workers used plant-based dyes — oak bark for brown, walnut hull extract for dark brown, iron-vinegar solution for black. Apply the dye in long, even strokes along the length to avoid blotching. Once dried, apply a leather conditioner — neatsfoot oil or a beeswax-based finish — to seal the surface, restore flexibility, and bring out the depth of the tooled pattern. The dye will settle more deeply into the stamped impressions, making the pattern more visible. Buff the surface with a soft cloth to a subtle sheen. Medieval belts were typically finished in brown or black, though dyed red and green belts were worn by the wealthy.
Attach the Buckle
Attach the Buckle
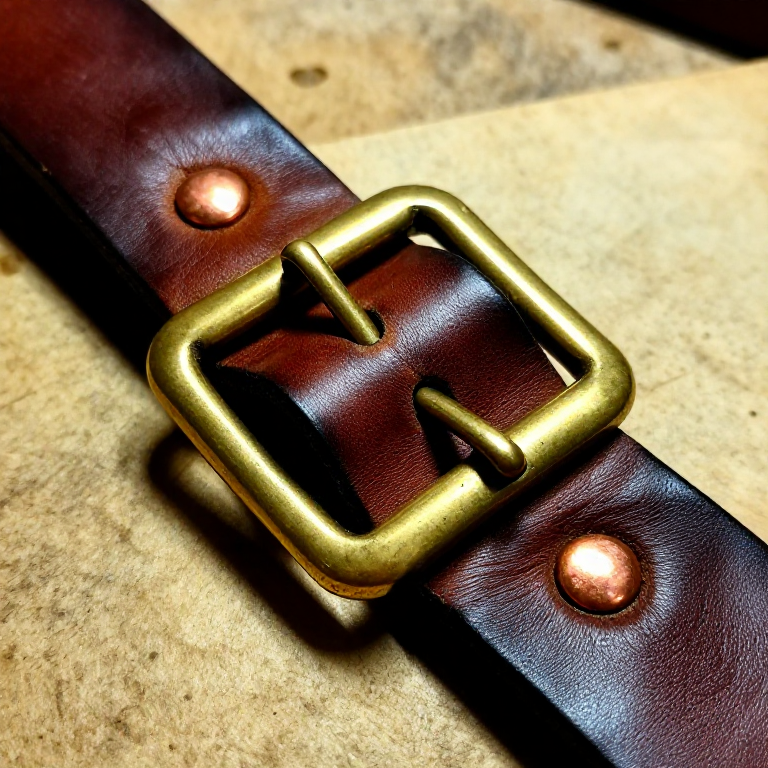
Fold the thinned buckle end of the belt around the buckle bar, passing the tongue through a slot cut in the centre of the folded section. The fold should be tight against the buckle bar with the grain side facing out. Secure the fold by punching two to three holes through both layers and setting rivets (copper or brass rivets with caps), or by stitching through with waxed linen thread using a saddle stitch. If using rivets, place them on the centre line of the belt, evenly spaced. The buckle should rotate freely on its bar but the belt should not slip through — the fold must be tight enough to grip the bar without a gap.
Punch Adjustment Holes and Complete
Punch Adjustment Holes and Complete
Punch a series of 5 to 7 evenly spaced holes through the belt at the opposite end from the buckle, centred on the belt width, for the buckle tongue to fasten through. Space the holes approximately 2.5 cm apart. Use a round leather punch that matches the buckle tongue diameter — typically 4 to 5 mm. The first hole should be positioned so the belt fits snugly on the wearer, with additional holes providing adjustment in both directions. Medieval belts were worn quite long, with the excess length after the buckle passed through a belt loop (a small leather ring attached to the belt near the buckle) and hung down the front of the body. Add a belt loop by cutting a small strip of matching leather, wrapping it around the belt, and riveting or stitching the ends together. The completed belt should be sturdy, comfortable, and decorated in a style that reflects the medieval leatherworker's skill.
Vifaa
4- 1 kipandeKishikilia Nafasi
- 1 bottle kipandeKishikilia Nafasi
- 1 strip kipandeKishikilia Nafasi
Zana Zinazohitajika
6- Kishikilia Nafasi
- Kishikilia Nafasi
- Kishikilia Nafasi
- Kishikilia Nafasi
- Kishikilia Nafasi
Related blueprints
Other builds that share materials, tools, or techniques with this one.
CC0 Umma Wote
Mchoro huu umetolewa chini ya CC0. Uko huru kunakili, kubadilisha, kusambaza, na kutumia kazi hii kwa madhumuni yoyote, bila kuomba ruhusa.
Saidia Mtengenezaji kwa kununua bidhaa kupitia Mchoro wao ambapo wanapata Kamisheni ya Mtengenezaji iliyowekwa na Wachuuzi, au unda marudio mapya ya Mchoro huu na uiunganishe kama kiungo katika Mchoro wako kuchangia mapato.