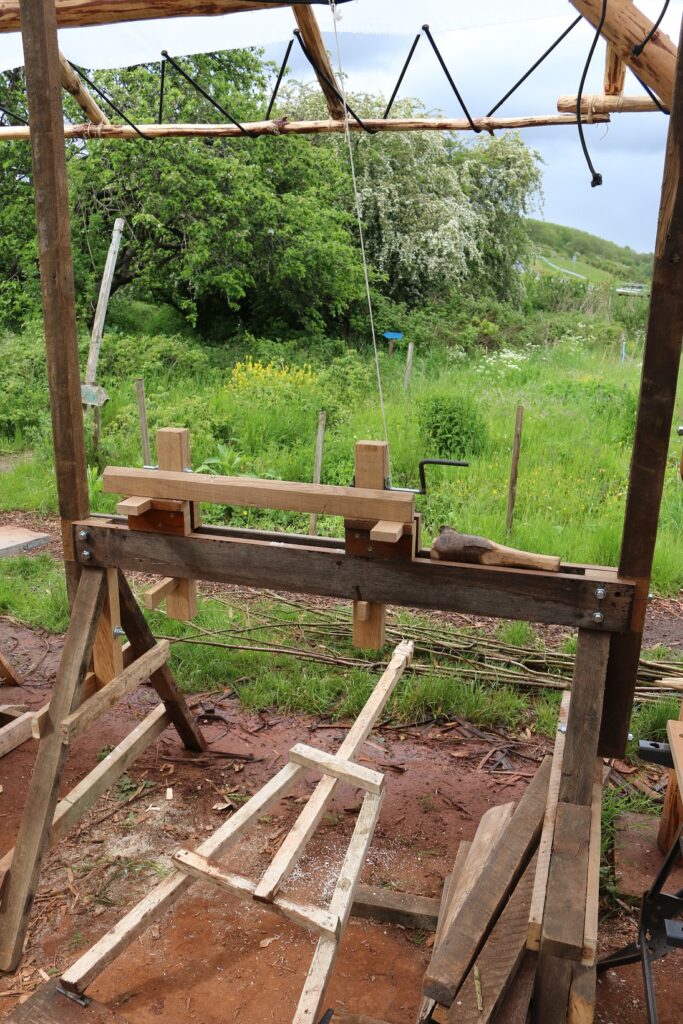


Tengeneza Lathe ya Fimbo ya Zama za Kati kwa Kunena Kuni Kijani
Maagizo
Build a Strong Horizontal Beam for the Lathe Bed
Build a Strong Horizontal Beam for the Lathe Bed
Vifaa kwa hatua hii:
 Kipande cha gogo la mti wa ash1 kipande
Add Two Vertical Stands and a Top Rail
Add Two Vertical Stands and a Top Rail
Zana zinazohitajika:
 Shoka
Shoka Shoka dogo
Install the Pole Lathe Drive System
Install the Pole Lathe Drive System
Create Support Centers
Create Support Centers
Vifaa kwa hatua hii:
 Magogo ya mbao ngumu (mwaloni, mepo, mbeech)1 kipande
Zana zinazohitajika:
 Shoka la kupasua
 Kabari ya mbao ya kuangushia mti
 Nyundo ya mbao
Set Up the Chuck
Set Up the Chuck
Zana zinazohitajika:
 Kisu cha Kuvuta
Test the Drive Connection
Test the Drive Connection
Zana zinazohitajika:
 Kekee cha ardhini
Install a Tool Holder
Install a Tool Holder
Vifaa kwa hatua hii:
Magogo ya mbao ngumu (mwaloni, mepo, mbeech)2 vipandeZana zinazohitajika:
ShokaKisu cha Kuvuta Seti ya patasiNyundo ya mbao
Set Up the First Workpiece
Set Up the First Workpiece
Vifaa kwa hatua hii:
 Misumari2 vipande
Zana zinazohitajika:
Nyundo ya mbao Tupa ya chuma
Secure the Workpiece
Secure the Workpiece
Vifaa kwa hatua hii:
Magogo ya mbao ngumu (mwaloni, mepo, mbeech)4 vipandeZana zinazohitajika:
ShokaKisu cha KuvutaTest Rotation
Test Rotation
Zana zinazohitajika:
Seti ya patasiNyundo ya mbaoKekee cha ardhiniBegin Rounding
Begin Rounding
Vifaa kwa hatua hii:
Kabari ya mbao ya kuangushia mti8 vipandeZana zinazohitajika:
Nyundo ya mbaoAdjust Across the Downstroke
Adjust Across the Downstroke
Vifaa kwa hatua hii:
Kipande cha gogo la mti wa ash2 vipandeZana zinazohitajika:
Seti ya patasiNyundo ya mbaoKekee cha ardhiniFinish the Smooth Surface
Finish the Smooth Surface
Vifaa kwa hatua hii:
 Ubao wa mti wa ash1 kipande
Zana zinazohitajika:
Kisu cha Kuvuta Msumeno wa watu wawili
Remove and Clean the Workpiece
Remove and Clean the Workpiece
Vifaa kwa hatua hii:
 Kijiti cha mbao (dauli)1 kipande
Zana zinazohitajika:
Kekee cha ardhiniTest Final Quality
Test Final Quality
Vifaa kwa hatua hii:
 Kamba ya Katani3 metre
Zana zinazohitajika:
 Kisu
KisuBegin the Drying Process
Begin the Drying Process
Vifaa kwa hatua hii:
 Kamba ya kufunga2 metre
Zana zinazohitajika:
Nyundo ya mbaoApply Optional Finishing Techniques
Apply Optional Finishing Techniques
Zana zinazohitajika:
Kekee cha ardhiniPrepare the Lathe for the Next Project
Prepare the Lathe for the Next Project
Zana zinazohitajika:
Nyundo ya mbaoKisuRefine Your Skills
Refine Your Skills
Maintain Tool Sharpness
Maintain Tool Sharpness
Explore Design Variations
Explore Design Variations
Zana zinazohitajika:
 Patasi ya Bapa-Pinda
Vifaa
8- 1 kipandeKishikilia Nafasi
- Kishikilia Nafasi
- 2 vipandeKishikilia Nafasi
- 8 vipandeKishikilia Nafasi
- 1 kipandeKishikilia Nafasi
- 1 kipandeKishikilia Nafasi
- 3 metreKishikilia Nafasi
- 2 metreKishikilia Nafasi
Zana Zinazohitajika
12- Kishikilia Nafasi
- Kishikilia Nafasi
- Kishikilia Nafasi
- Kishikilia Nafasi
- Kishikilia Nafasi
- Kishikilia Nafasi
- Kishikilia Nafasi
- Kishikilia Nafasi
- Kishikilia Nafasi
- Kishikilia Nafasi
- Kishikilia Nafasi
- Kishikilia Nafasi
CC0 Umma Wote
Mchoro huu umetolewa chini ya CC0. Uko huru kunakili, kubadilisha, kusambaza, na kutumia kazi hii kwa madhumuni yoyote, bila kuomba ruhusa.
Saidia Mtengenezaji kwa kununua bidhaa kupitia Mchoro wao ambapo wanapata Kamisheni ya Mtengenezaji iliyowekwa na Wachuuzi, au unda marudio mapya ya Mchoro huu na uiunganishe kama kiungo katika Mchoro wako kuchangia mapato.