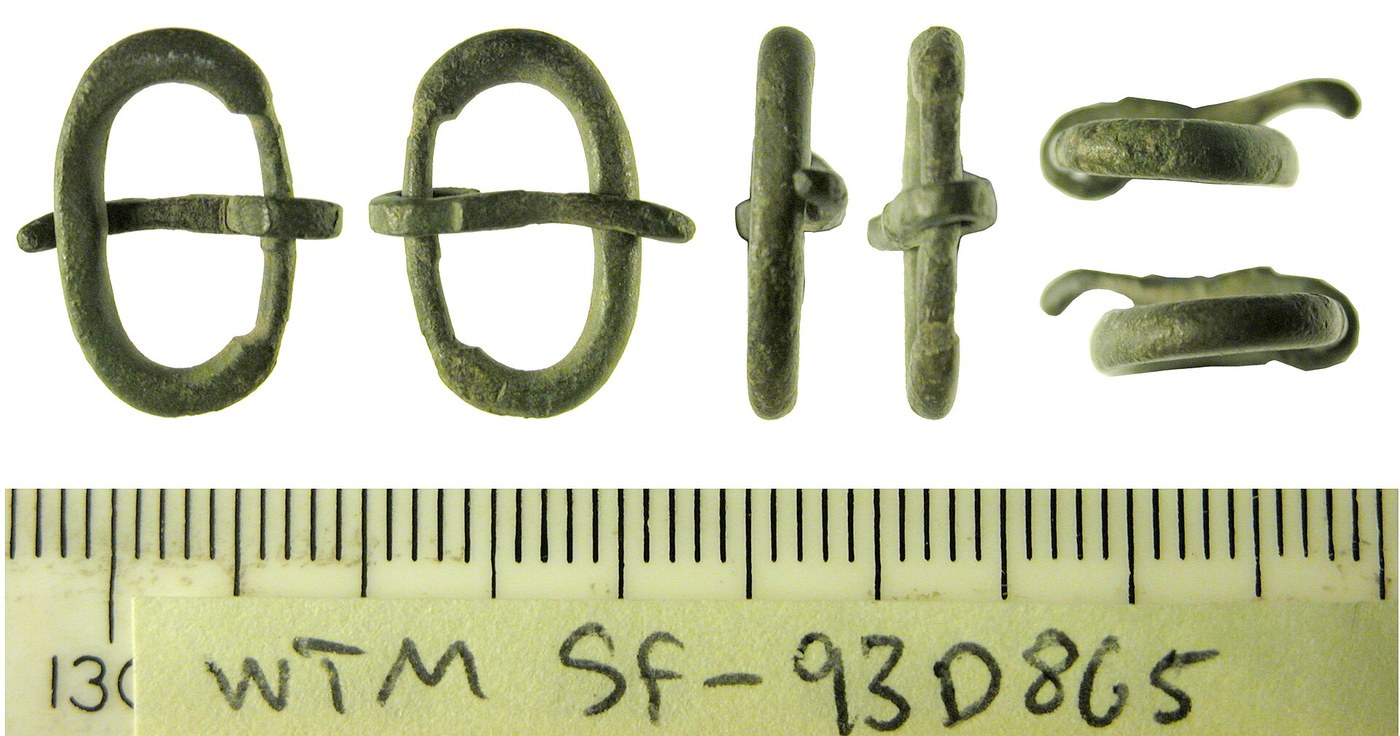


Anglo-Saxon Belt Buckle
A belt buckle is three parts that have to work together: a loop the strap passes through, a tongue that drops into a hole to hold the tension, and a plate that fastens the whole thing to the leather. Get the proportions wrong and the tongue slips, the loop bends, or the plate tears out of the strap.
Anglo-Saxon buckles survive in enormous numbers — they are among the commonest grave finds of the period, in copper alloy, iron, silver and occasionally gold. This blueprint builds the standard workaday form in cast or forged copper alloy, which is what most people actually wore.
It is emphatically not the Sutton Hoo great gold buckle. That object is a hollow box with a hinged back and a system of internal sliding rods, made from over 400 grams of gold. It is one of the finest pieces of metalwork to survive from early medieval Europe and it is not a beginner's project — but it is worth knowing about, so it is in the last step.
안내
Measure the strap
Measure the strap
Measure the belt width. Every dimension follows from it: the loop's internal width must be 2 mm wider than the strap so it runs freely without flopping.
이 단계의 재료:
 재생 가죽1 개
Bend the loop from rod
Bend the loop from rod
Anneal 120 mm of 4 mm brass rod to dull red, air-cool, then bend it into a D-shape over a former. The straight bar of the D is the axis the tongue will pivot on.
이 단계의 재료:
 황동 봉1 개
필요한 도구:
 프로판 토치
 내화 벽돌
내화 벽돌 세공용 플라이어 세트
File a seat for the tongue
File a seat for the tongue
File a shallow flat about 6 mm wide at the centre of the straight bar. The tongue sits in this seat and stops it sliding sideways along the bar in wear.
필요한 도구:
 정밀 줄(니들 파일) 세트
Close the loop joint
Close the loop joint
Bring the two ends of the D together and solder with hard silver solder. This joint carries the full pull of the belt — a gap here is where the buckle fails.
이 단계의 재료:
 은납 세트 (저온/중온/고온)1 세트
 납땜 플럭스 페이스트 (로진계)1 개
필요한 도구:
프로판 토치Cut and shape the tongue
Cut and shape the tongue
Cut a tapered tongue from 2 mm sheet, long enough to reach 3 mm past the far side of the loop. Too short and it lifts out under load; too long and it catches on the strap.
이 단계의 재료:
 황동판1 장
필요한 도구:
 보석 실톱
보석 실톱Roll the tongue's pivot eye
Roll the tongue's pivot eye
Anneal the wide end and roll it around the loop bar into a closed eye. Roll it on the bar — a separately-formed eye almost never fits.
필요한 도구:
세공용 플라이어 세트프로판 토치Check the tongue swings free
Check the tongue swings free
The tongue must fall under its own weight and rest against the far side of the loop. A stiff tongue will not seat itself when the wearer fastens the belt one-handed.
Cut the plate
Cut the plate
Cut a plate from 1.5 mm sheet, twice the strap width long. It folds in half around the strap end, so half wraps the front and half the back.
이 단계의 재료:
황동판1 장필요한 도구:
보석 실톱Cut the tongue slot
Cut the tongue slot
Pierce a slot across the fold line, wide enough for the tongue to pass through and hinge. Without it the plate cannot fold around the loop bar.
필요한 도구:
보석 실톱정밀 줄(니들 파일) 세트Chase a simple interlace
Chase a simple interlace
Chase a two-strand interlace into the plate with a small punch. Anglo-Saxon ornament is overwhelmingly interlace and stylised animal forms — keep it geometric and repeating.
필요한 도구:
 조각칼(뷰린)
Fold the plate around the bar
Fold the plate around the bar
Bend the plate over the loop bar so it hinges freely, with the tongue passing through the slot. Check the whole assembly articulates before the leather goes anywhere near it.
필요한 도구:
세공용 플라이어 세트Rivet to the strap
Rivet to the strap
Slide the strap end between the folded halves and set three rivets in a triangle, not a line. A line of rivets tears the leather along the grain; a triangle spreads the load.
이 단계의 재료:
 구리 리벳3 개
Punch the strap holes and test
Punch the strap holes and test
Punch holes at 25 mm spacing and fasten. Pull hard: the tongue should bite, the loop should not spring open, and the plate should not rock on the rivets.
History & Context
History & Context
Why buckles are everywhere in the archaeology. Belt fittings are among the most common finds from early medieval graves, because everyone wore a belt and metal survives when textile and leather do not. That abundance makes them a dating tool: buckle shapes changed with fashion, so a typology of buckles gives archaeologists a way to date a burial from a single small object. The plain copper-alloy buckle in this blueprint is the type most people actually owned.
The Sutton Hoo great gold buckle. Found in the 1939 ship burial and dated to the early 7th century, it is made from over 400 grams of gold and covered in zoomorphic interlace — thirteen intertwining creatures picked out with punched circles and inlaid with niello, a black metal alloy. It is not solid: it is a hollow box, made in parts joined by a hinge under the loop, and it opens at the back. Three plain hemispherical bosses connect to sliding catches on a hinged back-plate, operated through a system of internal rods fitting into slotted fixings. Nobody has satisfactorily explained what the cavity was for.
Three parts, one job. Loop, tongue and plate is a solution so good it has not changed. The buckle on a modern belt is the same three components in the same relationship. What changes across fifteen centuries is decoration and material, not mechanism — a sign the geometry was solved early.
Interlace is not decoration alone. Anglo-Saxon and Insular interlace is highly rule-bound: strands pass over and under in strict alternation, and a strand that breaks the alternation reads instantly as wrong even to an untrained eye. Chasing a convincing interlace is an exercise in following that rule without a template, which is why period examples that get it right are a marker of a skilled workshop.
Copper alloy, not "bronze". Archaeological reports usually say "copper alloy" rather than bronze or brass, because without analysis you cannot tell which alloy a given object is, and early medieval metalworkers used a wide and inconsistent range. It is a small habit of precision worth copying: name what you know, not what you assume.
재료
6- 1 개플레이스홀더
- 1 개플레이스홀더
- 1 세트플레이스홀더
- 플레이스홀더
- 1 장플레이스홀더
- 3 개플레이스홀더
이 블루프린트로 만드는 것
CC0 퍼블릭 도메인
이 블루프린트는 CC0로 공개되었습니다. 어떤 목적으로든 자유롭게 복사, 수정, 배포 및 사용할 수 있습니다.
제품 구매를 통해 메이커를 지원하세요. 판매자가 설정한 메이커 커미션 을 받거나, 이 블루프린트의 새로운 반복을 만들어 연결로 포함시킬 수 있습니다.