협업
예술
뷰티 및 웰니스
공예
문화 및 역사
엔터테인먼트
환경
음식 및 음료
역공학
과학
스포츠
기술
웨어러블
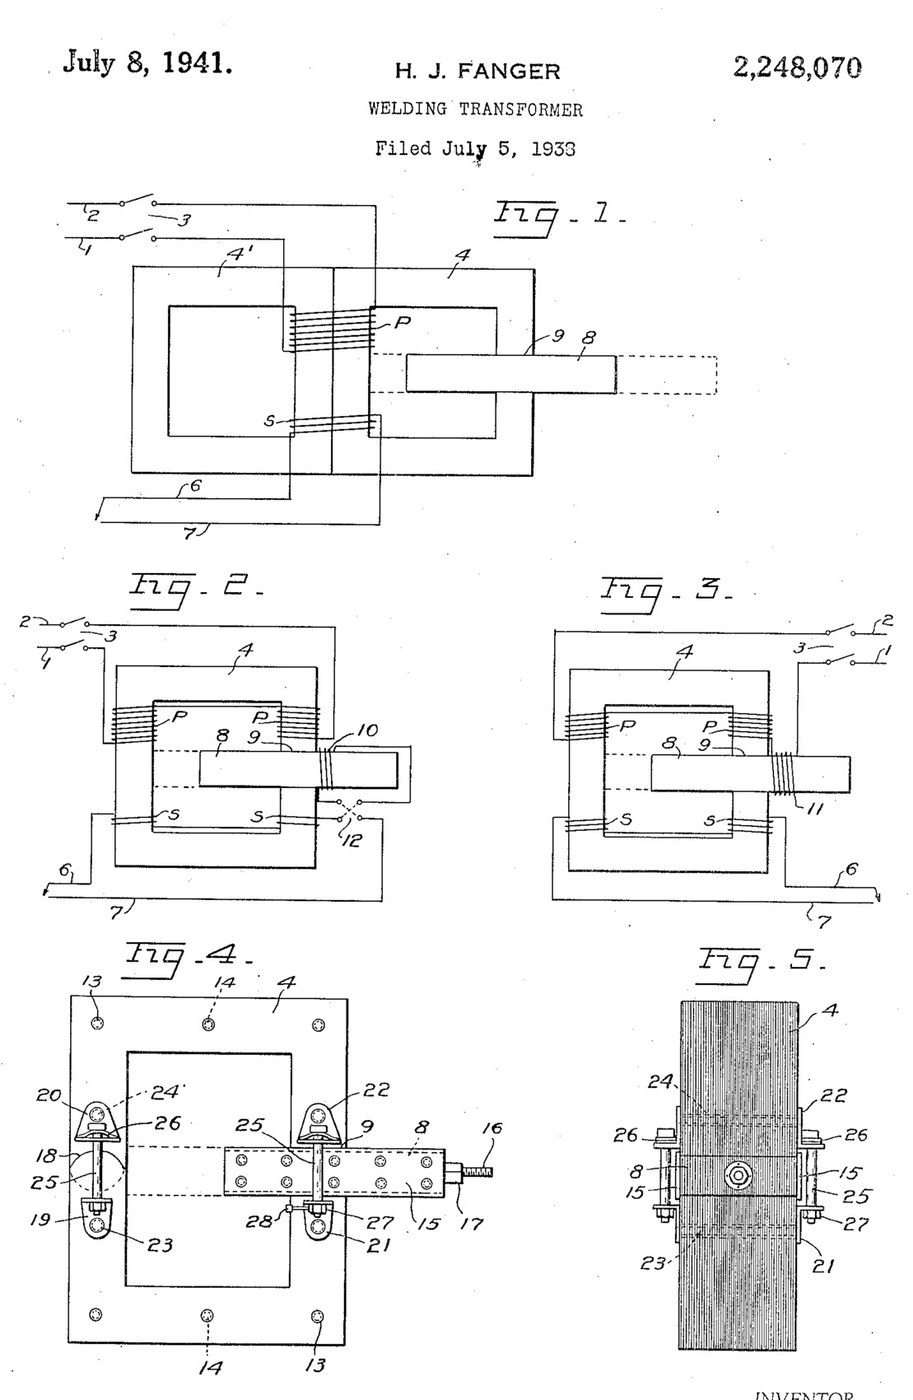


Arc Welder: AC Transformer with a Sliding Shunt Core (Fanger, US 2,248,070)
An AC arc welder is a step-down transformer whose current can be turned up and down. H. J. Fanger (US 2,248,070, 1941) cuts a gap through one leg of a laminated ring core and slides a laminated iron shunt bar through it: pushed in, it carries flux past the secondary and lowers the welding current; pulled out, the current rises.
For arc welding he gives about 60 to 68 volts open circuit, 15 to 200 amps, dropping to 38 or 40 volts at the working arc, with a small coil on the shunt bar in series with the secondary.
Source: H. J. Fanger, "Welding Transformer", US Patent 2,248,070 (filed 1938, granted 1941). Picture: its Figs. 1-5.
고급
Unknown
안내
1
1
Read Fanger
Read Fanger
"With arc welding, infinite control of the volume of the secondary current, between maximum and minimum is obtained by adjustment of the slidable shunt core without altering the welding characteristics of the current, also better ignition of the arc is had at a given voltage, and greater stability of the arc".
2
2
Stack the core
Stack the core
Build a single rectangular ring core of insulated iron laminations, held together with brass (or insulated) bolts or rivets in insulating tubes (Fig. 4). Cut a gap straight through one leg, accurately machined and finished, and make a circular joint through the opposite leg with the segments staggered to overlap in successive laminations. Core size, lamination iron and thickness are not given (ours: the tools).
이 단계의 재료:
 알 수 없는 금속1 iron laminations
 육각 볼트 모음1 brass bolts
 알 수 없는 절연 재료1 insulating tubes
필요한 도구:
 판금 가위
 탁상 드릴
 드릴 비트 세트
 줄 (손줄)
 알 수 없는 치수
3
3
Make the shunt bar
Make the shunt bar
Make the sliding shunt section of the same laminated iron, a snug fit in the gap with its laminations edge-to-edge with the core's, and long enough to fill the gap at every position. Sheath both sides with a slightly wider plate of Bakelite that overlaps the edges of the gap to guide it. Fit a threaded rod on its outer end, working in a nut fixed to the section (or move it by hand, with calibration marks along one edge).
이 단계의 재료:
알 수 없는 금속1 shunt laminations 베이클라이트2 side plates육각 볼트 모음1 brass bolts
 전산 볼트(나사 봉)1 개
 육각 너트1 개
필요한 도구:
탁상 드릴드릴 비트 세트줄 (손줄)4
4
Wind the coils
Wind the coils
Wind the primary and secondary windings on both legs of the core (Fig. 2), in series or in parallel to suit the line voltage and the current wanted. Wind a small auxiliary coil round the shunt bar's path, fixed so the bar slides through it, and connect it in series with the secondary through a reversing switch (some jobs weld better with the current through it one way). Turns and wire sizes are not given.
이 단계의 재료:
 구리선1 insulation and size not given
필요한 도구:
알 수 없는 치수5
5
Spring the joints
Spring the joints
On both sides of the gap and of the circular joint fit pairs of confronting angle plates, held by brass bolts in insulating sleeves and drawn together by spring bolts whose heads rest on slightly arched spring plates, so the joints close snugly on the sliding bar. A small lever on the gap-joint nut gives a half turn to release the bar for moving. The angle-plate material is not given.
이 단계의 재료:
 알 수 없는 재료4 angle plates육각 볼트 모음1 brass and spring bolts알 수 없는 절연 재료1 sleeves
 스프링강 띠1 arched spring plates육각 너트4 개
필요한 도구:
탁상 드릴드릴 비트 세트 멍키스패너
6
6
Connect and set
Connect and set
Connect the primary to the line through a line switch, and the secondary leads to the electrode holder and the work. Pull the shunt bar out for more current, push it in for less: Fanger gives about 60-68 volts open circuit and 15-200 amps, dropping to 38-40 volts at the arc.
이 단계의 재료:
 전원 스위치1 line switch
필요한 도구:
멍키스패너재료
10- 1 shunt laminations플레이스홀더
- 1 brass and spring bolts플레이스홀더
- 1 sleeves플레이스홀더
- 2 side plates플레이스홀더
- 1 개플레이스홀더
- 5 개플레이스홀더
- 1 insulation and size not given플레이스홀더
- 4 angle plates플레이스홀더
- 1 arched spring plates플레이스홀더
- 1 line switch플레이스홀더
이 블루프린트로 만드는 것

CC0 퍼블릭 도메인
이 블루프린트는 CC0로 공개되었습니다. 어떤 목적으로든 자유롭게 복사, 수정, 배포 및 사용할 수 있습니다.
제품 구매를 통해 메이커를 지원하세요. 판매자가 설정한 메이커 커미션 을 받거나, 이 블루프린트의 새로운 반복을 만들어 연결로 포함시킬 수 있습니다.