

Torque Wrench
“Tight” is not a quantity. Two fitters tightening the same bolt with the same spanner produce wildly different clamping loads, and both of them believe they did it right. A joint that is under-tightened works loose; one that is over-tightened stretches the bolt past its elastic limit and fails later, out of sight.
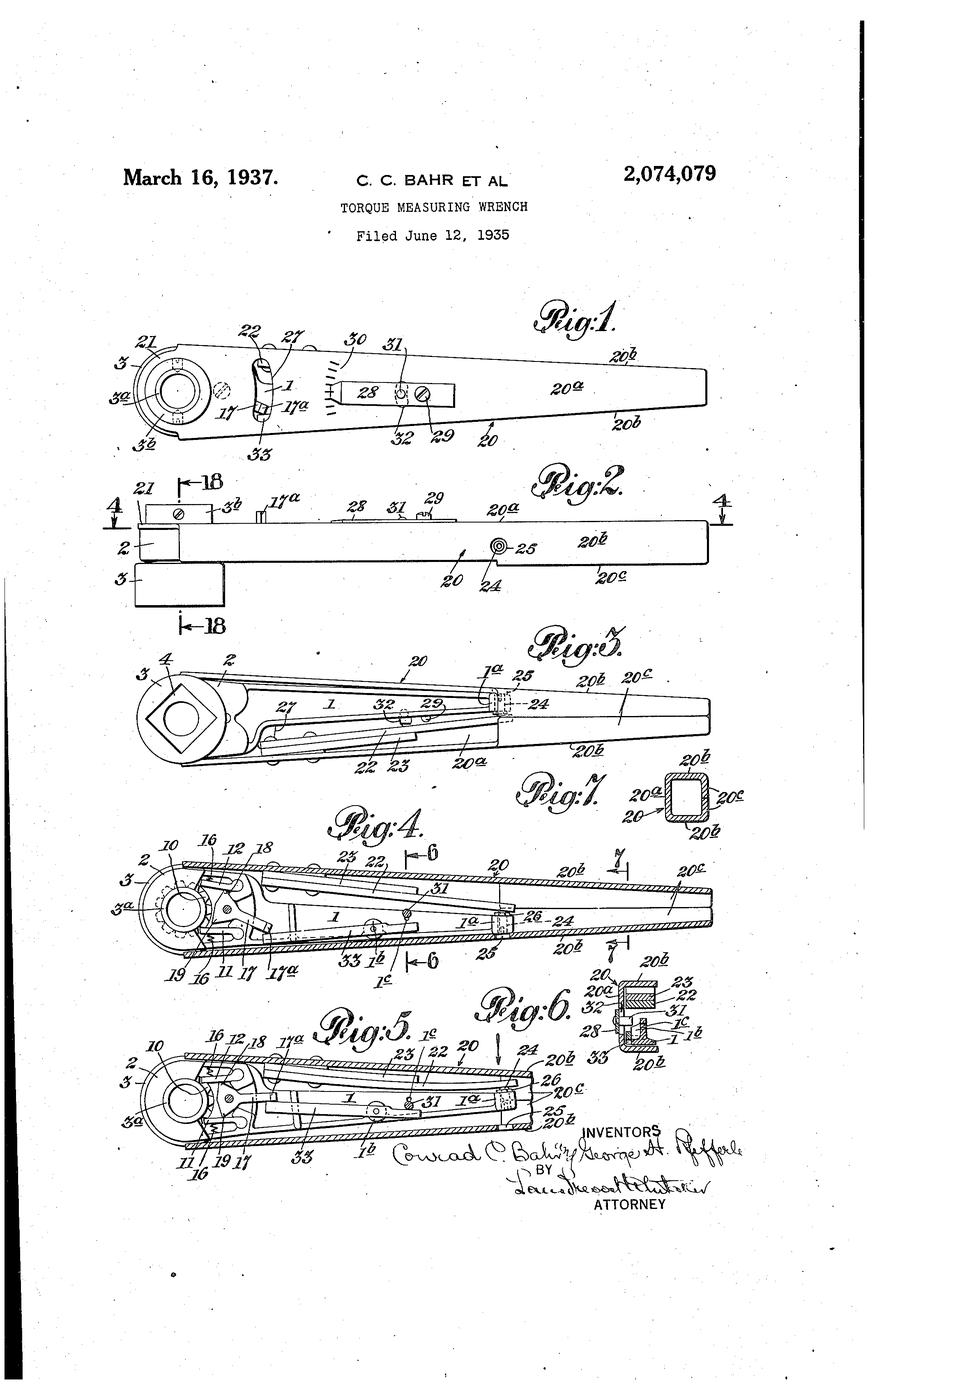
US 2,074,079, “Torque Measuring Wrench”, Conrad C. Bahr of New York and George H. Pfefferle of Bradford, Pennsylvania. Granted 16 March 1937. It is a ratchet-type socket wrench that measures what it applies, aimed explicitly at bolted pipe joints, couplings, clamps and sleeves — and it restricts back-ratcheting once the set torque is reached.
The 1918 story, corrected. Bahr is universally described as having invented the torque wrench in 1918 while working for the New York City water department, and that is where the idea came from: over-tightened bolts were cracking water-main fittings. But the first torque-wrench patent filing is John H. Sharp of Chicago in 1931, and Bahr's own patent — with Pfefferle, who is almost always left out — was filed in 1935 and granted in 1937. Conception and patent are seventeen years apart, and sources that print “patented in 1918” are wrong.
안내
Write the definition you are going to measure
Write the definition you are going to measure
Torque = force × perpendicular distance from the axis. Newton-metres. Write it down before touching a tool.
Clamp a bolt in the vise
Clamp a bolt in the vise
Clamp a Grade 8.8 hex bolt upright in the bench vise with a nut run down finger-tight.
이 단계의 재료:
 육각 머리 볼트 - 등급 8.81 개
필요한 도구:
 바이스(만력)
Fit a socket and measure the arm
Fit a socket and measure the arm
Fit the correct socket. Measure from the bolt axis to the point on the handle where you will pull, in metres.
필요한 도구:
 임팩트 소켓 세트(인치·미터)
 자
자Pull with a known force
Pull with a known force
Hook the spring scale at that marked point and pull perpendicular to the handle until the nut just turns. Read the force in newtons.
필요한 도구:
 힘 측정기(스프링 저울)임팩트 소켓 세트(인치·미터)
Calculate the torque you applied
Calculate the torque you applied
Multiply force by arm length. Example: 60 N at 0.25 m = 15 N·m. Record it.
이 단계의 재료:
 모눈종이1 장
Halve the arm and repeat
Halve the arm and repeat
Move your pull point to half the distance and tighten to the same 15 N·m. You now need twice the force. Confirm it on the scale.
이 단계의 재료:
모눈종이1 장필요한 도구:
힘 측정기(스프링 저울)Guess a torque by feel, five times
Guess a torque by feel, five times
Without any scale, tighten the nut to what feels like 15 N·m. Have someone measure each attempt with the spring scale. Record all five.
이 단계의 재료:
모눈종이1 장필요한 도구:
힘 측정기(스프링 저울)Calculate your personal spread
Calculate your personal spread
Largest guess minus smallest, as a percentage of the target. A spread of 30-50% is normal, and it is the entire case for the instrument.
이 단계의 재료:
모눈종이1 장Set the real torque wrench
Set the real torque wrench
Set the torque wrench to 15 N·m and tighten the same nut until it clicks. Note that the click is a release, not a stop.
필요한 도구:
 토크 렌치
토크 렌치Check the wrench against your own measurement
Check the wrench against your own measurement
Loosen, then re-tighten with the spring scale until the wrench would click. Compare the two numbers. Two independent methods, one quantity.
이 단계의 재료:
모눈종이1 장필요한 도구:
토크 렌치힘 측정기(스프링 저울)Show why lubrication changes everything
Show why lubrication changes everything
Put a drop of oil on the threads and tighten to the same 15 N·m. The nut turns visibly further — same torque, more clamping force, because friction fell.
이 단계의 재료:
육각 머리 볼트 - 등급 8.81 개 절삭유2 ml
필요한 도구:
토크 렌치 유성 매직
유성 매직Measure bolt stretch
Measure bolt stretch
Measure the bolt's length with the micrometer before and after tightening to 15 N·m. The difference — a few hundredths of a millimetre — is what actually holds the joint.
이 단계의 재료:
육각 머리 볼트 - 등급 8.81 개모눈종이1 장필요한 도구:
 마이크로미터
Tighten a small fastener by feel and then measure
Tighten a small fastener by feel and then measure
Try the same feel-test on a #6-32 machine screw with a hex key. Small fasteners are where feel fails worst, because the range between loose and stripped is tiny.
이 단계의 재료:
 #6-32 기계 나사1 개
필요한 도구:
 육각 렌치 세트힘 측정기(스프링 저울)
History & Context
History & Context
US 2,074,079, “Torque Measuring Wrench”, Conrad Charles Bahr, New York, and George H. Pfefferle, Bradford, McKean County, Pennsylvania. Granted 16 March 1937. The patent addresses ratchet-type socket wrenches for “the assembly of bolted pipe joints, couplings, clamps, sleeves, repair devices and other fittings”.
Three dates that sources merge. Bahr conceived the tool around 1918 as a municipal engineer in New York, to stop workmen cracking water-main fittings by over-tightening. The first torque-wrench patent filing on record is John H. Sharp of Chicago, 1931. Bahr and Pfefferle filed in 1935 and were granted in 1937. “Bahr patented the torque wrench in 1918” is a compression of all three into one, and it is false.
What a torque wrench actually controls, and does not. The engineer wants a clamping force, achieved by stretching the bolt elastically — step 12 measures it directly. What the wrench measures is torque, and most of that torque is spent overcoming friction under the head and in the threads, not stretching anything. Change the lubrication and the same torque gives a different clamp load, which is why step 11 matters and why critical joints are specified by angle-of-turn or by direct bolt-stretch measurement rather than by torque alone.
The click. The familiar clicker wrench uses a spring-loaded cam that slips at the set value — it signals, it does not prevent. Keep pulling after the click and you keep adding torque. The earlier beam type, with a pointer over a scale, cannot be set wrong because it has nothing to set; it is still the more honest instrument, and calibration labs like it for exactly that reason.
Why 1918 and not earlier. Hand-fitted machines had joints adjusted by a craftsman who knew each one. Mass-produced assemblies handed the same joint to any worker, in quantity, at speed. Once the skill left the hand, the number had to enter the tool — the same argument that produced every other measuring tool in the machine shop.
재료
4- 플레이스홀더
- 1 장플레이스홀더
- 2 ml플레이스홀더
- 1 개플레이스홀더
연결된 블루프린트 재료

이 블루프린트로 만드는 것
관련 블루프린트
이 블루프린트들은 지식을 공유합니다 — 기술, 재료 또는 원리

CC0 퍼블릭 도메인
이 블루프린트는 CC0로 공개되었습니다. 어떤 목적으로든 자유롭게 복사, 수정, 배포 및 사용할 수 있습니다.
제품 구매를 통해 메이커를 지원하세요. 판매자가 설정한 메이커 커미션 을 받거나, 이 블루프린트의 새로운 반복을 만들어 연결로 포함시킬 수 있습니다.