협업
예술
뷰티 및 웰니스
공예
문화 및 역사
엔터테인먼트
환경
음식 및 음료
역공학
과학
스포츠
기술
웨어러블
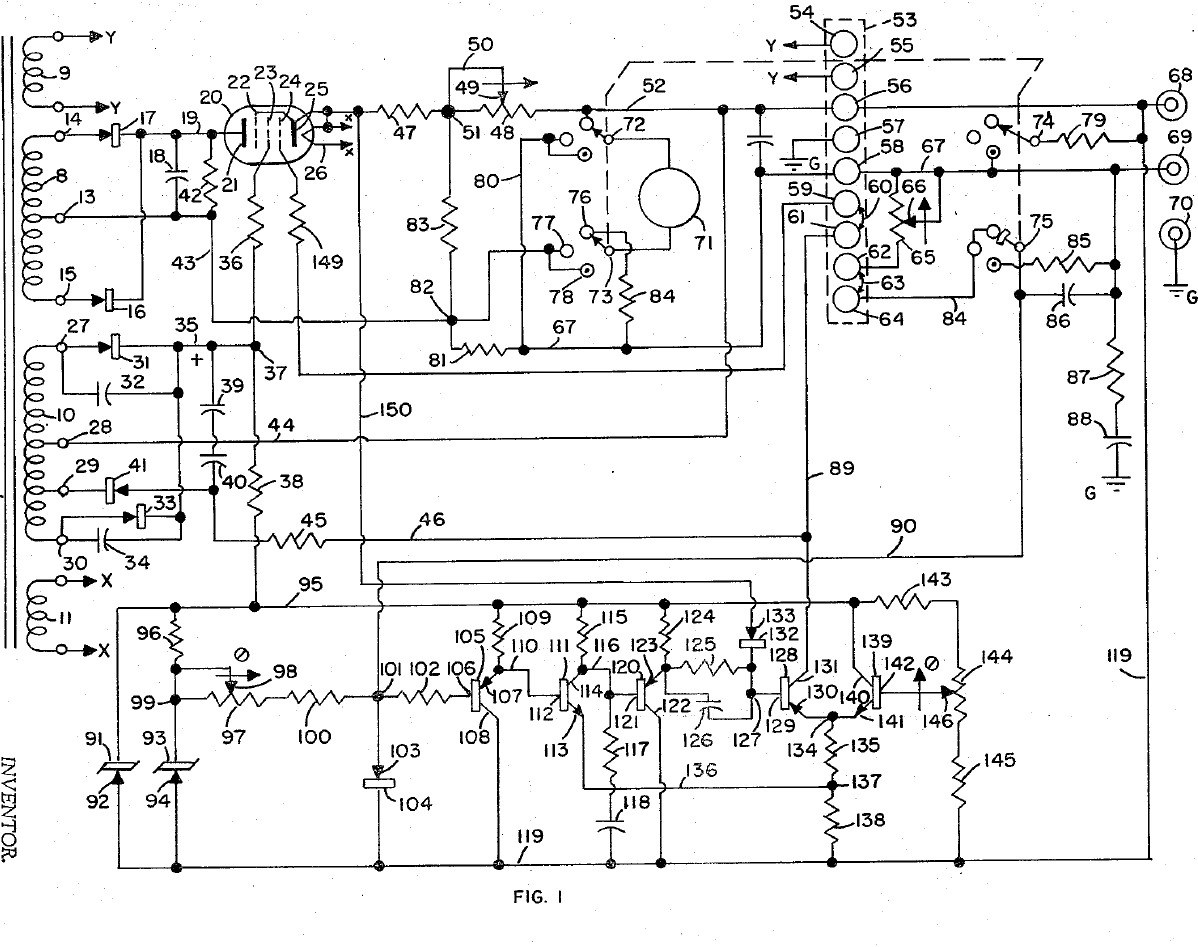


Bench Power Supply: Regulated, with Adjustable Current Limit and a Pentode Pass Tube (Gately, Forbro, US 3,243,690, 1966)
An adjustable bench supply that holds its output voltage steady and lets you set the most current it will deliver, so a circuit under test cannot be damaged. A pentode tube in series with the output is the regulator; a bridge with Zener references and a five-transistor amplifier keeps the output equal to the setting of one knob. A meter switch reads volts, amps, and the current limit, which can be set without disturbing the voltage.
Result: a regulated DC bench supply with adjustable current limiting.
Source: J. R. Gately (Forbro Design), US 3,243,690 (1966). Unknown: all component values and the output rating. Picture: the patent drawing.
고급
Unknown
안내
1
1
Wire the mains side
Wire the mains side
In a case, wire the power cord through a switch and a fuse to the primary of a transformer with four secondaries, and put a neon lamp across the primary to show the supply is on. One secondary (6.3 V) goes to two terminals for outside use, one heats the pentode, one is the main supply and one the bias supply. Ours: the case. Not given: the other winding voltages.
이 단계의 재료:
 알루미늄 케이스1 case
 플러그 달린 코드1 개
 토글 스위치1 개
 퓨즈1 개
 강압 변압기1 four secondaries
 네온 표시등1 개
 바인딩 포스트2 6.3 V terminals
필요한 도구:
 손 드릴
 드라이버 세트
2
2
Build the rectifiers
Build the rectifiers
Rectify the centre-tapped main winding with two rectifiers and smooth it with a capacitor. From the bias winding make two more supplies: one through two rectifiers with by-pass capacitors to a smoothing capacitor, for the pentode's screen and the reference circuit; the other through one rectifier and a capacitor, for the pentode's grid bias. Not given: the values.
이 단계의 재료:
 다이오드5 rectifiers
 전해 커패시터3 smoothing
 커패시터 키트1 by-pass
 땜납 선1 as needed
필요한 도구:
 인두
3
3
Fit the pass tube and reference
Fit the pass tube and reference
Put the pentode in series with the positive output: plate to the main supply, cathode through two current-sensing resistors (one fixed, one adjustable) to the + output terminal; suppressor tied to the cathode, screen fed through a resistor. Build the reference: a Zener fed through a resistor feeds a second Zener at constant current, giving a fixed voltage. Against it set two resistors and the voltage-control variable resistor: the output voltage is proportional to that resistor's setting. Not given: the tube type and values.
이 단계의 재료:
 오극관1 series pass tube
 제너 다이오드2 개
 전기 저항1 세트
 가감 저항기2 voltage control, current-limit range바인딩 포스트2 output + and -땜납 선1 as needed
필요한 도구:
인두4
4
Build the error amplifier and current limit
Build the error amplifier and current limit
Build a five-transistor amplifier that drives the pentode's grid to keep the bridge balanced: a PNP emitter follower, an NPN stage, a PNP emitter follower with a resistor-capacitor roll-off against oscillation, a PNP driver whose base resistor has a capacitor across it for quick response, and an NPN clamp whose base is set by a potentiometer. Feed the voltage across the current-sensing resistors to the driver's base through a diode: above the limit it takes over and turns the pentode down. Choose the fixed sensing resistor to limit at about 125 % of rated current, trim with the potentiometer, and use the adjustable one to set lower limits. Not given: the transistor types and values.
이 단계의 재료:
 PNP 트랜지스터3 개
 NPN 트랜지스터2 개다이오드1 개
 가변저항기1 개커패시터 키트1 roll-off, speed-up전기 저항1 세트땜납 선1 as needed
필요한 도구:
인두5
5
Fit the meter and use it
Fit the meter and use it
Fit a meter with a four-pole, three-position switch. Position 1 reads output volts through a multiplier resistor; position 2 reads current across a shunt in the negative line; position 3 (spring-return) puts a load resistor across the output and swaps a fixed resistor for the voltage control, so you can turn the limit control until the current limits at the value you want, without touching the voltage setting. Release the switch and use the supply.
이 단계의 재료:
 가동 코일형 패널 계기1 개
 로터리 스위치1 4-pole, 3-position전기 저항1 multiplier, shunt, load resistors
 알 수 없는 재료1 terminal strip
필요한 도구:
인두드라이버 세트재료
21- 1 case플레이스홀더
- 1 개플레이스홀더
- 플레이스홀더
- 1 개플레이스홀더
- 1 four secondaries플레이스홀더
- 1 개플레이스홀더
- 플레이스홀더
- 1 개플레이스홀더
- 3 smoothing플레이스홀더
- 1 roll-off, speed-up플레이스홀더
- 3 as needed플레이스홀더
- 1 series pass tube플레이스홀더
- 2 개플레이스홀더
- 1 multiplier, shunt, load resistors플레이스홀더
- 2 voltage control, current-limit range플레이스홀더
- 3 개플레이스홀더
- 2 개플레이스홀더
- 플레이스홀더
- 1 개플레이스홀더
- 1 4-pole, 3-position플레이스홀더
- 1 terminal strip플레이스홀더
이 블루프린트로 만드는 것

CC0 퍼블릭 도메인
이 블루프린트는 CC0로 공개되었습니다. 어떤 목적으로든 자유롭게 복사, 수정, 배포 및 사용할 수 있습니다.
제품 구매를 통해 메이커를 지원하세요. 판매자가 설정한 메이커 커미션 을 받거나, 이 블루프린트의 새로운 반복을 만들어 연결로 포함시킬 수 있습니다.