예술
뷰티 및 웰니스
공예
문화 및 역사
엔터테인먼트
환경
음식 및 음료
그린 퓨처
역공학
과학
스포츠
기술
웨어러블

번역됨
BLUEPRINT NFT

깜박이는 LED — 첫 번째 Arduino 프로젝트
클래식 첫 전자 프로젝트입니다! Arduino, 브레드보드, 저항기 및 단일 LED을(를) 사용하여 깜박이는 LED 회로를 만드세요. 절대 초보자에게 완벽합니다 — 납땜이 필요하지 않습니다.
안내
1
1
구성 요소 수집
구성 요소 수집
아래 나열된 모든 구성 요소를 수집하세요. 납땜이 필요하지 않습니다. 모든 것이 브레드보드에 연결됩니다.
이 단계의 재료:
 SparkFun Inventor's Kit - V3.21 키트
Arduino Uno R31 개
5mm LED (any color)1 개
 220 ohm Resistor (1/4W)1 개
Breadboard1 개
Jumper Wires (Male-to-Male)2 개
USB-B Cable1 개
필요한 도구:
Computer with Arduino IDE
2
2
회로 회로도
회로 회로도
신호는 Arduino Pin 13 → 220Ω 저항(R1) → LED(D1) → GND에서 흐릅니다. 저항은 LED를 보호하기 위해 전류를 제한합니다.
이 단계의 재료:
Arduino Uno R31 개
5mm LED (any color)1 개
220 ohm Resistor (1/4W)1 개3
3
배선 연결하기
배선 연결하기
- LED를 브레드보드에 삽입합니다 — 긴 다리(양극 +)는 한 줄에, 짧은 다리(음극 −)는 다음 줄에 삽입합니다.
- 220Ω 저항의 한쪽 다리를 LED 음극과 같은 줄에 삽입합니다. 다른 쪽 다리는 별도의 줄에 삽입합니다.
- 점퍼 와이어를 LED 양극 줄에서 Arduino Pin 13으로 연결합니다.
- 점퍼 와이어를 저항 자유 줄에서 Arduino GND로 연결합니다.
이 단계의 재료:
5mm LED (any color)1 개
220 ohm Resistor (1/4W)1 개Breadboard1 개
Jumper Wires (Male-to-Male)2 개
4
4
Blink 코드 업로드
Blink 코드 업로드
USB로 Arduino를 연결하세요. Arduino IDE를 열고, Tools → Board → Arduino Uno를 선택한 후 코드를 붙여넣고 Upload를 클릭하세요.
blink.inoarduino
이 단계의 재료:
Arduino Uno R31 개
USB-B Cable1 개
필요한 도구:
Computer with Arduino IDE
5
5
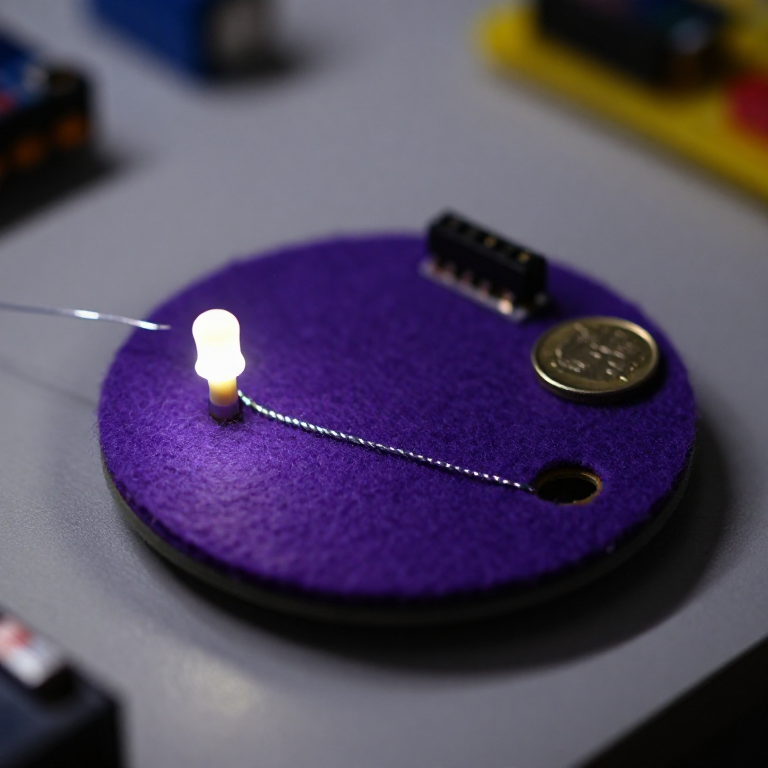
PCB 레이아웃 (참고)
PCB 레이아웃 (참고)
이것은 PCB 레이아웃으로 회로를 보여줍니다. 이 프로젝트에는 필요하지 않습니다 — 브레드보드가 완벽하게 작동합니다 — 하지만 같은 회로가 실제 보드로 제조된다면 어떻게 보일지 보여줍니다.
6
6
테스트 및 실험
테스트 및 실험
LED이 깜빡입니까? 축하합니다! 하드웨어를 방금 프로그래밍했습니다.
문제 해결:
다음 실험:
문제 해결:
- LED이 켜지지 않습니까? LED을 뒤집으세요 — 긴 다리가 Pin 13을 향하도록.
- LED이 켜진 상태로 유지됩니까? 코드가 성공적으로 업로드되었는지 확인하세요.
- 아무것도 일어나지 않습니까? 배선이 2단계의 회로도와 일치하는지 확인하세요.
다음 실험:
delay()값을 변경하여 깜빡임 속도 제어- Pin 12에 두 번째 LED 추가
- RGB LED으로 교체 (SIK Circuit 3 참조)
재료
7- ₩1,530
예상 총액
₩1,530Related blueprints
Other builds that share materials, tools, or techniques with this one.

Using a Shift Register — SIK Circuit 14electronics/active
Blinking an LED with LilyPad Arduinoelectronics

Making Charcoal — The First Chemical Processmaterials

The Spinning Jenny — Multi-Spindle Yarn Productiontextiles

Starting Seeds Indoors — Raising Seedlings for a Head Start

Driving a Motor — SIK Circuit 12electronics/electromech
CC0 퍼블릭 도메인
이 블루프린트는 CC0로 공개되었습니다. 어떤 목적으로든 자유롭게 복사, 수정, 배포 및 사용할 수 있습니다.
제품 구매를 통해 메이커를 지원하세요. 판매자가 설정한 메이커 커미션 을 받거나, 이 블루프린트의 새로운 반복을 만들어 연결로 포함시킬 수 있습니다.