협업
예술
뷰티 및 웰니스
공예
문화 및 역사
엔터테인먼트
환경
음식 및 음료
역공학
과학
스포츠
기술
웨어러블
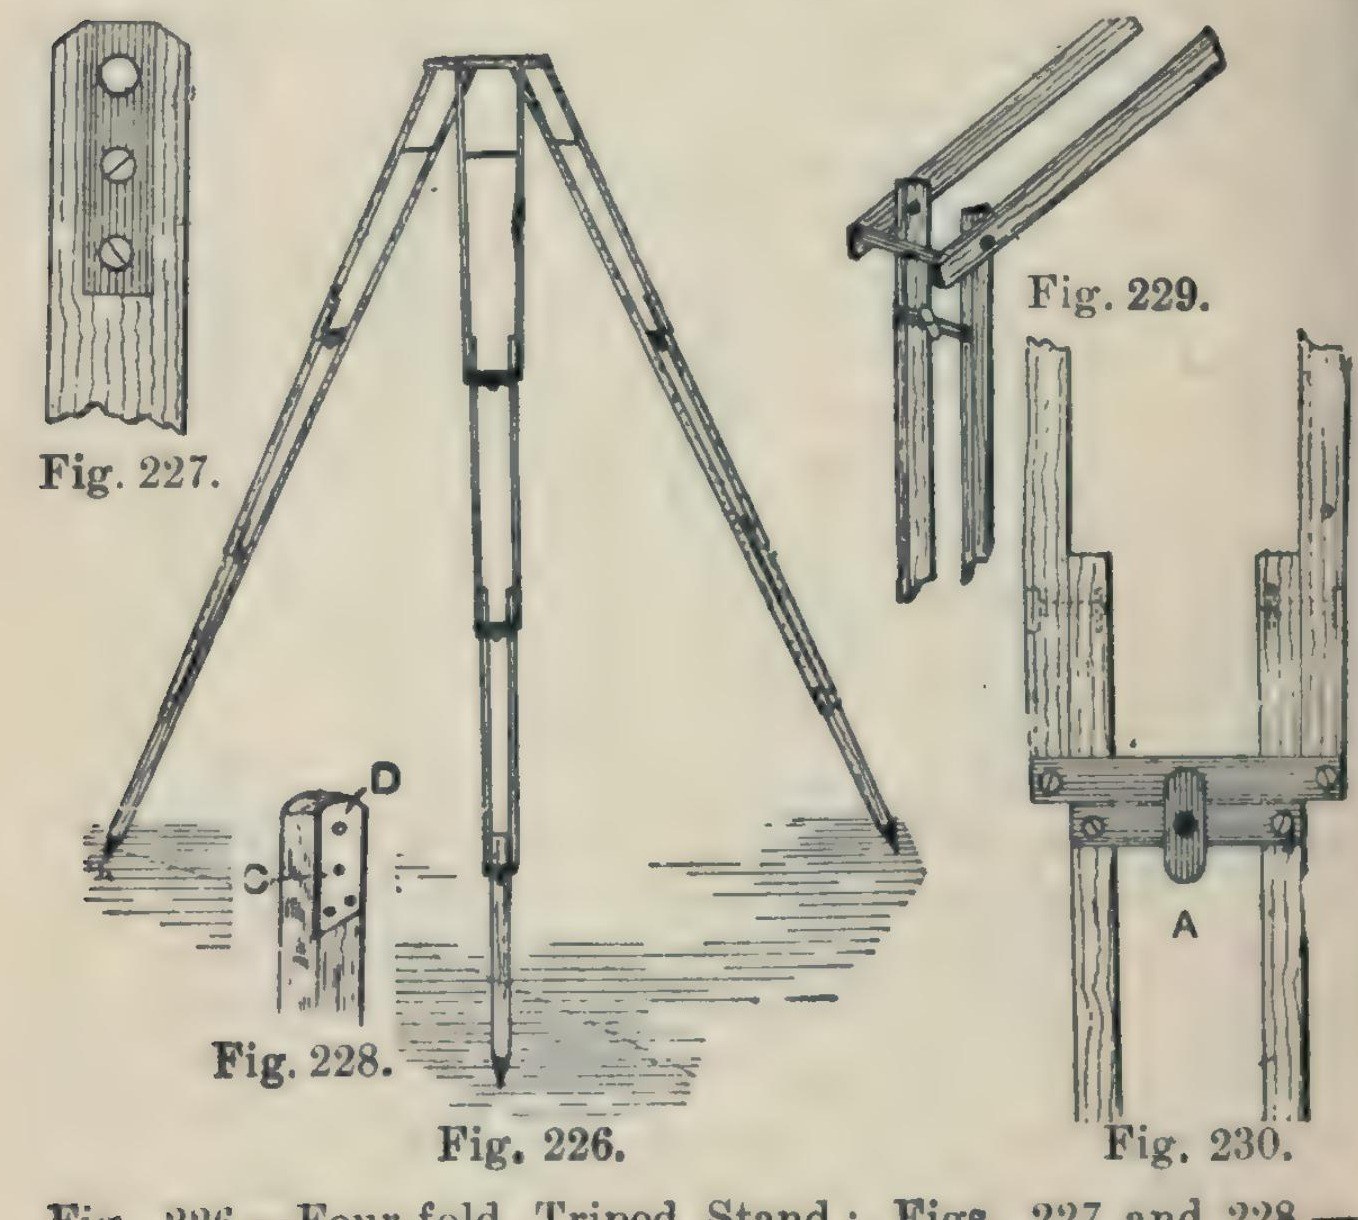


Camera Tripod: a Four-Fold Ash Tripod Stand (Hasluck, 1902)
A light, compact folding camera stand: three legs, each of seven ash laths riveted so it folds in four, locked open by brass buttons, on a triangular ash top with brass pins and a hole for the camera screw.
Hasluck says the same method makes stands that fold in three or two.
Source: Paul N. Hasluck, Photographic Cameras and Accessories (1902), pp. 153-157. Picture: Figs. 226-230 of the book.
중급
Unknown
안내
1
1
Cut the ash laths
Cut the ash laths
Cut laths of good ash, true and square or the stand won't be rigid, and round the edges slightly: six 17 1/4 x 5/8 x 3/8 in, six 16 x 5/8 x 3/8 in, six 15 1/2 x 5/8 x 3/8 in, and three 14 x 5/8 x 5/8 in.
이 단계의 재료:
 물푸레나무 판재1 21 laths
필요한 도구:
 등대기톱
 블록 플레인
2
2
Fit the top ends and stretcher
Fit the top ends and stretcher
On each 17 1/4 in lath let in flush a 1/16 in brass plate, 1 1/4 in long, with a 3/16 in hole 1/4 in from the top, held by two countersunk brass screws; bore the wood to match and take off the top corners. On one lath of each pair cut a groove inside, about 3/16 in deep and 3 1/2 in long, starting 2 in from the top, and hinge a 1/8 in brass rod stretcher in it on a pin. On the other lath cut a curved groove 1 1/2 in long, 3/16 in wide, with a small hole at the bottom where the rod catches.
이 단계의 재료:
 황동판1 1/16 in plates
 나사못1 small brass screws
 황동 봉1 1/8 in stretcher
필요한 도구:
 쇠톱 프레임과 톱날
 금속용 줄
 손 드릴
 끌
 일자 드라이버
3
3
Bore and rivet the legs
Bore and rivet the legs
Bore the rivet holes: in the long laths 1 3/4 in from the lower end, counterbored so the copper rivet head sits flush, then 1/8 in through; in the 16 in and 15 1/2 in laths 1/2 in and 1 3/4 in from the ends; in each 14 in piece 1/2 in from one end, and taper its other end for a pointed iron shoe or a steel point and ferrule. Rivet the 21 laths into three legs with 1/8 in copper rivets and washers: a 16 in lath inside each 17 1/4 in one, a 15 1/2 in lath inside that, the 14 in foot between the last pair. Rivets flush, just tight enough to fold but not loose.
이 단계의 재료:
 구리 리벳1 1/8 in, with washers
 알 수 없는 금속3 iron shoes or steel points
필요한 도구:
 곡병 손드릴과 비트손 드릴
 리벳 망치
4
4
Add cross strips and lock buttons
Add cross strips and lock buttons
Screw 1/16 in brass strips across the bottom ends of each pair of laths (Fig. 229). Under them screw strips carrying a small brass button riveted at the centre; turned, the button hooks over the strip above and locks the joint open (Fig. 230).
이 단계의 재료:
황동판1 cross strips, buttons나사못1 개필요한 도구:
쇠톱 프레임과 톱날금속용 줄일자 드라이버리벳 망치5
5
Make the top
Make the top
Plane ash to 1/2 in and draw an equilateral triangle with 8 1/2 in sides. Bisect the angles; 2 in from each corner draw a line at right angles, go 1/2 in in along the sides, and mark three rectangles 2 7/8 x 3/4 in; cut the outline (Fig. 231). Fix a 3/16 in brass rod, one end tapered, across each rectangle, bored 3/8 in from the outer edge and projecting about 1/2 in, for the legs to hang on. Bore a 1/4 in hole in the centre for the camera screw and glue felt on top.
이 단계의 재료:
물푸레나무 판재1 top황동 봉3 3/16 in pins 양모 펠트1 개
 동물 아교1 개
필요한 도구:
블록 플레인등대기톱곡병 손드릴과 비트손 드릴6
6
Finish
Finish
Glasspaper and varnish the wood, and lacquer the brass.
이 단계의 재료:
 셸락 바니시1 varnish
 알 수 없는 재료1 brass lacquer
필요한 도구:
 사포
재료
10- 1 top플레이스홀더
- 1 cross strips, buttons플레이스홀더
- 1 개플레이스홀더
- 3 3/16 in pins플레이스홀더
- 1 1/8 in, with washers플레이스홀더
- 3 iron shoes or steel points플레이스홀더
- 1 개플레이스홀더
- 1 개플레이스홀더
- 1 varnish플레이스홀더
- 1 brass lacquer플레이스홀더
이 블루프린트로 만드는 것

CC0 퍼블릭 도메인
이 블루프린트는 CC0로 공개되었습니다. 어떤 목적으로든 자유롭게 복사, 수정, 배포 및 사용할 수 있습니다.
제품 구매를 통해 메이커를 지원하세요. 판매자가 설정한 메이커 커미션 을 받거나, 이 블루프린트의 새로운 반복을 만들어 연결로 포함시킬 수 있습니다.