예술
뷰티 및 웰니스
공예
문화 및 역사
엔터테인먼트
환경
음식 및 음료
역공학
과학
스포츠
기술
웨어러블
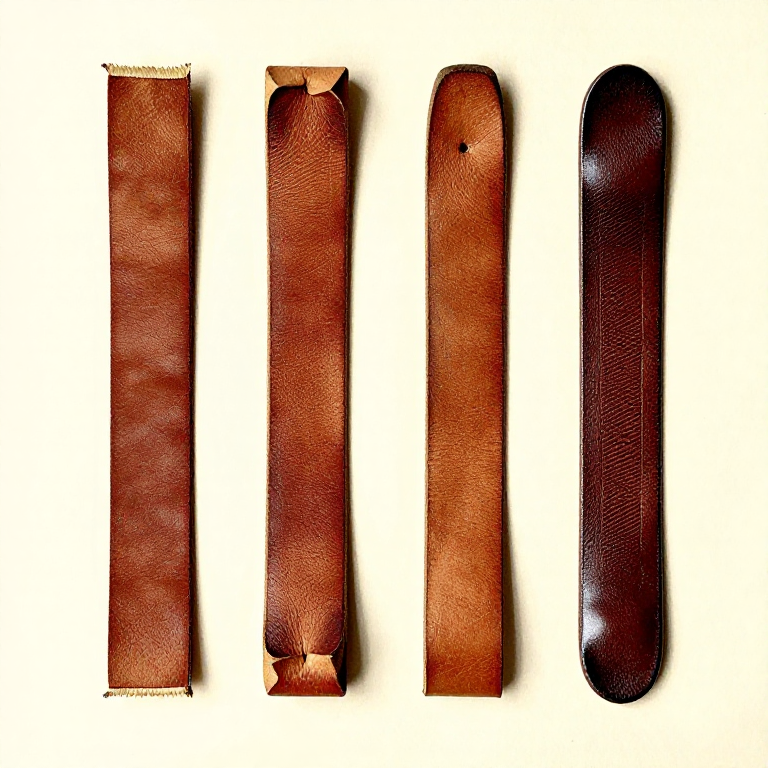


Edges That Last: The Part Everyone Sees and Nobody Plans For
A cut edge in leather is a raw edge. The fibres of the flesh side run straight out into the air, and they fray, absorb dirt and darken. It is the first thing that makes a handmade piece look handmade in the wrong way.
Finishing an edge closes those fibres back down into a smooth dense surface that is nearly as hard as the grain. On vegetable-tanned leather this is done with water, friction and heat — no product is strictly required — and it takes about five minutes per edge to do properly.
It is also the operation that cannot be done later: once a seam is stitched shut, its edges are as good as they will ever be.
중급
3 hours
안내
1
1
Sand square, then bevel both sides
Sand square, then bevel both sides
**Start square.** If the edge is not straight and perpendicular, no amount of burnishing fixes it. Sand along the edge with a block — 220 grit, then 400 — until it is flat and the two faces meet it at right angles.
On a glued and stitched assembly, sand the two layers down together so they become one edge. A step between layers will be visible for ever.
**Then bevel.** An edge beveller is a small gouge that shaves a consistent chamfer off the corner. Run it along both the grain side and the flesh side, in one smooth pull, with the tool held at a steady angle.
Bevellers come in sizes — a #1 for thin leather up to about 4 oz, #2 for 5 to 7 oz, #3 and up for heavy. Too large a beveller on thin leather removes most of the edge; too small on thick leather leaves a corner.
The bevel does two things: it rounds the edge so it takes a burnish, and it removes the sharp corner that would otherwise scuff pale and ragged in a month's use.
이 단계의 재료:
 식물 탄닌 가죽2 개
필요한 도구:
 모서리 따는 공구
 가죽 모서리 깎는 도구
 자
자2
2
Burnishing: water, friction, heat
Burnishing: water, friction, heat
Burnishing works because vegetable-tanned leather is collagen fibre that can be wetted, compressed and dried in a new shape. Friction supplies heat, the heat drives out the water, and the fibres set as a hard smooth layer.
**Wet the edge only.** A damp finger, a cotton bud, a sponge. Damp, not soaked — water spreading onto the grain side leaves a permanent mark.
**Rub hard and fast** with a burnisher: a slicker of hardwood or bone with grooves of different sizes, an agate, a piece of canvas, or a wooden dowel in a drill. Back and forth along the edge, with real pressure.
**The edge tells you when it is done.** It goes from fuzzy and matt to smooth and glossy, and it darkens. It should feel hard and slightly warm.
**Repeat.** Two or three cycles of wet, burnish, let dry beat one long session. Each one sets the fibres a little harder.
**Chrome-tanned leather will not do this.** The tannage does not set with water and heat, so its edges are finished with paint instead — several thin coats of edge paint, sanded between. That is why most modern bags have a painted edge and a saddler's belt has a burnished one.
이 단계의 재료:
식물 탄닌 가죽2 개 크롬 무두질 가죽1 개
필요한 도구:
 마노 광내기 도구모서리 따는 공구
3
3
What to burnish with, and whether it is needed
What to burnish with, and whether it is needed
**Water alone** works, and on good firm leather it is enough. It is also reversible: a water-burnished edge that gets soaked will lift again.
**Gum tragacanth** is the traditional edge dressing — a plant gum that lays the fibres down and holds them while they set. Brush a thin coat on, let it soak in, burnish while damp. It gives a harder, more durable edge than water and is still breathable.
**Beeswax or saddle soap** rubbed into the edge before the final burnish gives the highest gloss and the best water resistance. The friction melts the wax into the fibres. This is the finish on a good belt.
**Edge paint** is a flexible acrylic that sits on top rather than soaking in. Necessary on chrome tan, optional on vegetable tan, and the usual choice when the edge must be a colour the leather is not.
Order matters: **dye first, then burnish.** Dye will not penetrate a burnished edge, so an edge burnished before dyeing stays pale. This is the commonest order-of-operations mistake after trying to punch holes in a finished piece.
이 단계의 재료:
 트라가칸트 검 (키트레)1 개
 밀랍1 개
밀랍1 개 가죽 염료1 개식물 탄닌 가죽1 개
필요한 도구:
마노 광내기 도구4
4
Reading a bad edge
Reading a bad edge
Every edge fault has one cause, and they are worth knowing because the fix is usually to go back a step rather than to burnish harder.
**Fuzzy and will not shine.** Either the leather is not vegetable tanned, or the edge was too dry, or there was not enough friction. Try more water and more speed first.
**Shiny in patches.** Uneven pressure, or the edge was not sanded flat before starting. Sand it back and begin again.
**Dark spots spreading onto the grain.** Too much water. It will mostly dry out on vegetable tan and it may not go entirely.
**A visible step between two glued layers.** They were not sanded together. Sand them as one edge before bevelling.
**A ragged edge that will not sand true.** The original cut was bevelled — the knife was leaning. Nothing fixes that except cutting the piece narrower, which is why the cutting rung insists on a vertical blade.
**Cracked after a few months.** Over-burnished and dried too hard, with no oil in the leather. A light dressing of oil before the final burnish prevents it.
이 단계의 재료:
식물 탄닌 가죽2 개필요한 도구:
마노 광내기 도구모서리 따는 공구재료
5- 2 개플레이스홀더
- 1 개플레이스홀더
- 플레이스홀더
- 1 개플레이스홀더
- 1 개플레이스홀더
관련 블루프린트
이 블루프린트들은 지식을 공유합니다 — 기술, 재료 또는 원리
CC0 퍼블릭 도메인
이 블루프린트는 CC0로 공개되었습니다. 어떤 목적으로든 자유롭게 복사, 수정, 배포 및 사용할 수 있습니다.
제품 구매를 통해 메이커를 지원하세요. 판매자가 설정한 메이커 커미션 을 받거나, 이 블루프린트의 새로운 반복을 만들어 연결로 포함시킬 수 있습니다.