협업
예술
뷰티 및 웰니스
공예
문화 및 역사
엔터테인먼트
환경
음식 및 음료
역공학
과학
스포츠
기술
웨어러블
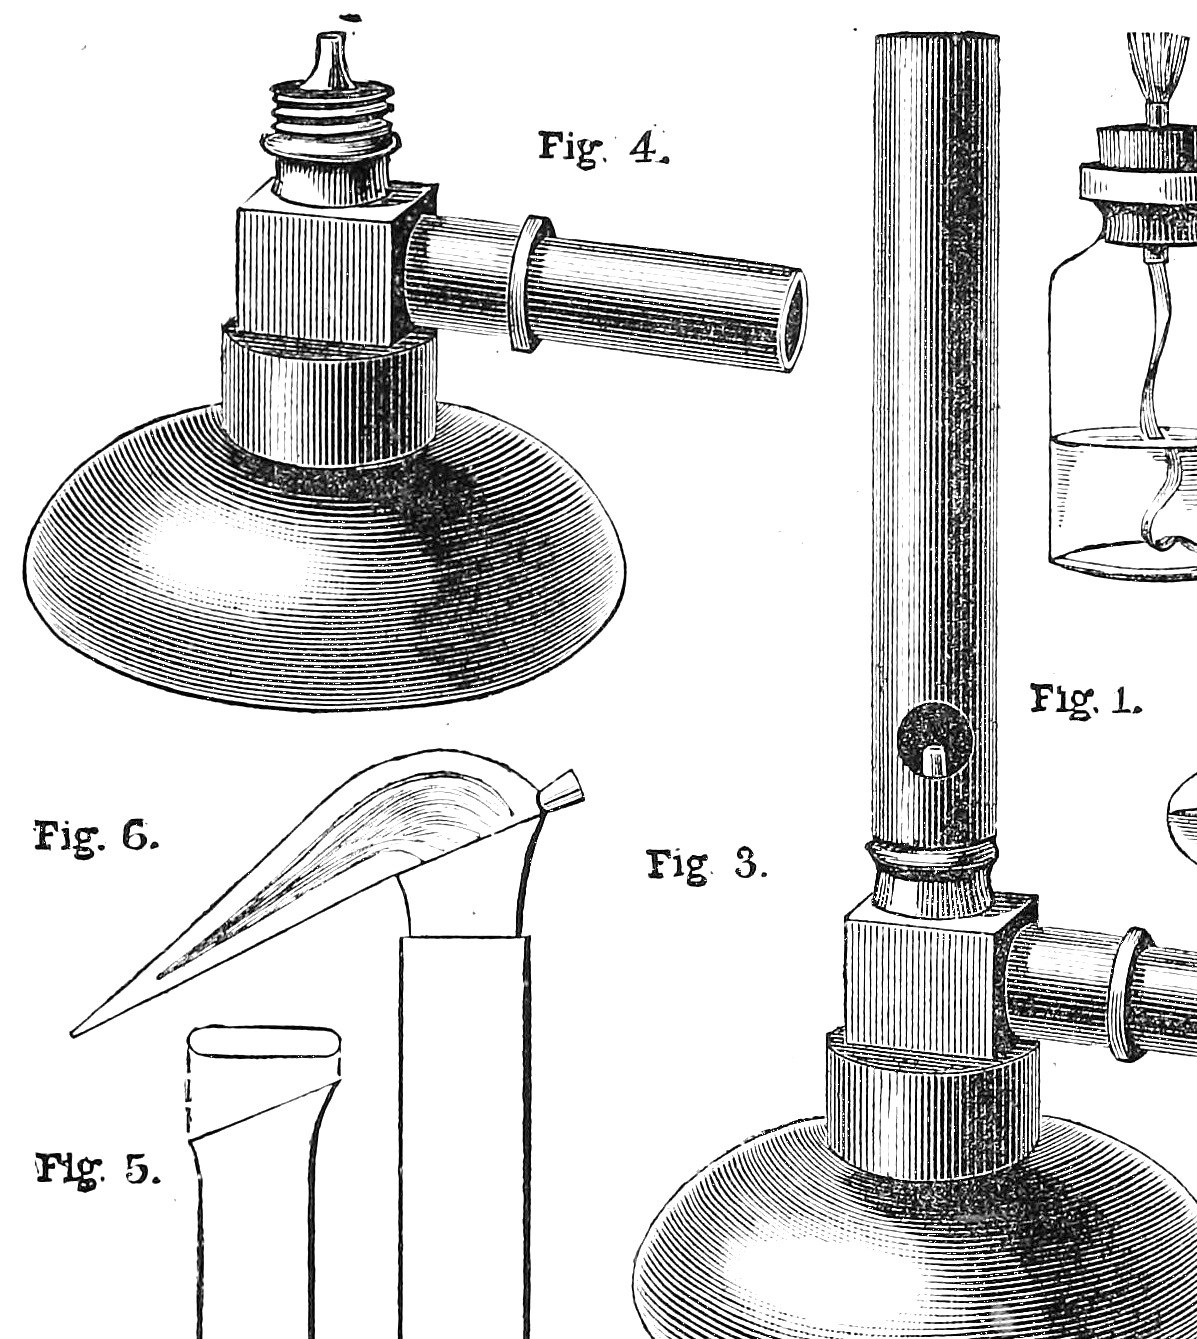


Gas Burner: a Home-Made Bunsen Burner from Brass Tube (Work, 1892)
A Bunsen burner: gas from a fine jet draws air in through two holes at the foot of an upright tube, and the mixture burns at the top with a hot blue flame that leaves no soot. H. B. Stocks (Work, 1892) makes one from a 3 1/2 in. brass tube 1/2 in. across, a short 3/8 in. tube for the gas, a brass boss and elbow from a gas bracket, and a bit of fine-bore tube from an old oil-can as the jet.
A sliding brass collar over the air-holes sets the flame.
Source: H. B. Stocks, How to Make a Cheap Spirit Lamp, Bunsen Burner, Blowpipes, etc., Work No. 167 (28 May 1892), p. 167. Picture: his Figs. 3-4.
중급
Unknown
안내
1
1
Read Stocks
Read Stocks
"To make a Bunsen burner the following materials will be necessary:—A piece of brass tube 3 1/2 in. long, 1/2 in. diameter (external); a piece of tube 3/8 in. in diameter, 1 1/2 in. long; a brass boss similar to those on an ordinary bracket, but without a tap; a brass elbow tube; also a piece of tubing with very fine bore (small bit of tube from an old oil-can will do)."
2
2
Solder the elbow on the boss
Solder the elbow on the boss
Solder the brass elbow-piece onto the brass boss, with the tube that has a screw cut for a gallery uppermost.
이 단계의 재료:
 나사식 배관 이음쇠2 boss and elbow
 주석-납 땜납1 joint
 플럭스1 joint
필요한 도구:
 인두
3
3
Fit the jet
Fit the jet
Cut the fine-bore tube 3/4 in. to 1 in. long and solder it inside the vertical tube of the elbow-piece so it projects about 1/2 in. If it is too small for the hole, plug round it with a little sheet lead, keeping it perfectly vertical and in the centre of the outer tube, then solder. The metal of the oil-can tube is not given (unknown).
이 단계의 재료:
 알 수 없는 금속1 fine-bore tube
 납판1 packing주석-납 땜납1 joint
필요한 도구:
인두 판금 가위
4
4
Make the burner tube
Make the burner tube
Take the brass tube 3 1/2 in. long, 1/2 in. across. If it is not of very thick brass it will be a little too large: turn a piece of very thin sheet brass 1/2 in. by 1 1/4 in. into a cylinder and solder it inside one end. Tap that end inside to screw onto the male thread of the elbow-piece. At the same end drill two holes about 3/8 in. across, exactly opposite each other, their centres 5/8 in. from the end: the air-holes.
이 단계의 재료:
 황동관 바깥지름 1/2인치1 3 1/2 in.
 황동판1 1/2 x 1 1/4 in.주석-납 땜납1 joint
필요한 도구:
판금 가위인두 나사내기 탭·다이스 세트
 탭 핸들
 손 드릴
5
5
Assemble and test
Assemble and test
Screw the burner tube onto the elbow-piece and screw the 3/8 in. tube, 1 1/2 in. long, into the side opening. Push the india-rubber tube from the gas supply onto the side tube and light. A purplish-blue flame means air and gas are in the right proportion. A yellow tip means too much gas: plug the hole in the jet slightly.
이 단계의 재료:
 바깥지름 9.5 mm 황동관1 1 1/2 in.
필요한 도구:
 고무관
6
6
Fit the air collar
Fit the air collar
If the gas burns with a green flame and a hissing noise, the air-holes are too large. Cut sheet brass about 3/4 in. wide and 1 3/4 in. long and drill two holes 3/8 in. across, 1/2 in. from each end (their centres 3/16 in. further in). Turn it into a tube and push it onto the burner tube over the air-holes. Turn it until the two sets of holes do not quite match, so the right amount of air reaches the burner.
이 단계의 재료:
황동판1 3/4 x 1 3/4 in.필요한 도구:
판금 가위손 드릴재료
8- 2 boss and elbow플레이스홀더
- 3 joint플레이스홀더
- 1 joint플레이스홀더
- 1 fine-bore tube플레이스홀더
- 1 packing플레이스홀더
- 1 3 1/2 in.플레이스홀더
- 1 3/4 x 1 3/4 in.플레이스홀더
- 1 1 1/2 in.플레이스홀더
이 블루프린트로 만드는 것

CC0 퍼블릭 도메인
이 블루프린트는 CC0로 공개되었습니다. 어떤 목적으로든 자유롭게 복사, 수정, 배포 및 사용할 수 있습니다.
제품 구매를 통해 메이커를 지원하세요. 판매자가 설정한 메이커 커미션 을 받거나, 이 블루프린트의 새로운 반복을 만들어 연결로 포함시킬 수 있습니다.