

Halftone Screen
A printing press can only do two things at any point on the paper: put ink there, or not. It has no grey. Yet newspapers printed photographs. The halftone screen is how.
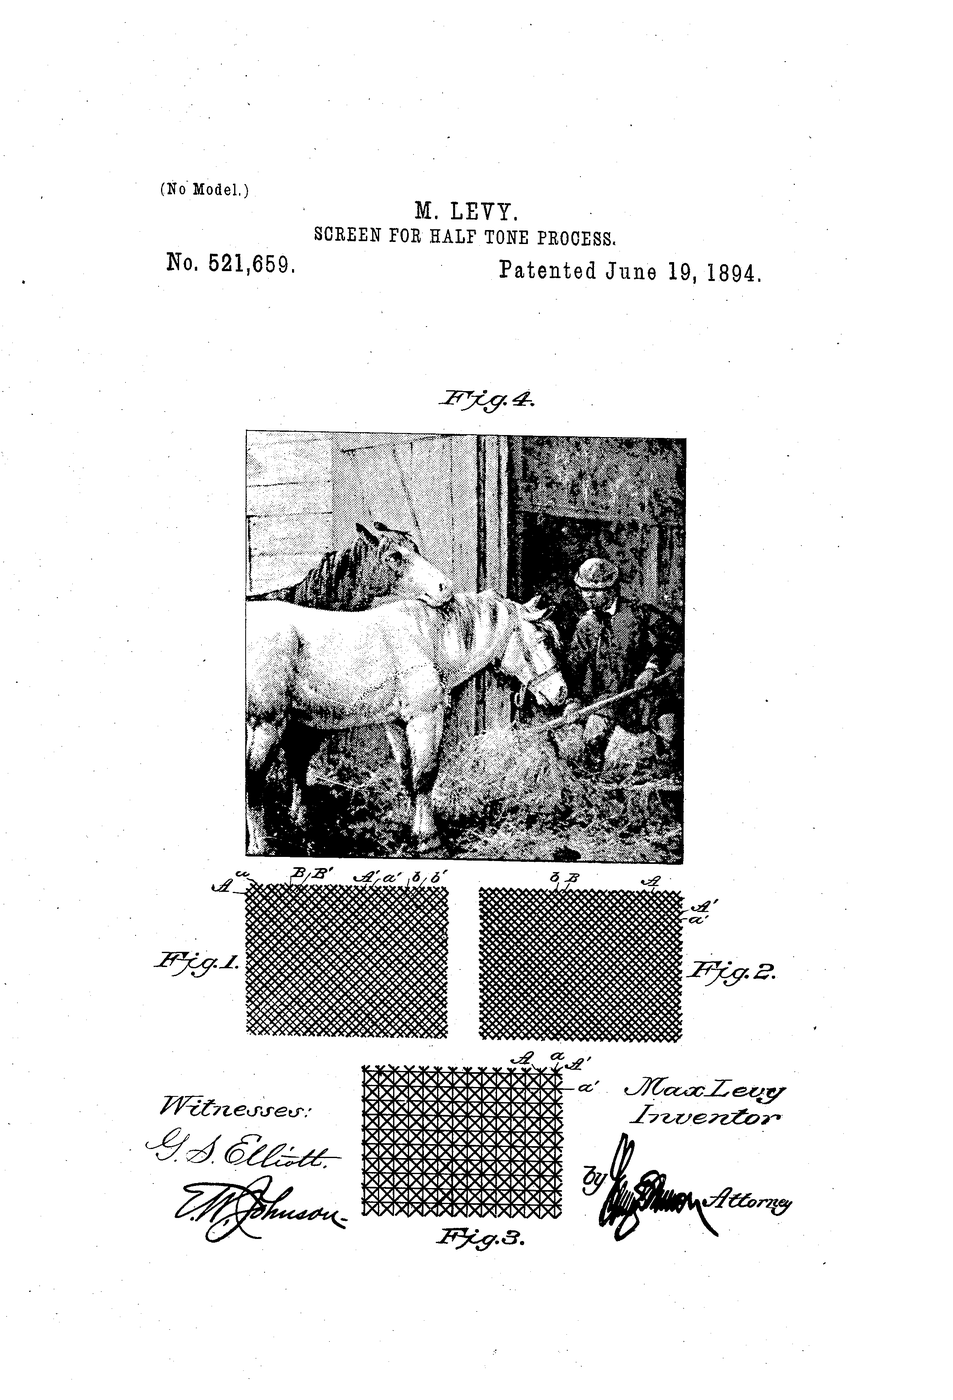
Break the image into dots too small for the eye to resolve, and vary their size. Big dots read as dark, small dots as light, and the eye averages them into continuous tone. Max Levy's US 521,659, “Screen for Half-Tone Process”, granted 19 June 1894 (filed 1 March 1894) claims a specific refinement: lines of varying thickness and spacing, crossed so as to form “transparent apertures of varying sizes arranged in groups”.
The Levy workshop in Philadelphia made these by coating optical glass with lacquer, ruling through it, etching the lines with hydrofluoric acid, filling them with an opaque compound, and cementing two plates face to face with their rulings at 90°. This blueprint builds a working screen safely, with no acid, and measures the dot-size-to-tone relationship directly.
안내
Prove the press has no grey
Prove the press has no grey
Ink the brayer and roll it once, firmly, on paper. The ink is one density everywhere it touches. There is no half-ink. Write down what that means for printing a photograph.
이 단계의 재료:
 판화 잉크2 ml
 종이1 장
종이1 장필요한 도구:
 고무 잉크 롤러
Look at a real printed photograph
Look at a real printed photograph
Examine a newspaper or magazine photo under the magnifying glass. Find the dots. Note that they sit on a regular grid but differ in size.
필요한 도구:
 돋보기
돋보기Rule the first line plate
Rule the first line plate
On tracing paper, rule parallel ink lines 2 mm apart across a 100 mm square. Keep them straight and evenly spaced.
이 단계의 재료:
 패턴 트레이싱지 롤1 장판화 잉크1 ml
필요한 도구:
 자
자Rule the second plate with varying thickness
Rule the second plate with varying thickness
On a second sheet, rule lines 2 mm apart but alternate thick and thin. This is Levy's actual claim — varying line thickness, not uniform ruling.
이 단계의 재료:
패턴 트레이싱지 롤1 장판화 잉크1 ml필요한 도구:
자Cross them at 90°
Cross them at 90°
Lay the second sheet over the first with the rulings at right angles. Hold to the light. You now have a grid of transparent apertures — and because one set alternates, the apertures come in different sizes, in groups. That is US 521,659.
필요한 도구:
돋보기Make a grey wedge to photograph
Make a grey wedge to photograph
Paint a strip on watercolour paper grading from near-white to near-black in five steps.
이 단계의 재료:
 수채화 용지1 장판화 잉크3 ml
Photograph the wedge through the screen
Photograph the wedge through the screen
Hold the crossed screen a few millimetres above the wedge and photograph it with a phone camera. Keep the screen parallel to the paper.
Inspect the captured dots
Inspect the captured dots
Zoom in on the photograph. In the light zone the dots are small; in the dark zone they merge. Tone became dot size.
필요한 도구:
돋보기Measure dot size against tone
Measure dot size against tone
For each of the five wedge steps, measure the dot width on screen. Tabulate tone versus dot size — this is the transfer curve every printer still works with.
필요한 도구:
자Find the screen ruling
Find the screen ruling
Count lines per centimetre on your screen and convert to lines per inch. Levy's commercial screens ran from about 65 to 175 lines per inch; the linked Science Museum example is 133.
필요한 도구:
자돋보기Rotate one plate to 45°
Rotate one plate to 45°
Turn the top sheet to 45°. Levy's Figure 3 claims four sets of lines with the second pair crossing diagonally. Note how the pattern regularity changes.
Create a moiré on purpose
Create a moiré on purpose
Now rotate slowly through small angles and watch interference bands appear. Moiré is the failure mode that dictates screen angles in colour printing to this day.
Print through your screen
Print through your screen
Ink the brayer lightly, roll over the crossed screen onto paper, and lift. You have physically screened an area of flat tone into dots.
이 단계의 재료:
판화 잉크2 ml종이1 장필요한 도구:
고무 잉크 롤러History & Context
History & Context
US 521,659, “Screen for Half-Tone Process”, granted 19 June 1894, filed 1 March 1894.
The patent names Max Levy alone. This is worth stating carefully. Max and his brother Louis Levy together produced the first commercial halftone screens in Philadelphia in 1890, and the credit for that work is genuinely joint. But this particular document carries one inventor. Sources that describe “the Levy brothers' patent” are compressing a company into a filing — the same confusion that surrounds the so-called Rice–Kellogg loudspeaker patent, which likewise names one man.
The Levys' screens were good enough that, as Britannica puts it, there has been no significant change in the method of making halftone screens since. Their manufacturing process — rule, etch with hydrofluoric acid, fill, cement at 90° — remained standard for decades.
Halftone predates Levy. Frederic Eugene Ives patented halftone processes in 1881 and introduced an improved screen in 1885, and credited himself with the first crossline screen made by cementing two single-line screens with Canada balsam. Levy's contribution is the screen's manufacture and geometry, not the idea of screening. Do not read this patent as the invention of the halftone.
What survives today: every printed photograph you have ever seen, and the CMYK screen angles chosen specifically to keep the moiré you produced in step 12 from appearing.
연결된 블루프린트 재료

관련 블루프린트
이 블루프린트들은 지식을 공유합니다 — 기술, 재료 또는 원리

CC0 퍼블릭 도메인
이 블루프린트는 CC0로 공개되었습니다. 어떤 목적으로든 자유롭게 복사, 수정, 배포 및 사용할 수 있습니다.
제품 구매를 통해 메이커를 지원하세요. 판매자가 설정한 메이커 커미션 을 받거나, 이 블루프린트의 새로운 반복을 만들어 연결로 포함시킬 수 있습니다.