예술
뷰티 및 웰니스
공예
문화 및 역사
엔터테인먼트
환경
음식 및 음료
역공학
과학
스포츠
기술
웨어러블
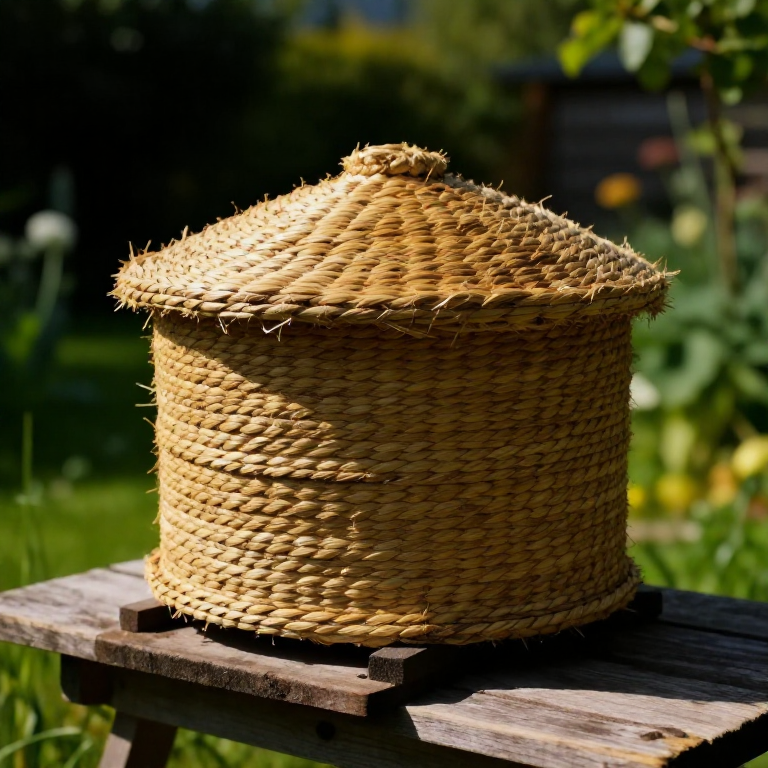
Making a Coiled-Straw Bee Skep — The Traditional Beehive Before Wooden Boxes
The bee skep is the coiled-straw beehive that housed honeybees across Europe for roughly two thousand years, from antiquity into the 1800s, before wooden box hives replaced it. Using the same coiling technique as a straw basket, long rye straw is wound into a dome and stitched together with split cane. This blueprint builds a traditional skep by hand — from preparing the straw to the finished, weatherproofed hive ready to house a swarm.
중급
8
안내
1
1
Harvest and clean long rye straw
Harvest and clean long rye straw
Cut long rye or wheat straw and strip off the seed heads and leaf sheaths, keeping the hollow stems long and unbroken for strong coils.
이 단계의 재료:
 Rye Straw1 묶음
필요한 도구:
 Knife
Knife2
2
Split and soak the binding cane
Split and soak the binding cane
Split lengths of cane into thin flexible strips and soak them in water until pliable — these will sew the straw coils together.
이 단계의 재료:
 Split Cane1 묶음
 Water3 리터
필요한 도구:
Knife3
3
Make the girth gauge
Make the girth gauge
Form a small open ring about 2.5 cm across (the traditional 'girth', often a cow-horn tip). Straw fed through it keeps every coil the same thickness.
필요한 도구:
 Skep Girth Gauge
4
4
Bind the crown
Bind the crown
Take a small handful of straw, bend it into a tight knot to form the top knob of the skep, and lash it firmly with a strip of split cane.
이 단계의 재료:
Rye Straw1 묶음Split Cane1 미터필요한 도구:
 Awl
Awl5
5
Feed straw into an even rope
Feed straw into an even rope
Pass straw through the girth to form a continuous rope of even thickness, adding a few stems at a time so the bundle never thins as you work.
이 단계의 재료:
Rye Straw1 묶음필요한 도구:
Skep Girth Gauge6
6
Sew the first coils to the crown
Sew the first coils to the crown
Coil the straw rope in a tight spiral around the crown. Push the awl through the coil below, pass split cane through, and pull each stitch snug about every 2 cm.
이 단계의 재료:
Split Cane1 미터필요한 도구:
Awl7
7
Spiral outward to start the dome
Spiral outward to start the dome
Continue spiralling outward from the crown, binding each new coil to the one below. The domed top of the hive begins to take shape.
이 단계의 재료:
Rye Straw1 묶음Split Cane1 미터필요한 도구:
Awl8
8
Build the domed wall downward
Build the domed wall downward
Work the spiral down and out to build the wall, keeping the girth on the rope to hold thickness and every binding stitch tight and evenly spaced.
이 단계의 재료:
Rye Straw1 묶음Split Cane1 미터필요한 도구:
AwlSkep Girth Gauge9
9
Keep the courses even
Keep the courses even
Control how far each coil steps outward so the dome stays smooth and symmetrical. Steady, even courses make a strong, weathertight hive.
이 단계의 재료:
Rye Straw1 묶음필요한 도구:
Awl10
10
Widen to the finished base
Widen to the finished base
As you near the bottom, let the coils reach the finished diameter of about 35–40 cm — the standard size for a colony of bees.
이 단계의 재료:
Rye Straw1 묶음Split Cane1 미터필요한 도구:
Awl11
11
Cut the flight entrance
Cut the flight entrance
At the lower edge, cut a small entrance notch in a coil so the bees can come and go once the skep is set open-side down.
필요한 도구:
Knife12
12
Finish and lock the base coil
Finish and lock the base coil
Complete the last coil at the base, taper off the straw rope, and lock the final binding stitches so the skep cannot unravel.
이 단계의 재료:
Split Cane1 미터필요한 도구:
Awl13
13
Trim the skep clean
Trim the skep clean
Trim protruding straw ends and stray cane with the knife to leave a clean rim and an even outer surface.
필요한 도구:
Knife14
14
Clom the outside for weatherproofing
Clom the outside for weatherproofing
Smear a thin coat of cow-dung-and-clay daub over the straw to shed rain and seal drafts, then let it dry — the traditional 'clomming'.
이 단계의 재료:
 Cow Dung2 kg
 Ball Clay1 kg
15
15
Cure the finished skep
Cure the finished skep
Cure the skep in a dry, airy place. Once fully dry it is ready to hive a swarm — set open-side down on a board or stand.
재료
6- 1 묶음플레이스홀더
- 6 미터플레이스홀더
연결된 블루프린트 재료
관련 블루프린트
이 블루프린트들은 지식을 공유합니다 — 기술, 재료 또는 원리
Related blueprints
Other builds that share materials, tools, or techniques with this one.
Saving Lettuce Seeds — Letting the Leaf Crop Bolt
Making a Sistrum — The Sacred Rattle of Ancient Egypt

Making a Leather Sling — The Shepherd's Projectile Weaponsurvival

Making a Bronze Awl — The Leatherworker's Piercing ToolMetalworking
Making a Fire-Hardened Hunting Spear — The Oldest Weaponsurvival

Making a Leather Belt from Scratch — Step-by-Step LeatherworkingTextiles
CC0 퍼블릭 도메인
이 블루프린트는 CC0로 공개되었습니다. 어떤 목적으로든 자유롭게 복사, 수정, 배포 및 사용할 수 있습니다.
제품 구매를 통해 메이커를 지원하세요. 판매자가 설정한 메이커 커미션 을 받거나, 이 블루프린트의 새로운 반복을 만들어 연결로 포함시킬 수 있습니다.