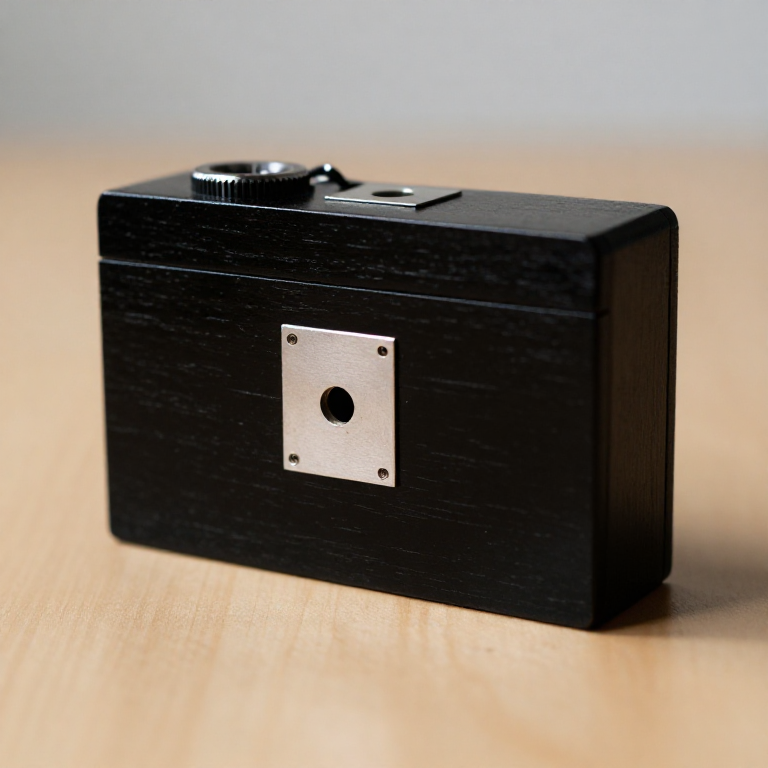


Pinhole Camera
A camera with no lens. A light-tight box, a hole a fraction of a millimetre across, and film or paper at the back. Every point of the scene sends one narrow pencil of light through the hole, and those pencils land in order and upside down.
The hole size is the whole design problem, and it pulls two ways. Smaller is sharper — until it isn't. Below a certain diameter diffraction spreads the light back out and the image softens again. There is an optimum, it depends on the focal length, and Lord Rayleigh worked it out in 1891: roughly d = 2√(fλ).
Everything else follows from having no lens: no focus to set, enormous depth of field, and exposures measured in seconds or minutes rather than fractions.
안내
Choose the box and fix the focal length
Choose the box and fix the focal length
Take a rigid box and measure the distance from the front face to the back — that distance is the focal length. A 100 mm box is a good first choice: wide angle, and short enough to keep exposures sensible.
이 단계의 재료:
 Cardboard Tube1 개
필요한 도구:
 Measuring Ruler
Calculate the optimal pinhole diameter
Calculate the optimal pinhole diameter
Use d = 2√(fλ) with λ = 0.00055 mm for green light. At f = 100 mm that gives d ≈ 0.47 mm. Do the arithmetic for your own box before making anything.
Make the pinhole in thin metal
Make the pinhole in thin metal
Take a piece of aluminium from a drinks can and dimple it with a needle — do not push through. Thin material is essential: a hole in thick card is a short tunnel and it vignettes the edges of the frame.
이 단계의 재료:
 Aluminium Foil1 장
필요한 도구:
 Sewing Needle
Sand the dimple through and deburr
Sand the dimple through and deburr
Sand the back of the dimple until the tip just opens, then turn it over and sand again lightly. A ragged edge scatters light into the image and is the commonest cause of a soft, flarey result.
필요한 도구:
 Sandpaper
Measure the hole you actually made
Measure the hole you actually made
Photograph or scan the pinhole against a ruler and measure it, or project sunlight through it onto a wall and compare. The hole you made is never quite the hole you calculated, and the real number is what sets your exposures.
Blacken the inside of the box
Blacken the inside of the box
Paint the entire interior matt black, including the inside of the lid. Any pale surface bounces light around and lays a grey fog over the picture.
이 단계의 재료:
 Spray Paint1 개
Mount the pinhole centred
Mount the pinhole centred
Cut a window in the front of the box and tape the metal pinhole over it, centred on the film area. Off-centre gives an off-centre image circle and one dark corner.
Make a shutter that does not shake the box
Make a shutter that does not shake the box
Tape a flap of card over the pinhole, hinged at the top. Open and close it by lifting, not by sliding — anything that nudges the camera during a ten-second exposure blurs the whole frame.
Light-proof every seam
Light-proof every seam
Tape every joint and edge, then take the closed box into bright sun and look for pinpricks of light from inside in the dark. One unnoticed leak fogs every exposure you make.
Load photographic paper in the dark
Load photographic paper in the dark
In a dark room under a red safelight, tape a sheet of black-and-white photographic paper to the inside back, emulsion facing the pinhole. Paper is far easier than film for a first camera and gives a paper negative.
이 단계의 재료:
 Photographic Paper1 장
Work out the f-number
Work out the f-number
Divide focal length by hole diameter: 100 mm ÷ 0.47 mm ≈ f/213. That is a very small aperture, which is precisely why pinhole exposures are long — and why nothing ever needs focusing.
Expose by bracketing, not by guessing
Expose by bracketing, not by guessing
In bright sun with paper, start around 30 seconds, then take further frames at 15 s, 60 s and 120 s. Photographic paper is slow and its speed is not marked — bracketing is measurement, and one exposure tells you nothing.
필요한 도구:
 Stopwatch
Develop the paper negative
Develop the paper negative
Develop, stop and fix the paper under a safelight, then wash it. The result is a negative: light subjects dark, dark subjects light, and the image the right way round because the paper was upside down at the back of the box.
Contact print it to a positive
Contact print it to a positive
Lay the dry negative face down on a fresh sheet under glass and expose it to a brief flash of light, then develop that. Two negatives make a positive, which is exactly the logic of the whole paper-negative process.
Test the theory: make a hole twice as big
Test the theory: make a hole twice as big
Build a second pinhole at 1 mm and shoot the same scene. It is brighter and needs a quarter of the exposure — and visibly softer, because now geometry rather than diffraction is limiting you. That comparison is the Rayleigh formula, demonstrated.
History & Context
History & Context
The effect is ancient; the camera is not. That light through a small hole projects an inverted image was described long before photography — the camera obscura is a room-sized version used for observation and drawing for centuries. A pinhole camera only becomes possible once there is something to record the image on, which means the nineteenth century.
Rayleigh did the optics. In an 1891 paper Lord Rayleigh calculated the diameter giving best resolution as 2√(fλ), with λ generally taken as 0.00055 mm for green light. In a second 1891 paper he gave 1.9√(fλ). The two differ by about five per cent, which is smaller than the error in most hand-made pinholes — worth knowing before treating any single formula as exact. Later work gives separate optima for resolution and for contrast, and adjusts for object distance.
Why there is an optimum at all. Two effects run in opposite directions. Geometrically, a smaller hole means each point of the scene casts a smaller blur circle, so sharper. But light diffracts at an aperture, and the smaller the hole the wider it spreads — so below the optimum the image gets softer again. The best pinhole is the size where the two curves cross.
What the lack of a lens buys you. No focusing, and depth of field from a few centimetres to infinity simultaneously — a lens cannot do that. No chromatic aberration either, since nothing is being refracted. What you pay is light: at f/200 exposures run into seconds and minutes, which is why pinhole photographs of streets are empty of people and full of ghosts.
재료
4- 플레이스홀더
- 플레이스홀더
- 플레이스홀더
- 플레이스홀더

CC0 퍼블릭 도메인
이 블루프린트는 CC0로 공개되었습니다. 어떤 목적으로든 자유롭게 복사, 수정, 배포 및 사용할 수 있습니다.
제품 구매를 통해 메이커를 지원하세요. 판매자가 설정한 메이커 커미션 을 받거나, 이 블루프린트의 새로운 반복을 만들어 연결로 포함시킬 수 있습니다.