협업
예술
뷰티 및 웰니스
공예
문화 및 역사
엔터테인먼트
환경
음식 및 음료
역공학
과학
스포츠
기술
웨어러블
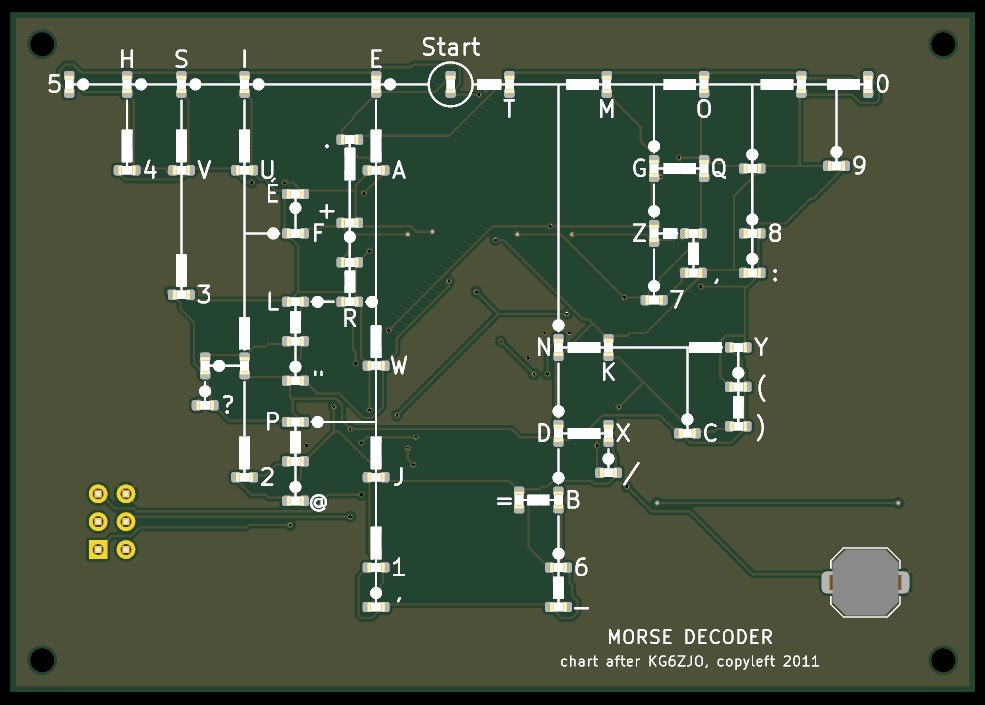


Pocket Morse Code Learning Board - v.2
The complete pocket Morse decoder, 88 x 62 mm: every letter, the figures 0-9, the thirteen punctuation signs of the international code and the accented E, each with its own LED on Dave Nathanson's decoding chart. Press the key short for a dot and long for a dash, and the LED of the character you have reached lights; pause, and it blinks.
It runs on one CR2032 coin cell and sleeps between uses. The board was drawn with Youblob's Draw PCB, and its checks pass, but it has not been built yet.
고급
About 1 day, plus board delivery
안내
1
1
LED current and keying speed
LED current and keying speed
Jupyter 노트북 불러오는 중…
2
2
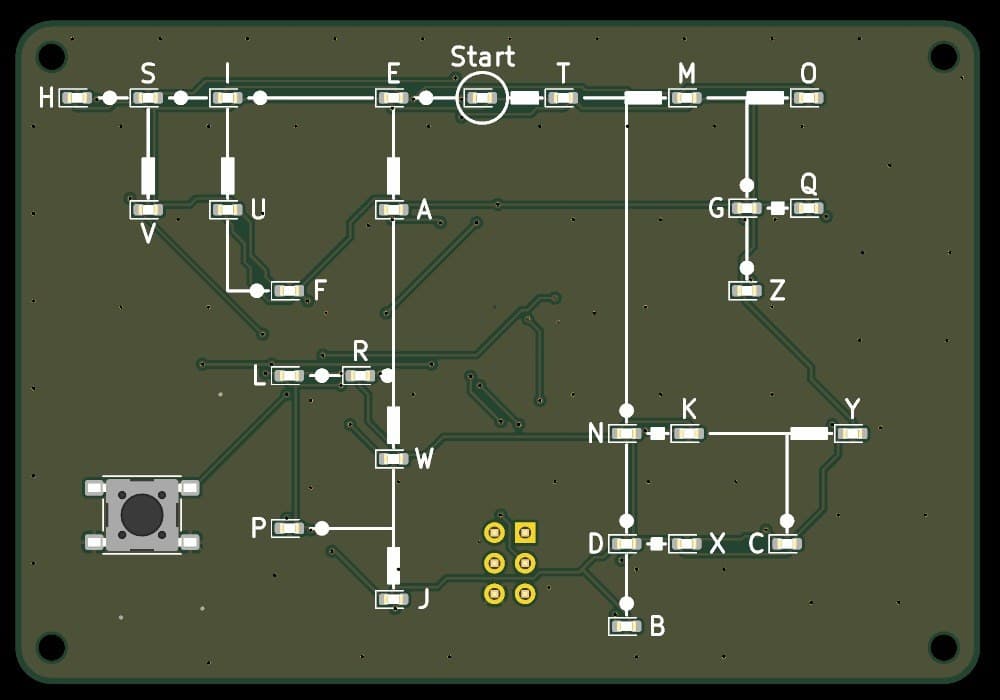
The letters-only board, before it
The letters-only board, before it
The same design with 27 LEDs. This one adds the figures and the signs, 59 LEDs in all.
3
3
Read the chart
Read the chart
Dave Nathanson's (KG6ZJO) complete chart adds the figures to his letters: "A-Z and Numbers (I left off the punctuation & symbols for simplicity)". This board adds them back from ITU-R M.1677-1 on new branches: . , : ? ' - / ( ) " = + @ and the accented E. Eight unlabelled LEDs are waypoints on the way to a figure or sign.
4
4
The schematic
The schematic
ATmega328P on its internal 8 MHz clock, straight from the coin cell; 59 LEDs charlieplexed on nine lines (PC0-PC5, PD0, PD1, PD3) through 300 Ω resistors; the key on INT0; a 2x3 ISP footprint.
KiCanvas 뷰어 로딩 중...
전문 PCB 디자인 뷰어
5
5
The board
The board
Two layers, 88 x 62 mm. The chart, LEDs and key on the front; the chip, resistors, capacitors and cell holder on the back.
KiCanvas 뷰어 로딩 중...
전문 PCB 디자인 뷰어
6
6
Order the board
Order the board
Open the board in KiCad and plot Gerber and drill files (File > Fabrication Outputs). Order a two-layer board, 1.6 mm thick, from any board maker that takes Gerbers.
이 단계의 재료:
 인쇄 회로 기판1 개
필요한 도구:
 Arduino IDE가 설치된 컴퓨터
7
7
Solder the parts
Solder the parts
Back first: paste and reflow U1, R1-R10, C1-C3 and the cell holder BT1 with hot air. Then the front: the 59 red LEDs D1-D59 with pad 1 (cathode) as the board's assembly drawing shows, and the key SW1, a two-pad 6 x 6 mm switch to match its footprint. J1 is optional. Clean off the flux, then test each LED's direction with the meter's diode test.
이 단계의 재료:
 ATmega328P 마이크로컨트롤러1 개
 칩 LED59 개
 칩 저항10 개
 세라믹 칩 커패시터3 개
 푸시 버튼1 개
 건전지 홀더1 개
 솔더 페이스트 (무연)1 개
 땜납 선1 개
필요한 도구:
 열풍 리워크 스테이션
 인두
 끝이 뾰족한 핀셋
 플럭스
 돋보기
 멀티미터
 이소프로필 알코올 99 %
8
8
The firmware
The firmware
pocket_morse_decoder_complete.ino: every timing is a named constant at the top of the sketch. Board in the Arduino IDE: Arduino Pro or Pro Mini, ATmega328P (3.3V, 8 MHz).
pocket_morse_decoder_complete.inoarduino
9
9
Set the fuses and upload
Set the fuses and upload
Do not use Burn Bootloader: the Pro board setting expects a crystal, and this board has none. Hold an ISP programmer's 2x3 pins on J1 and set the internal 8 MHz clock: avrdude -c usbasp -p m328p -U lfuse:w:0xE2:m -U hfuse:w:0xD9:m -U efuse:w:0xFF:m. Then, in the Arduino IDE, use Sketch > Upload Using Programmer.
필요한 도구:
 AVR ISP 프로그래머Arduino IDE가 설치된 컴퓨터
10
10
Print the back shell
Print the back shell
An open-front tray, 92.6 x 66.6 x 8.3 mm, with four standoffs for M2 screws, a notch and floor opening to slide the cell out and an opening under J1. PLA, 0.2 mm layers, 20 % infill, printed on its floor.
11
11
Fit the shell
Fit the shell
The standoffs hold the board 6.7 mm above the floor: measure your cell holder with a cell in it before you print. Check the holder's open end faces the board's bottom edge, where the shell's cell notch is. Slide in a CR2032 and screw the board into the shell with four M2 x 8 self-tapping screws.
이 단계의 재료:
 PLA 필라멘트1 개
 태핑 나사4 개
 CR2032 코인 전지1 개
필요한 도구:
 FDM 3D 프린터
 버니어 캘리퍼스
 정밀 드라이버 세트
12
12
Troubleshooting
Troubleshooting
Pocket Morse decoder troubleshooting.
Flow
Loading...
13
13
History and honest limits
History and honest limits
The letters and figures follow **Dave Nathanson**'s (KG6ZJO) complete chart of 2011, shared as copyleft. Where the signs sit is ours; their codes are ITU-R M.1677-1's. The board, sizes, parts and timings are ours, drawn with Youblob's Draw PCB: its ERC and DRC pass with no errors and every LED's wiring, code and label was checked against the firmware by script, but it has not been built, flashed or tested.
재료
12- 1 개플레이스홀더
- 플레이스홀더
- 59 개플레이스홀더
- 10 개플레이스홀더
- 3 개플레이스홀더
- 플레이스홀더
- 플레이스홀더
- 1 개플레이스홀더
- 1 개플레이스홀더
- 1 개플레이스홀더
- 4 개플레이스홀더
- 1 개플레이스홀더
필요 도구
12- 플레이스홀더
- 플레이스홀더
- 2 vendors sell this, none ship to you yet플레이스홀더
- 플레이스홀더
- 플레이스홀더
- 플레이스홀더
- 플레이스홀더
- 플레이스홀더
- 플레이스홀더
- 플레이스홀더
- 플레이스홀더
- 플레이스홀더
이 블루프린트로 만드는 것

관련 블루프린트
이 블루프린트들은 지식을 공유합니다 — 기술, 재료 또는 원리


CC0 퍼블릭 도메인
이 블루프린트는 CC0로 공개되었습니다. 어떤 목적으로든 자유롭게 복사, 수정, 배포 및 사용할 수 있습니다.
제품 구매를 통해 메이커를 지원하세요. 판매자가 설정한 메이커 커미션 을 받거나, 이 블루프린트의 새로운 반복을 만들어 연결로 포함시킬 수 있습니다.