협업
예술
뷰티 및 웰니스
공예
문화 및 역사
엔터테인먼트
환경
음식 및 음료
역공학
과학
스포츠
기술
웨어러블
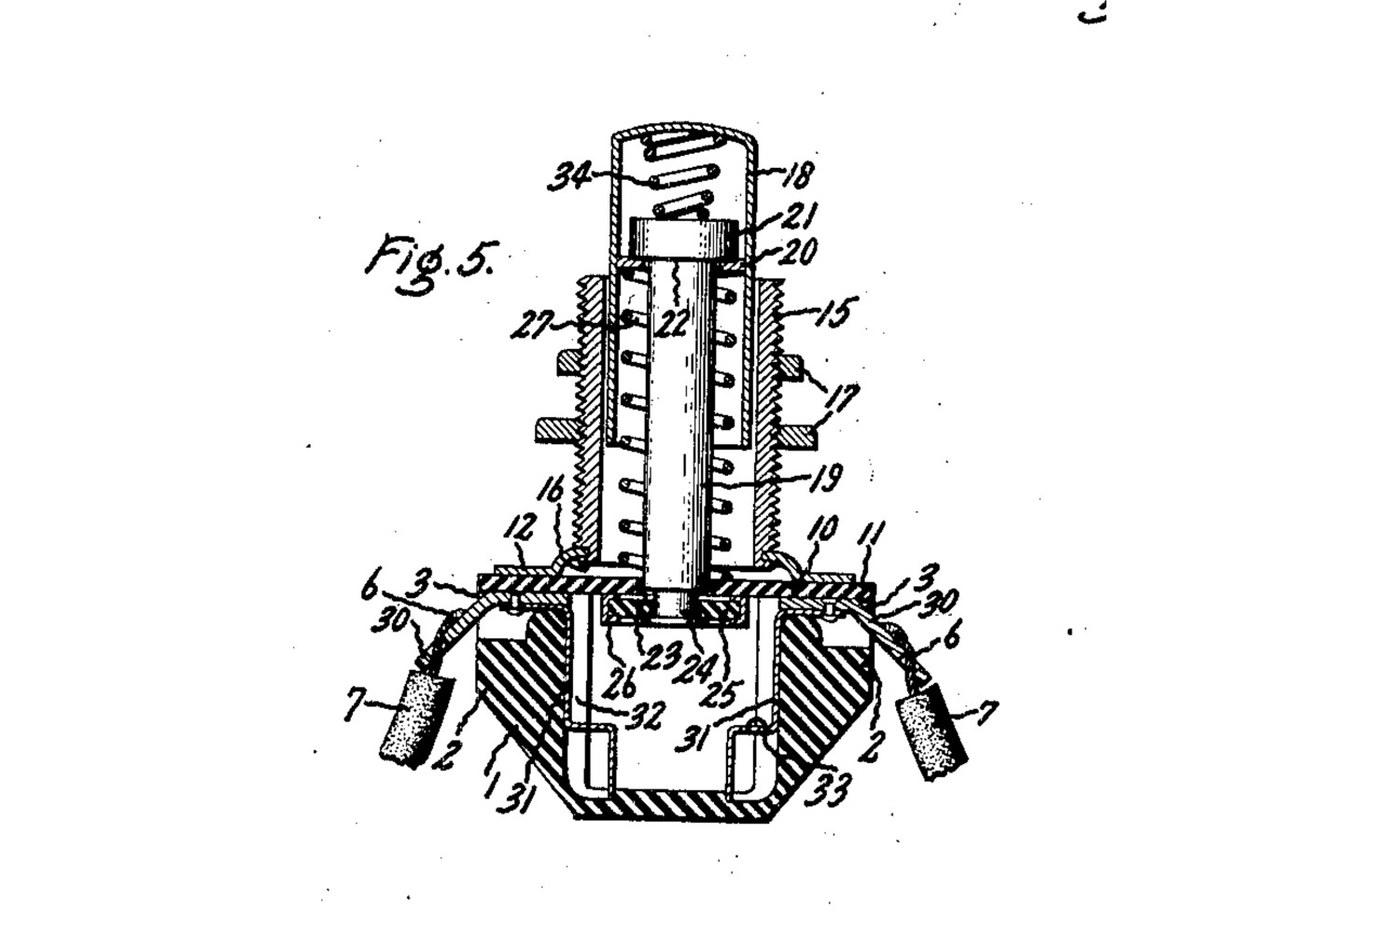


Push Button: Normally Open Momentary Switch with a Cushioned Contact (De Reamer, GE 1939)
A panel push button that closes a circuit only while you press it. A spring holds the button out, and a metal rim on the end of its rod sits clear of two contacts. Press it and the rim bridges both contacts. A second spring inside the button lets the rod give, so the contacts never take more than that spring's force.
Source: Frank C. De Reamer, US 2,166,803 (General Electric, 1939), Fig. 5. Unknown: the insulating material, the metals and every size. De Reamer gives none of them, so they are linked to unknown heads. The tools are ours. Picture: the patent's Fig. 5.
고급
2 days
안내
1
1
Mould the housing
Mould the housing
Mould a cup-shaped housing of insulating material, with a boss on each of two opposite sides, a recess in the top of each boss, a groove inside below each boss, and a bead round the top. Unknown: the material, the sizes and the moulding.
이 단계의 재료:
 알 수 없는 절연 재료1 as required
필요한 도구:
 압축 성형 금형
 알 수 없는 치수
2
2
Make the terminals and contacts
Make the terminals and contacts
Bend two angled metal strips. The upper end of each sits in a boss recess, and the lower end is a solder lug. Fix each upper end to a contact that fits the groove inside the housing, stepped at its bottom end. Unknown: the metal.
이 단계의 재료:
 알 수 없는 금속1 as required
필요한 도구:
 판금 가위
 평집게알 수 없는 치수
3
3
Make the sleeve, plate and cover
Make the sleeve, plate and cover
Turn a threaded sleeve and cut its thread. Spin its lower end over onto a metal plate with tangs. Cut a cover of insulating sheet with ears that reach over the bosses and a hole in the middle to guide the rod.
이 단계의 재료:
알 수 없는 금속1 as required알 수 없는 절연 재료1 as required필요한 도구:
 금속 선반
 선반 공구 세트 (HSS)
 다이스 홀더판금 가위
 버니어 캘리퍼스알 수 없는 치수
4
4
Make the push button
Make the push button
Make a drawn metal tube closed at the top, and a rod with a head. Put a small coil spring in the top of the tube, then the rod's head. Wedge a washer into the tube under the head. Leave clearance so the rod can swivel a little. Turn the rod's lower end down to a smaller diameter. Unknown: the metal.
이 단계의 재료:
알 수 없는 금속1 as required 압축 스프링 세트1 spring
필요한 도구:
금속 선반선반 공구 세트 (HSS)버니어 캘리퍼스알 수 없는 치수5
5
Assemble
Assemble
Set the terminals in their recesses and the contacts in their grooves. Slide the button into the sleeve, with a coil spring round the rod between the cover and the wedged washer. Pass the rod's end through the cover's hole. Put on it a loose insulating washer with a metal rim round its edge. Hammer the rod's end over into a flange. Lay the cover on the housing, so its ears clamp the terminals, and bend the plate's tangs over the bead.
이 단계의 재료:
알 수 없는 절연 재료1 as required알 수 없는 금속1 as required압축 스프링 세트1 spring필요한 도구:
 바이스(만력)
 볼핀 해머평집게
 보안경
6
6
Mount and wire it
Mount and wire it
Put the sleeve through a hole in the panel and clamp the panel between two nuts on the thread. Solder the bared wire ends to the two lugs.
이 단계의 재료:
 육각 너트2 pcs
 땜납 선1 as required
필요한 도구:
 인두평집게
7
7
Check it
Check it
At rest, the rim sits against the underside of the cover and the circuit is open. Pressed, the rim meets the stepped ends of both contacts and closes it. The checking is ours: the meter reads open, then closed while pressed.
필요한 도구:
 멀티미터
재료
5- 1 as required플레이스홀더
- 1 as required플레이스홀더
- 1 spring플레이스홀더
- 2 pcs플레이스홀더
- 1 as required플레이스홀더
이 블루프린트로 만드는 것
관련 블루프린트
이 블루프린트들은 지식을 공유합니다 — 기술, 재료 또는 원리

CC0 퍼블릭 도메인
이 블루프린트는 CC0로 공개되었습니다. 어떤 목적으로든 자유롭게 복사, 수정, 배포 및 사용할 수 있습니다.
제품 구매를 통해 메이커를 지원하세요. 판매자가 설정한 메이커 커미션 을 받거나, 이 블루프린트의 새로운 반복을 만들어 연결로 포함시킬 수 있습니다.