협업
예술
뷰티 및 웰니스
공예
문화 및 역사
엔터테인먼트
환경
음식 및 음료
역공학
과학
스포츠
기술
웨어러블
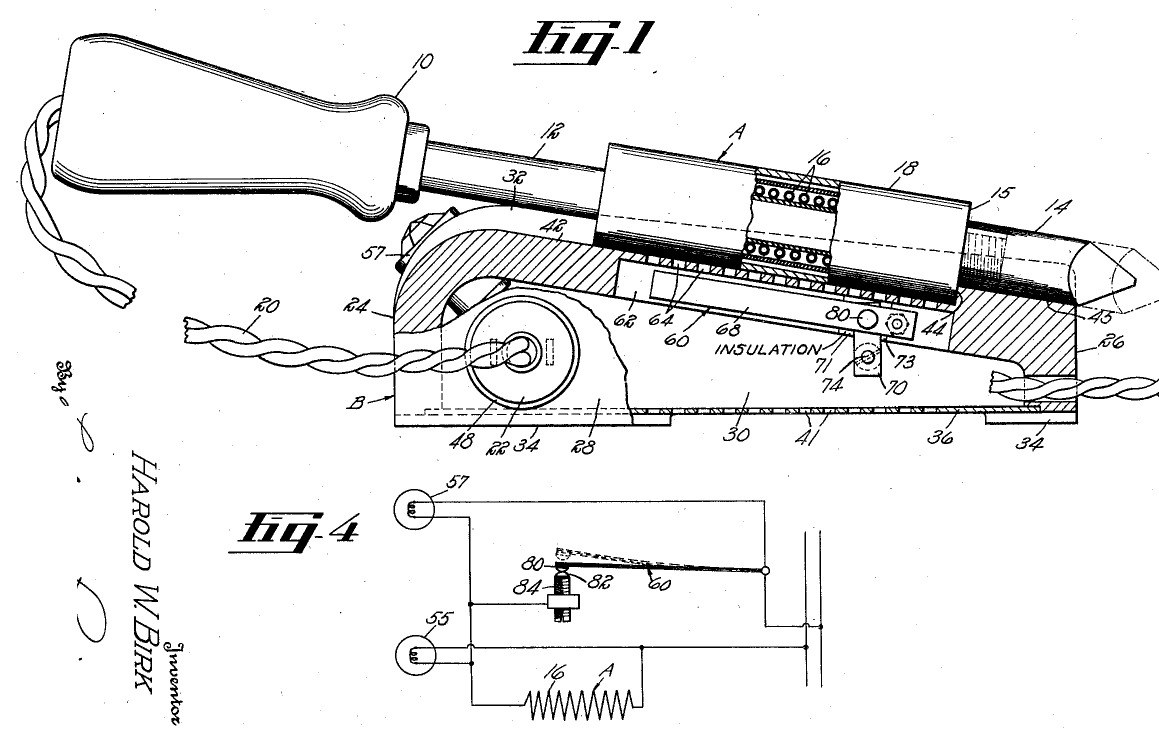


Soldering Station: a Stand Whose Bimetal Switch Reads the Iron's Heat (Birk, Hart Mfg., US 2,248,486, 1941)
A soldering station: an ordinary electric iron plugs into its stand, and the stand controls it. When the iron is laid in the stand's trough, its heater housing sits over a flue with a U-shaped bimetal switch inside; the heat it gives off opens the switch at the temperature you set with a screw, and closes it again as it cools. A red lamp shows the iron heating, a green lamp shows it hot and idling.
Result: a stand that keeps an electric iron at a set temperature between jobs and shows its state.
Source: H. W. Birk (Hart Manufacturing), US 2,248,486 (1941). Unknown: sizes, the bimetal, the lamps. Picture: the patent drawing.
중급
Unknown
안내
1
1
Make the stand
Make the stand
Cast or form a box-shaped stand in one piece from a fire-resistant material such as porcelain: a high front wall, a low back wall, two side walls and a top sloping down about 10° toward the back, with feet at the corners so air can pass beneath. Close the bottom with a removable plate screwed to a flange and pierced with air holes. In the top, hollow a trough shaped to the iron's heater housing, ending at a shoulder, then a narrower groove for the tip. Cut a flue through the top along the trough, under a cover with holes. Ours: porcelain. Not given: sizes.
이 단계의 재료:
 알 수 없는 재료1 porcelain stand
 알 수 없는 금속1 bottom plate, screws
필요한 도구:
 알 수 없는 치수
2
2
Fit the bimetal switch
Fit the bimetal switch
Bend a strip of bimetal into a U whose legs spread apart when cool and close together when hot. Rivet one leg to a metal strip fixed beside the flue (on an insulating bracket if the stand conducts); put a contact on the free leg's end. Face it with a fixed contact on a screw stud threaded through a metal plate and out through the side wall in an insulating sleeve, slotted for a screwdriver: turning it sets the temperature, low for wax melting or high for electric branding irons. Not given: the bimetal, the contact metal.
이 단계의 재료:
 바이메탈 판1 개알 수 없는 금속1 strips, plate, contacts, stud
 알 수 없는 절연 재료1 bracket, sleeve, plate
필요한 도구:
 리벳 공구 한 벌
 나사내기 탭·다이스 세트
3
3
Wire the outlet and lamps
Wire the outlet and lamps
Set an outlet in a side wall for the iron's plug, held by a flange and a split ring, and wire it in series with the switch to the supply cord. At the top of the front wall, set two lamp sockets at about 45°, one with a red lens and one with a green: wire the red in parallel with the iron's heater, the green in parallel with the switch. Not given: the lamp ratings, the outlet type.
이 단계의 재료:
 알 수 없는 커넥터1 outlet
 전구 소켓2 개
 전구2 개알 수 없는 재료2 red and green lenses
 플러그 달린 코드1 개
필요한 도구:
 드라이버 세트
4
4
Use it
Use it
Set the temperature by turning the slotted stud with a screwdriver. Plug an electric soldering iron into the stand's outlet and lay it in the trough so its heater housing closes the flue. While the bimetal is cool the switch is closed and the red lamp lights: the iron heats. At the set temperature the switch opens; the green lamp glows, the red goes dark and the iron idles. Lift the iron off and air rushes up the flue, cooling the bimetal so the iron heats again. Because it senses the heater, not the tip, the heater cannot burn out even if the tip is loose.
이 단계의 재료:
 인두1 electric soldering iron
필요한 도구:
드라이버 세트재료
9- 2 red and green lenses플레이스홀더
- 1 strips, plate, contacts, stud플레이스홀더
- 1 개플레이스홀더
- 1 bracket, sleeve, plate플레이스홀더
- 1 outlet플레이스홀더
- 2 개플레이스홀더
- 2 개플레이스홀더
- 1 개플레이스홀더
- 플레이스홀더
연결된 블루프린트 재료



이 블루프린트로 만드는 것

CC0 퍼블릭 도메인
이 블루프린트는 CC0로 공개되었습니다. 어떤 목적으로든 자유롭게 복사, 수정, 배포 및 사용할 수 있습니다.
제품 구매를 통해 메이커를 지원하세요. 판매자가 설정한 메이커 커미션 을 받거나, 이 블루프린트의 새로운 반복을 만들어 연결로 포함시킬 수 있습니다.