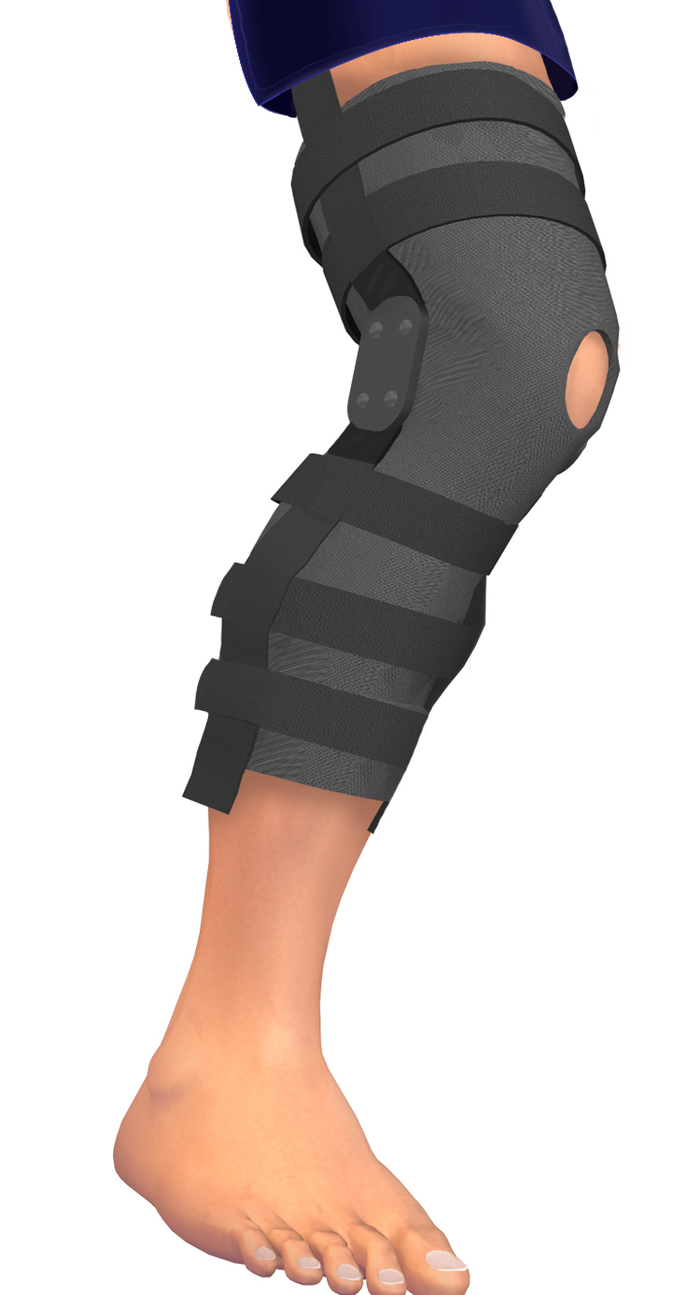


The Knee Brace
Strap a simple hinge to the outside of a knee and bend it, and the brace will slide down your leg. Every time. That single, annoying observation is the whole engineering problem, and it has a precise cause.
The knee is not a hinge. A hinge turns about one fixed axis. The knee rolls and glides — the femur rolls back on the tibia while sliding forward on it — so the point it is momentarily turning about, its instantaneous centre of rotation, is not fixed. It travels backwards as the knee flexes, tracing a curved path.
Put a single-pivot hinge beside a joint whose centre moves, and the two disagree by a growing distance through the range of motion. Something has to give: either the strap slips, or the brace migrates, or it drags on the leg. Brace migration is not poor strapping. It is a kinematic mismatch.
There are two honest answers. Accept it and design the straps to tolerate small motion. Or use a polycentric hinge — a four-bar linkage whose own instantaneous centre moves along a path approximating the knee's.
This blueprint builds both, on a wooden leg model, and measures the migration so you can see the difference rather than take it on trust. It is a wearable-device build, not medical advice — a brace for an actual injury is a clinician's call.
안내
Build a leg model with a realistic joint
Build a leg model with a realistic joint
Cut two lengths of timber for thigh and shank. Join them not with a bolt but with two short cords crossed between them, anchored front and back — the cords stand in for the cruciate ligaments.
Bend it.
Expect the upper piece to roll and slide on the lower rather than pivot in place.
The crossed cords ARE the four-bar linkage, and they are why the knee's centre of rotation moves.
이 단계의 재료:
 소나무 제재목1 개
 결속 노끈2 미터
필요한 도구:
 손톱(핸드소)
Find the moving centre of rotation
Find the moving centre of rotation
Tape paper behind the model. Mark two points on the shank, then flex by 15° and mark their new positions.
For each point, draw the line joining old to new, then its perpendicular bisector. Where the two bisectors cross is the instantaneous centre for that increment.
Repeat across the range and join the crossings.
Expect a curve, not a point, drifting backwards as flexion increases. That curve is the thing every brace has to live with.
이 단계의 재료:
 모눈종이1 개
필요한 도구:
 각도기
각도기Fit a single-pivot hinge and measure the mismatch
Fit a single-pivot hinge and measure the mismatch
Make two aluminium or steel side bars joined by one bolt. Strap them to the model with the pivot set at the centre you measured at full extension.
Flex through the full range and measure how far the lower bar's end slides along the shank.
Expect measurable migration, growing with flexion.
Nothing is loose and nothing is badly made — the geometry simply cannot agree at both ends of the range.
이 단계의 재료:
 연강 앵글 38 x 38 mm1 개
 1/4"-20 x 1" 엘리베이터 볼트2 개
필요한 도구:
 디지털 캘리퍼스 6인치
 쇠톱(핵소)
Build a polycentric hinge and measure it again
Build a polycentric hinge and measure it again
Replace the single bolt with a four-bar linkage: two short links joining the upper and lower bars at two pivots each, so the bars move relative to each other rather than turning about one point.
Repeat the measurement from step 3.
Expect markedly less migration across the range.
The linkage has its own moving instantaneous centre, and you have tuned it to approximate the knee's — you have not eliminated the mismatch, you have matched two moving curves.
Add the soft parts and fit them properly
Add the soft parts and fit them properly
Cut a neoprene sleeve and stitch pockets to carry the side bars. Add hook-and-loop straps above and below the joint — never across it.
Anchor the upper strap on the wide part of the thigh and the lower one below the calf swell.
Straps work by resting on a taper, not by being tightened. A strap over a cylinder slides down however hard you pull it, and pulling harder buys pressure injury rather than grip.
이 단계의 재료:
 무릎 보호대 제작 키트1 키트
 찍찍이(후크 앤드 루프)1 미터
Set a range-of-motion stop and verify it
Set a range-of-motion stop and verify it
Add a removable stop that limits extension, flexion or both. Set it, then measure the achieved angle with a protractor against the model.
Test that the stop holds under hand force.
Expect the set angle and the measured angle to differ unless the hinge axis is aligned with the joint.
A range limit is only as accurate as the hinge placement — which is why fitting a real brace is a measured procedure and not a guess.
필요한 도구:
 각도기 / 각도 측정기
Compendium — what braces do, and what they do not
Compendium — what braces do, and what they do not
The knee is a four-bar linkage made of ligament. The anterior and posterior cruciate ligaments cross inside the joint, and together with the bones they form a closed kinematic chain — which is exactly the mechanism you built with two crossed cords in step 1. As the knee flexes, that linkage forces the femur to roll backwards while sliding forwards on the tibia, and the instantaneous centre of rotation migrates posteriorly along a curved path, often drawn as a J. Every claim in this blueprint follows from that one anatomical fact.
The three classes of brace answer three different questions. Prophylactic braces aim to prevent injury in uninjured knees in contact sport; the evidence for them is mixed and contested. Functional braces are for knees with a known instability, typically after ligament injury, and aim to restrain the specific motion the missing ligament used to restrain. Rehabilitative braces are worn after surgery, and their main job is the range-of-motion stop from step 6 — protecting a repair by making certain angles mechanically unreachable. These are not interchangeable and a brace bought for the wrong one is at best useless.
Polycentric hinges are an approximation, not a solution. A four-bar linkage can be designed so its instantaneous centre traces a path close to the knee's, and commercial functional braces do exactly this. But every knee's path differs, the path changes with load, and the brace sits outside soft tissue that moves independently of the bone underneath. Soft-tissue movement, not hinge design, sets the practical limit — which is why high-end braces are custom-moulded to the limb, and why even those migrate somewhat.
A genuinely open question worth stating plainly. Whether functional bracing meaningfully protects a reconstructed ligament during sport is not settled; several trials have found little difference in re-injury rates, while many patients report improved confidence and proprioceptive awareness. That is a real and honest finding — a device can help by changing how the wearer moves, without mechanically taking load. Presenting braces as mechanical armour overstates the evidence in both directions.
Scope, stated once and clearly. This is a build for understanding a mechanism: a wooden leg model, a hinge, a sleeve, and two measurements. It is not a medical device and must not be worn as one. A knee that is painful, swollen, unstable or recently injured needs assessment, and any brace worn for a real condition — including its type, its hinge, and its range settings — is a decision for a clinician, not a maker. Build this to learn why braces slide down; do not build it to treat a knee.
재료
7- 1 개플레이스홀더
- 2 미터플레이스홀더
- 1 개플레이스홀더
- 플레이스홀더
- 플레이스홀더
- 1 키트플레이스홀더
- 1 미터플레이스홀더


관련 블루프린트
이 블루프린트들은 지식을 공유합니다 — 기술, 재료 또는 원리

CC0 퍼블릭 도메인
이 블루프린트는 CC0로 공개되었습니다. 어떤 목적으로든 자유롭게 복사, 수정, 배포 및 사용할 수 있습니다.
제품 구매를 통해 메이커를 지원하세요. 판매자가 설정한 메이커 커미션 을 받거나, 이 블루프린트의 새로운 반복을 만들어 연결로 포함시킬 수 있습니다.