협업
예술
뷰티 및 웰니스
공예
문화 및 역사
엔터테인먼트
환경
음식 및 음료
역공학
과학
스포츠
기술
웨어러블
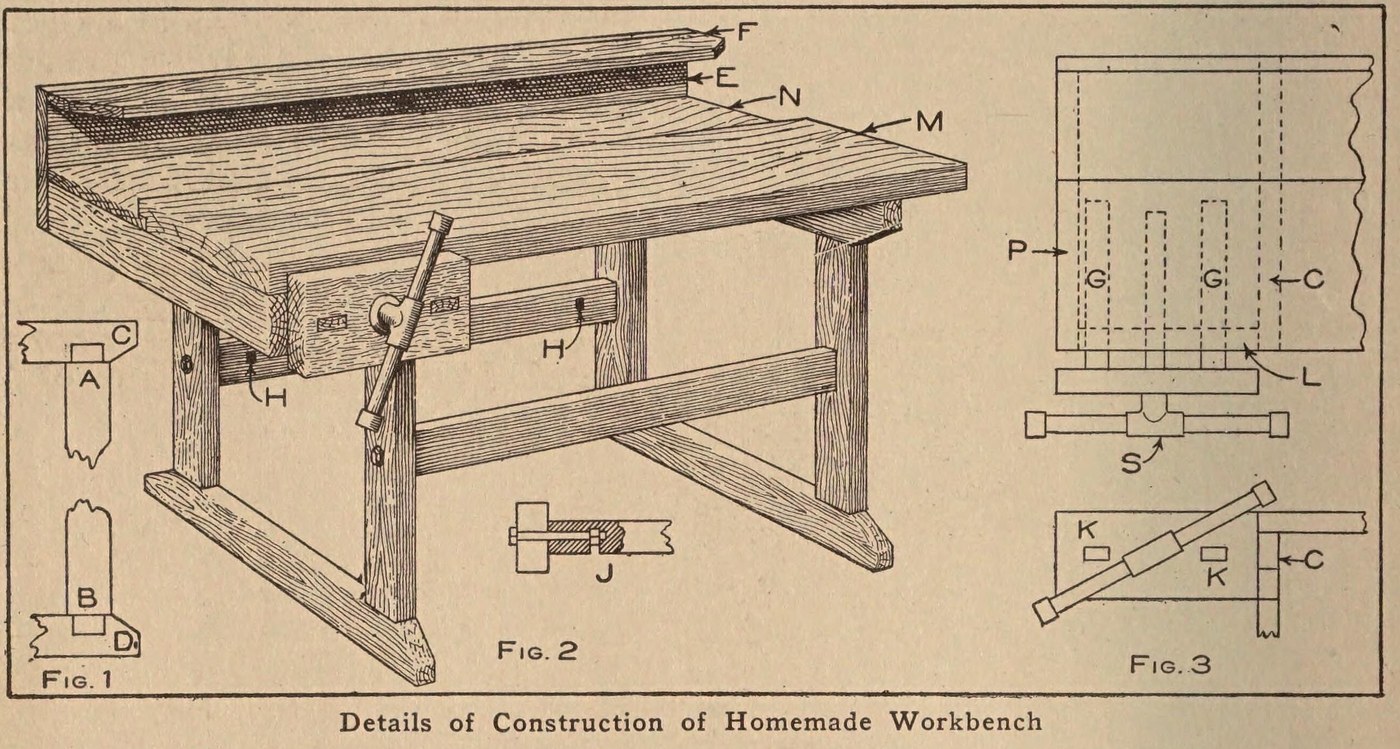


Workbench: a Pine Bench with a Laminated Maple Top and Vise (Boy Mechanic, 1913)
The same pine bench with a harder top: 14 maple strips set on edge, glued and screwed together, with a back board, a tool rack and a wooden vise on an iron bench screw.
Source: C. E. McKinney, Jr., 'Homemade Workbench', The Boy Mechanic, Book 1 (1913), pp. 442-443. Picture: Figs. 1-3 of the book.
중급
Unknown
안내
1
1
Make the two leg frames
Make the two leg frames
Cut four 2 x 4 in pine legs 23 in long with a tenon on each end 1/2 in thick, 3 1/2 in wide and 1 1/2 in long (Fig. 1, A and B). Cut four crosspieces of the same stock 20 in long, mortised in the narrow edge 1 1/4 in from each end, and slope their corners from the leg out to the middle. Fit each pair of legs to a pair of crosspieces to make the two supports.
이 단계의 재료:
 소나무 제재목1 2 x 4 in: legs, crosspieces
필요한 도구:
 손톱(핸드소)
 장부구멍 끌
 망치
2
2
Brace them together
Brace them together
Join the supports with two 2 x 4 in braces 24 in long, ends sawn square. Bore through each leg and 4 in into the centre of each brace end, bore an intersecting hole on the back of each brace for the nut, and draw each joint tight with a 3/8 x 6 in bolt (Fig. 2, J). A cross brace on the back stops rocking when planing.
이 단계의 재료:
소나무 제재목1 2 x 4 in: braces 둥근머리 볼트4 3/8 x 6 in
필요한 도구:
손톱(핸드소) 곡병 손드릴과 비트
 멍키스패너
3
3
Build up the maple top
Build up the maple top
Make the main top M of 14 maple strips 7/8 in thick, 2 in wide and 3 1/2 ft long, set on edge, each glued and screwed to the next, all with the grain one way so it planes smooth. Rabbet its back edge 1/2 in to take a back board N of the same length, 8 1/2 in wide and 7/8 in thick. Screw the top to the top crosspieces with long screws.
이 단계의 재료:
 알 수 없는 재료14 maple strips 7/8 x 2 in x 3 1/2 ft
 목공용 접착제1 개
 소나무 판재1 back board
 나사못1 개
필요한 도구:
손톱(핸드소) 블록 플레인
 일자 드라이버
4
4
Add the tool rack
Add the tool rack
Nail a board E 10 in wide to the back of the bench and fasten a 2 1/2 in board F on top of it at right angles; both 7/8 in thick and 3 1/2 ft long. Bore holes or cut notches in F to hold tools.
이 단계의 재료:
소나무 판재2 7/8 in, 3 1/2 ft 못1 개
필요한 도구:
곡병 손드릴과 비트손톱(핸드소)망치5
5
Fit the vise
Fit the vise
Fasten an iron bench screw in a 2 x 6 in block 12 in long. Mortise two guide rails 7/8 x 1 1/2 in and 20 in long into the block; they slide in mortises in a 2 x 4 piece L bolted under the top, which holds the bench-screw nut between the two mortises. Nail L to a top crosspiece and to a 2 x 4 piece P bolted under the top at the end (Fig. 3).
이 단계의 재료:
소나무 제재목1 2 x 6 block, 2 x 4 pieces, guide rails 목조각용 벤치 스크루1 개둥근머리 볼트1 for L and P못1 개
필요한 도구:
손톱(핸드소)장부구멍 끌곡병 손드릴과 비트멍키스패너망치재료
8- 1 2 x 6 block, 2 x 4 pieces, guide rails플레이스홀더
- 1 for L and P플레이스홀더
- 14 maple strips 7/8 x 2 in x 3 1/2 ft플레이스홀더
- 1 개플레이스홀더
- 2 7/8 in, 3 1/2 ft플레이스홀더
- 1 개플레이스홀더
- 2 개플레이스홀더
- 1 개플레이스홀더
이 블루프린트로 만드는 것

CC0 퍼블릭 도메인
이 블루프린트는 CC0로 공개되었습니다. 어떤 목적으로든 자유롭게 복사, 수정, 배포 및 사용할 수 있습니다.
제품 구매를 통해 메이커를 지원하세요. 판매자가 설정한 메이커 커미션 을 받거나, 이 블루프린트의 새로운 반복을 만들어 연결로 포함시킬 수 있습니다.