සහයෝගීතාව
කලාව
රූපලාවණ්ය සහ සුවතාව
ශිල්පය
සංස්කෘතිය සහ ඉතිහාසය
විනෝදාස්වාදය
පරිසරය
ආහාර සහ පාන
ප්රතිලෝම ඉංජිනේරු
විද්යාවන්
ක්රීඩා
තාක්ෂණය
පැළඳිය හැකි
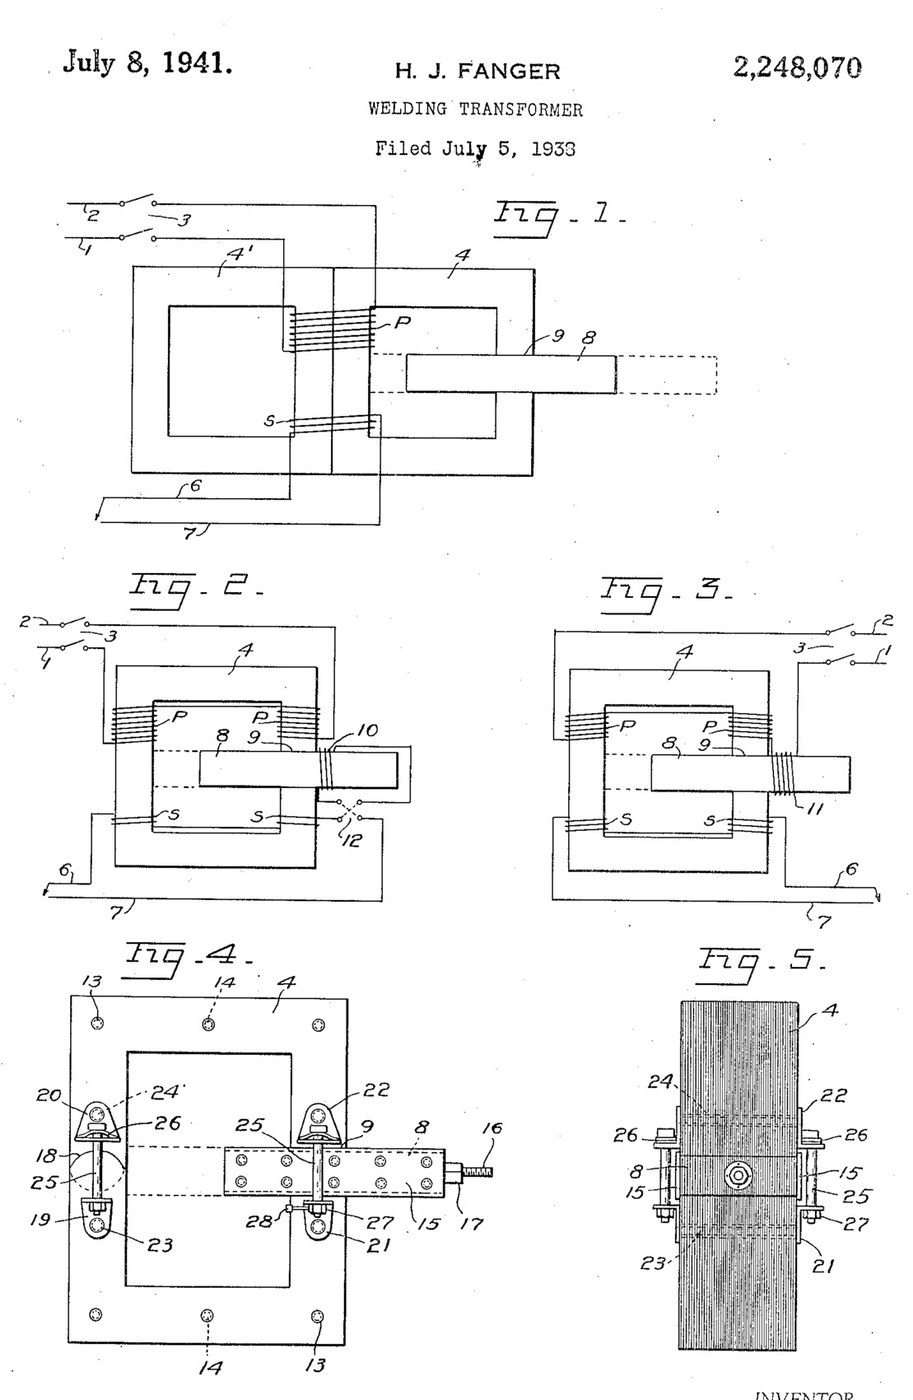


Arc Welder: AC Transformer with a Sliding Shunt Core (Fanger, US 2,248,070)
An AC arc welder is a step-down transformer whose current can be turned up and down. H. J. Fanger (US 2,248,070, 1941) cuts a gap through one leg of a laminated ring core and slides a laminated iron shunt bar through it: pushed in, it carries flux past the secondary and lowers the welding current; pulled out, the current rises.
For arc welding he gives about 60 to 68 volts open circuit, 15 to 200 amps, dropping to 38 or 40 volts at the working arc, with a small coil on the shunt bar in series with the secondary.
Source: H. J. Fanger, "Welding Transformer", US Patent 2,248,070 (filed 1938, granted 1941). Picture: its Figs. 1-5.
උසස්
Unknown
උපදෙස්
1
1
Read Fanger
Read Fanger
"With arc welding, infinite control of the volume of the secondary current, between maximum and minimum is obtained by adjustment of the slidable shunt core without altering the welding characteristics of the current, also better ignition of the arc is had at a given voltage, and greater stability of the arc".
2
2
Stack the core
Stack the core
Build a single rectangular ring core of insulated iron laminations, held together with brass (or insulated) bolts or rivets in insulating tubes (Fig. 4). Cut a gap straight through one leg, accurately machined and finished, and make a circular joint through the opposite leg with the segments staggered to overlap in successive laminations. Core size, lamination iron and thickness are not given (ours: the tools).
මෙම පියවර සඳහා ද්රව්ය:
 නොදන්නා ලෝහය1 iron laminations
 ෂඩාස්ර බෝල්ට් එකතුව1 brass bolts
 නොදන්නා පරිවාරක ද්රව්යය1 insulating tubes
අවශ්ය මෙවලම්:
 තහඩු කපන කතුර
 ස්ථාවර සිදුරු යන්ත්රය
 සිදුරු කරන තුඩු කට්ටලය
 කියතුරු (අත් කියතුර)
 නොදන්නා මිනුම්
3
3
Make the shunt bar
Make the shunt bar
Make the sliding shunt section of the same laminated iron, a snug fit in the gap with its laminations edge-to-edge with the core's, and long enough to fill the gap at every position. Sheath both sides with a slightly wider plate of Bakelite that overlaps the edges of the gap to guide it. Fit a threaded rod on its outer end, working in a nut fixed to the section (or move it by hand, with calibration marks along one edge).
මෙම පියවර සඳහා ද්රව්ය:
නොදන්නා ලෝහය1 shunt laminations බේක්ලයිට්2 side platesෂඩාස්ර බෝල්ට් එකතුව1 brass bolts
 ඉස්කුරුප්පු දණ්ඩ1 කැබැල්ල
 ෂඩාස්ර ඇණ බෝල්තුව1 කැබැල්ල
අවශ්ය මෙවලම්:
ස්ථාවර සිදුරු යන්ත්රයසිදුරු කරන තුඩු කට්ටලයකියතුරු (අත් කියතුර)4
4
Wind the coils
Wind the coils
Wind the primary and secondary windings on both legs of the core (Fig. 2), in series or in parallel to suit the line voltage and the current wanted. Wind a small auxiliary coil round the shunt bar's path, fixed so the bar slides through it, and connect it in series with the secondary through a reversing switch (some jobs weld better with the current through it one way). Turns and wire sizes are not given.
මෙම පියවර සඳහා ද්රව්ය:
 තඹ කම්බිය1 insulation and size not given
අවශ්ය මෙවලම්:
නොදන්නා මිනුම්5
5
Spring the joints
Spring the joints
On both sides of the gap and of the circular joint fit pairs of confronting angle plates, held by brass bolts in insulating sleeves and drawn together by spring bolts whose heads rest on slightly arched spring plates, so the joints close snugly on the sliding bar. A small lever on the gap-joint nut gives a half turn to release the bar for moving. The angle-plate material is not given.
මෙම පියවර සඳහා ද්රව්ය:
 නොදන්නා ද්රව්යය4 angle platesෂඩාස්ර බෝල්ට් එකතුව1 brass and spring boltsනොදන්නා පරිවාරක ද්රව්යය1 sleeves
 දුනු වානේ තීරුව1 arched spring platesෂඩාස්ර ඇණ බෝල්තුව4 කැබලි
අවශ්ය මෙවලම්:
ස්ථාවර සිදුරු යන්ත්රයසිදුරු කරන තුඩු කට්ටලය සීරුම් රැන්ච්
6
6
Connect and set
Connect and set
Connect the primary to the line through a line switch, and the secondary leads to the electrode holder and the work. Pull the shunt bar out for more current, push it in for less: Fanger gives about 60-68 volts open circuit and 15-200 amps, dropping to 38-40 volts at the arc.
මෙම පියවර සඳහා ද්රව්ය:
 සක්රිය/අක්රිය ස්විචය1 line switch
අවශ්ය මෙවලම්:
සීරුම් රැන්ච්ද්රව්ය
10- 1 shunt laminationsස්ථානගත
- 1 brass and spring boltsස්ථානගත
- 1 sleevesස්ථානගත
- 2 side platesස්ථානගත
- 1 කැබැල්ලස්ථානගත
- 5 කැබලිස්ථානගත
- 1 insulation and size not givenස්ථානගත
- 4 angle platesස්ථානගත
- 1 arched spring platesස්ථානගත
- 1 line switchස්ථානගත
මෙම සැලසුම සාදන්නේ

CC0 පොදු වසම
මෙම බ්ලූප්රින්ට් CC0 යටතේ නිකුත් කර ඇත. ඔබට අවසර නොමැතිව පිටපත් කිරීම, වෙනස් කිරීම, බෙදා හැරීම සහ භාවිතා කිරීම කළ හැක.
බ්ලූප්රින්ට් හරහා නිෂ්පාදන මිලදී ගැනීමෙන් නිර්මාතෘට සහාය වන්න නිර්මාතෘ කොමිසම විකුණුම්කරුවන් විසින් නියම කළ, හෝ මෙම බ්ලූප්රින්ට්හි නව අනුවාදයක් සාදා ආදායම බෙදා ගැනීමට ඔබේ බ්ලූප්රින්ට්හි සම්බන්ධතාවයක් ලෙස ඇතුළත් කරන්න.