සහයෝගීතාව
කලාව
රූපලාවණ්ය සහ සුවතාව
ශිල්පය
සංස්කෘතිය සහ ඉතිහාසය
විනෝදාස්වාදය
පරිසරය
ආහාර සහ පාන
ප්රතිලෝම ඉංජිනේරු
විද්යාවන්
ක්රීඩා
තාක්ෂණය
පැළඳිය හැකි
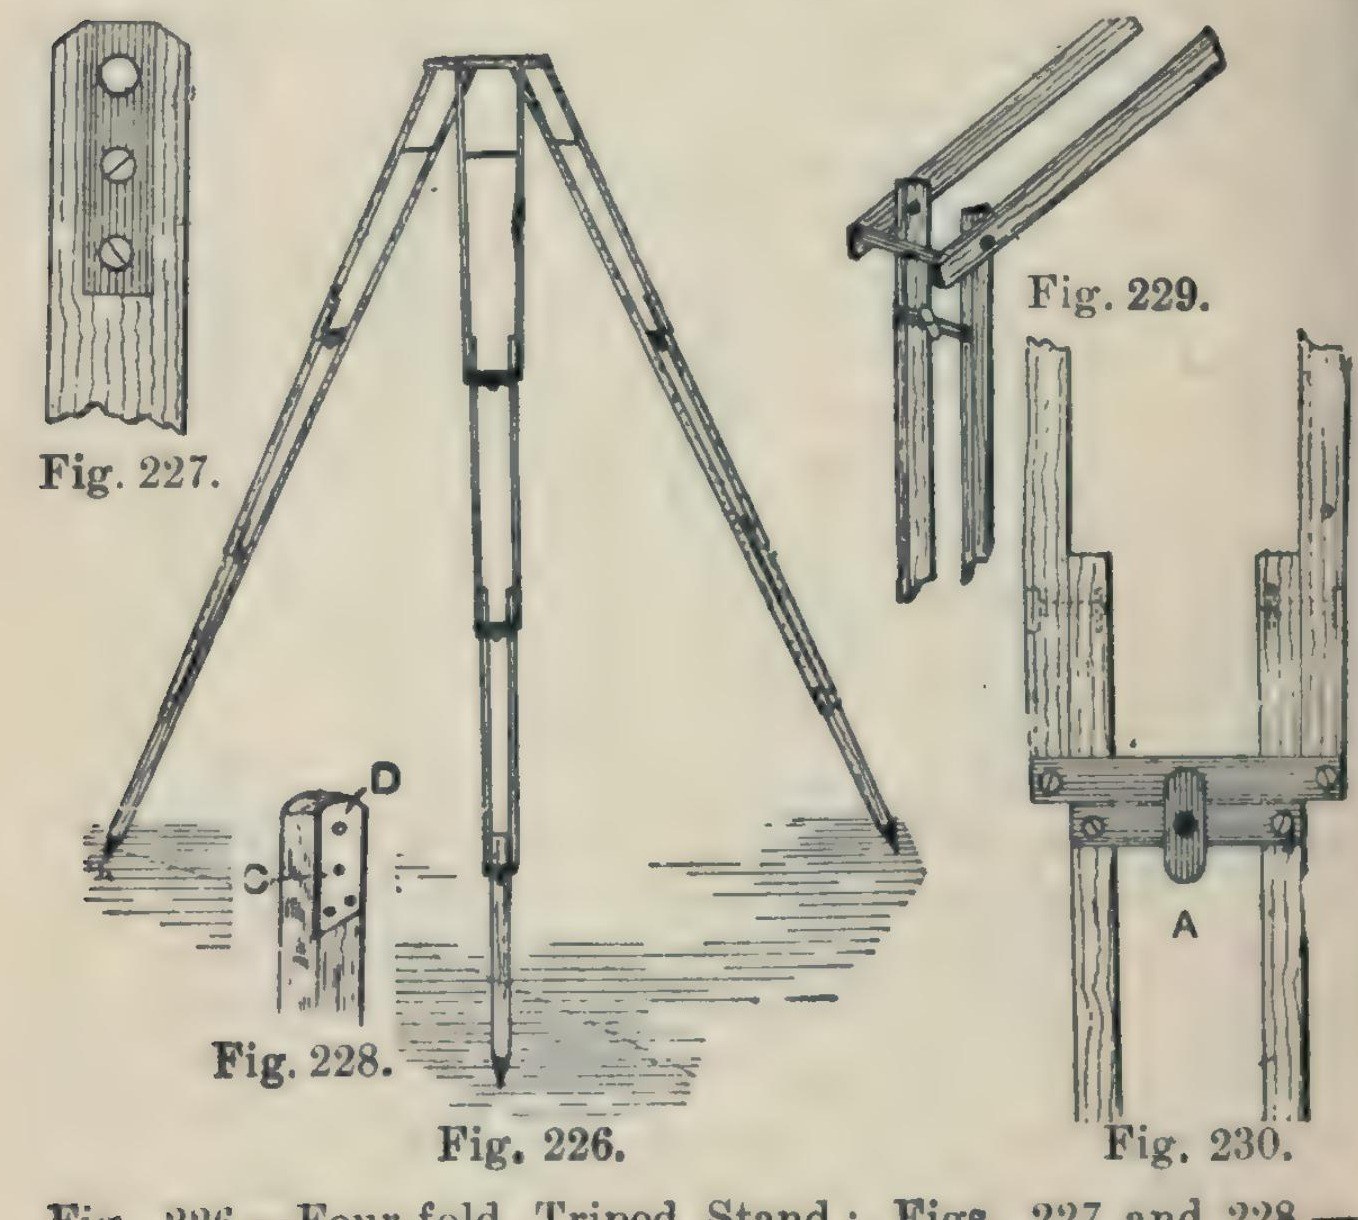


Camera Tripod: a Four-Fold Ash Tripod Stand (Hasluck, 1902)
A light, compact folding camera stand: three legs, each of seven ash laths riveted so it folds in four, locked open by brass buttons, on a triangular ash top with brass pins and a hole for the camera screw.
Hasluck says the same method makes stands that fold in three or two.
Source: Paul N. Hasluck, Photographic Cameras and Accessories (1902), pp. 153-157. Picture: Figs. 226-230 of the book.
මධ්යම
Unknown
උපදෙස්
1
1
Cut the ash laths
Cut the ash laths
Cut laths of good ash, true and square or the stand won't be rigid, and round the edges slightly: six 17 1/4 x 5/8 x 3/8 in, six 16 x 5/8 x 3/8 in, six 15 1/2 x 5/8 x 3/8 in, and three 14 x 5/8 x 5/8 in.
මෙම පියවර සඳහා ද්රව්ය:
 ඈෂ් ලී පුවරුව1 21 laths
අවශ්ය මෙවලම්:
 කොඳු සහිත කියත
 කුඩා අත් රන්දය
2
2
Fit the top ends and stretcher
Fit the top ends and stretcher
On each 17 1/4 in lath let in flush a 1/16 in brass plate, 1 1/4 in long, with a 3/16 in hole 1/4 in from the top, held by two countersunk brass screws; bore the wood to match and take off the top corners. On one lath of each pair cut a groove inside, about 3/16 in deep and 3 1/2 in long, starting 2 in from the top, and hinge a 1/8 in brass rod stretcher in it on a pin. On the other lath cut a curved groove 1 1/2 in long, 3/16 in wide, with a small hole at the bottom where the rod catches.
මෙම පියවර සඳහා ද්රව්ය:
 පිත්තල තහඩුව1 1/16 in plates
 ලී ඉස්කුරුප්පු1 small brass screws
 පිත්තල දණ්ඩ1 1/8 in stretcher
අවශ්ය මෙවලම්:
 යකඩ කපන රාමුව සහ තල
 ලෝහ කටුව
 අත් විදුම
 නියන්
 පිරුක් තලය - පැතලි
3
3
Bore and rivet the legs
Bore and rivet the legs
Bore the rivet holes: in the long laths 1 3/4 in from the lower end, counterbored so the copper rivet head sits flush, then 1/8 in through; in the 16 in and 15 1/2 in laths 1/2 in and 1 3/4 in from the ends; in each 14 in piece 1/2 in from one end, and taper its other end for a pointed iron shoe or a steel point and ferrule. Rivet the 21 laths into three legs with 1/8 in copper rivets and washers: a 16 in lath inside each 17 1/4 in one, a 15 1/2 in lath inside that, the 14 in foot between the last pair. Rivets flush, just tight enough to fold but not loose.
මෙම පියවර සඳහා ද්රව්ය:
 තඹ රිවට්1 1/8 in, with washers
 නොදන්නා ලෝහය3 iron shoes or steel points
අවශ්ය මෙවලම්:
 අත් හැරවුම් විදුම සහ තුඩඅත් විදුම
 රිවට් මිටිය
4
4
Add cross strips and lock buttons
Add cross strips and lock buttons
Screw 1/16 in brass strips across the bottom ends of each pair of laths (Fig. 229). Under them screw strips carrying a small brass button riveted at the centre; turned, the button hooks over the strip above and locks the joint open (Fig. 230).
මෙම පියවර සඳහා ද්රව්ය:
පිත්තල තහඩුව1 cross strips, buttonsලී ඉස්කුරුප්පු1 කැබැල්ලඅවශ්ය මෙවලම්:
යකඩ කපන රාමුව සහ තලලෝහ කටුවපිරුක් තලය - පැතලිරිවට් මිටිය5
5
Make the top
Make the top
Plane ash to 1/2 in and draw an equilateral triangle with 8 1/2 in sides. Bisect the angles; 2 in from each corner draw a line at right angles, go 1/2 in in along the sides, and mark three rectangles 2 7/8 x 3/4 in; cut the outline (Fig. 231). Fix a 3/16 in brass rod, one end tapered, across each rectangle, bored 3/8 in from the outer edge and projecting about 1/2 in, for the legs to hang on. Bore a 1/4 in hole in the centre for the camera screw and glue felt on top.
මෙම පියවර සඳහා ද්රව්ය:
ඈෂ් ලී පුවරුව1 topපිත්තල දණ්ඩ3 3/16 in pins ලොම් පිලිත්ත1 කැබැල්ල
 සත්ව මැලියම්1 කැබැල්ල
අවශ්ය මෙවලම්:
කුඩා අත් රන්දයකොඳු සහිත කියතඅත් හැරවුම් විදුම සහ තුඩඅත් විදුම6
6
Finish
Finish
Glasspaper and varnish the wood, and lacquer the brass.
මෙම පියවර සඳහා ද්රව්ය:
 ෂෙලැක් වාර්නිෂ්1 varnish
 නොදන්නා ද්රව්යය1 brass lacquer
අවශ්ය මෙවලම්:
 වැලි කඩදාසි
ද්රව්ය
10- 1 topස්ථානගත
- 1 cross strips, buttonsස්ථානගත
- 1 කැබැල්ලස්ථානගත
- 3 3/16 in pinsස්ථානගත
- 1 1/8 in, with washersස්ථානගත
- 3 iron shoes or steel pointsස්ථානගත
- 1 කැබැල්ලස්ථානගත
- 1 කැබැල්ලස්ථානගත
- 1 varnishස්ථානගත
- 1 brass lacquerස්ථානගත
මෙම සැලසුම සාදන්නේ

CC0 පොදු වසම
මෙම බ්ලූප්රින්ට් CC0 යටතේ නිකුත් කර ඇත. ඔබට අවසර නොමැතිව පිටපත් කිරීම, වෙනස් කිරීම, බෙදා හැරීම සහ භාවිතා කිරීම කළ හැක.
බ්ලූප්රින්ට් හරහා නිෂ්පාදන මිලදී ගැනීමෙන් නිර්මාතෘට සහාය වන්න නිර්මාතෘ කොමිසම විකුණුම්කරුවන් විසින් නියම කළ, හෝ මෙම බ්ලූප්රින්ට්හි නව අනුවාදයක් සාදා ආදායම බෙදා ගැනීමට ඔබේ බ්ලූප්රින්ට්හි සම්බන්ධතාවයක් ලෙස ඇතුළත් කරන්න.