සහයෝගීතාව
කලාව
රූපලාවණ්ය සහ සුවතාව
ශිල්පය
සංස්කෘතිය සහ ඉතිහාසය
විනෝදාස්වාදය
පරිසරය
ආහාර සහ පාන
ප්රතිලෝම ඉංජිනේරු
විද්යාවන්
ක්රීඩා
තාක්ෂණය
පැළඳිය හැකි
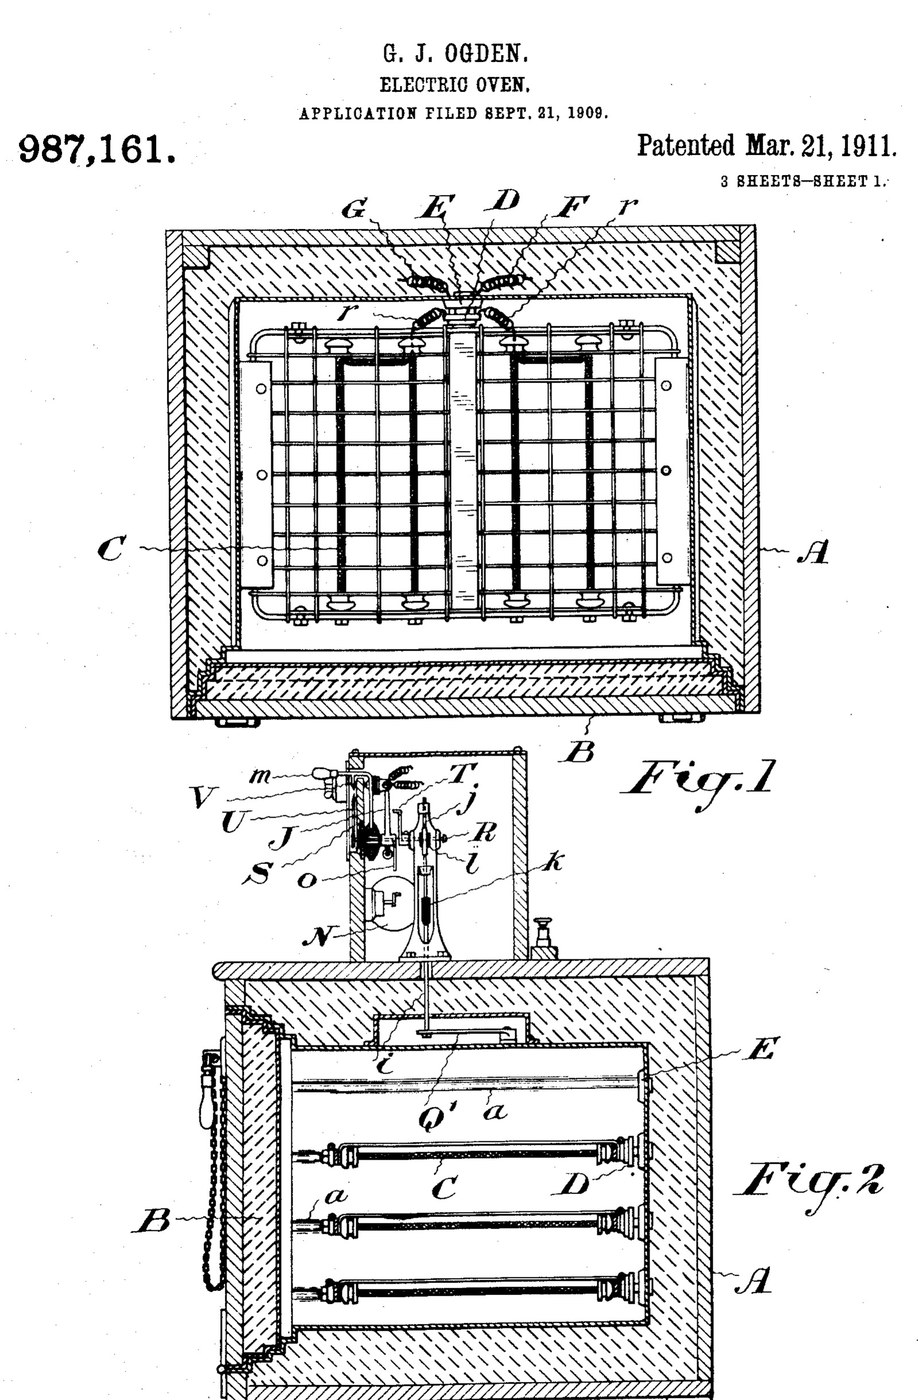


Oven: Insulated Electric Oven with Plug-In Grid Heaters and a Thermostat (Ogden, US 987,161, 1911)
An electric oven built to waste as little heat as possible: a double-walled, packed box with a packed door that seals like a strong-room door. Grid-shaped heating elements slide into grooves in the walls and plug into sockets at the back, and the food rests on them. A thermostat cuts the current when the set temperature is reached and switches it on again as the oven cools.
Result: an oven that bakes, roasts or dries at a set temperature with any number of heating grids.
Source: G. J. Ogden, US 987,161 (1911). Unknown: sizes, metals, packing and temperatures. Picture: the patent drawing.
උසස්
Unknown
උපදෙස්
1
1
Build the insulated casing and door
Build the insulated casing and door
Make the oven chamber as a double-walled casing with packing between the walls, and grooves on the inner side walls to take the heating grids. Fit a door that closes like a fire-proof vault door, also packed, so the casing seals closely. Ours: mild steel sheet. Not given: sizes, the packing.
මෙම පියවර සඳහා ද්රව්ය:
 මෘදු වානේ තහඩුව1 inner and outer walls, door
 නොදන්නා පරිවාරක ද්රව්යය1 packing
අවශ්ය මෙවලම්:
 තහඩු කපන කතුර
 ස්ථාවර සිදුරු යන්ත්රය
 නොදන්නා මිනුම්
2
2
Make the plug-in heating grids
Make the plug-in heating grids
Make heating elements in the form of grids that slide into the grooves and on which the food can rest. Fix a porcelain plug to each, carrying spring fingers that push into a socket with matching spring fingers in the back wall. Wire the sockets so all the elements are in parallel; use as many as the temperature and amount of food need. Ours: nichrome wire. Not given: the element type.
මෙම පියවර සඳහා ද්රව්ය:
 නික්රෝම් කම්බිය1 heating grids
 නොදන්නා ද්රව්යය1 porcelain plugs and sockets
 පෙන වානේ කම්බිය1 spring fingers
 සම්බන්ධක රැහැන1 circuit wiring
අවශ්ය මෙවලම්:
 පෑස්සුම් කූරු
3
3
Fit the thermostat control
Fit the thermostat control
Put a thermostat that bends with heat inside the oven, working a contact finger that plays between two contacts a few degrees above and below the set temperature. A switch-changing device, a small rotary motor, throws the main switch off and on as the finger touches one contact or the other. Mount a setting arm with a pointer over a scale marked in degrees, and a second pointer driven by the thermostat. Add a hand switch to turn the current on or off independently, and a lamp with its own switch to light the oven. Ours: a bimetal strip, toggle switches. Not given: temperatures.
මෙම පියවර සඳහා ද්රව්ය:
 ද්වි-ලෝහ තීරුව1 thermostat
 විදුලි මෝටරය1 switch-changing motor
 ටොගල් ස්විචය3 main, hand and lamp switches
 නොදන්නා ලෝහය1 contacts, arm, scaleනොදන්නා ද්රව්යය1 incandescent oven lamp
අවශ්ය මෙවලම්:
පෑස්සුම් කූරු උෂ්ණත්වමානය
ද්රව්ය
10- 1 inner and outer walls, doorස්ථානගත
- 1 packingස්ථානගත
- 1 heating gridsස්ථානගත
- 1 incandescent oven lampස්ථානගත
- 1 spring fingersස්ථානගත
- ස්ථානගත
- 1 thermostatස්ථානගත
- 1 switch-changing motorස්ථානගත
- ස්ථානගත
- 1 contacts, arm, scaleස්ථානගත
අවශ්ය මෙවලම්
5- ස්ථානගත
- ස්ථානගත
- ස්ථානගත
- 2 vendors sell this, none ship to you yetස්ථානගත
- ස්ථානගත
සම්බන්ධිත සැලසුම්වල ද්රව්ය

මෙම සැලසුම සාදන්නේ

CC0 පොදු වසම
මෙම බ්ලූප්රින්ට් CC0 යටතේ නිකුත් කර ඇත. ඔබට අවසර නොමැතිව පිටපත් කිරීම, වෙනස් කිරීම, බෙදා හැරීම සහ භාවිතා කිරීම කළ හැක.
බ්ලූප්රින්ට් හරහා නිෂ්පාදන මිලදී ගැනීමෙන් නිර්මාතෘට සහාය වන්න නිර්මාතෘ කොමිසම විකුණුම්කරුවන් විසින් නියම කළ, හෝ මෙම බ්ලූප්රින්ට්හි නව අනුවාදයක් සාදා ආදායම බෙදා ගැනීමට ඔබේ බ්ලූප්රින්ට්හි සම්බන්ධතාවයක් ලෙස ඇතුළත් කරන්න.