සහයෝගීතාව
කලාව
රූපලාවණ්ය සහ සුවතාව
ශිල්පය
සංස්කෘතිය සහ ඉතිහාසය
විනෝදාස්වාදය
පරිසරය
ආහාර සහ පාන
ප්රතිලෝම ඉංජිනේරු
විද්යාවන්
ක්රීඩා
තාක්ෂණය
පැළඳිය හැකි
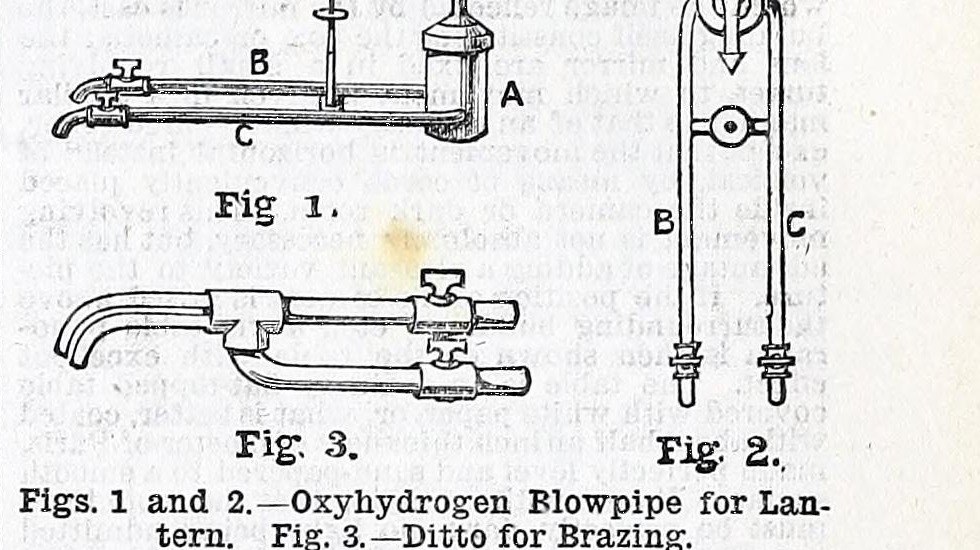


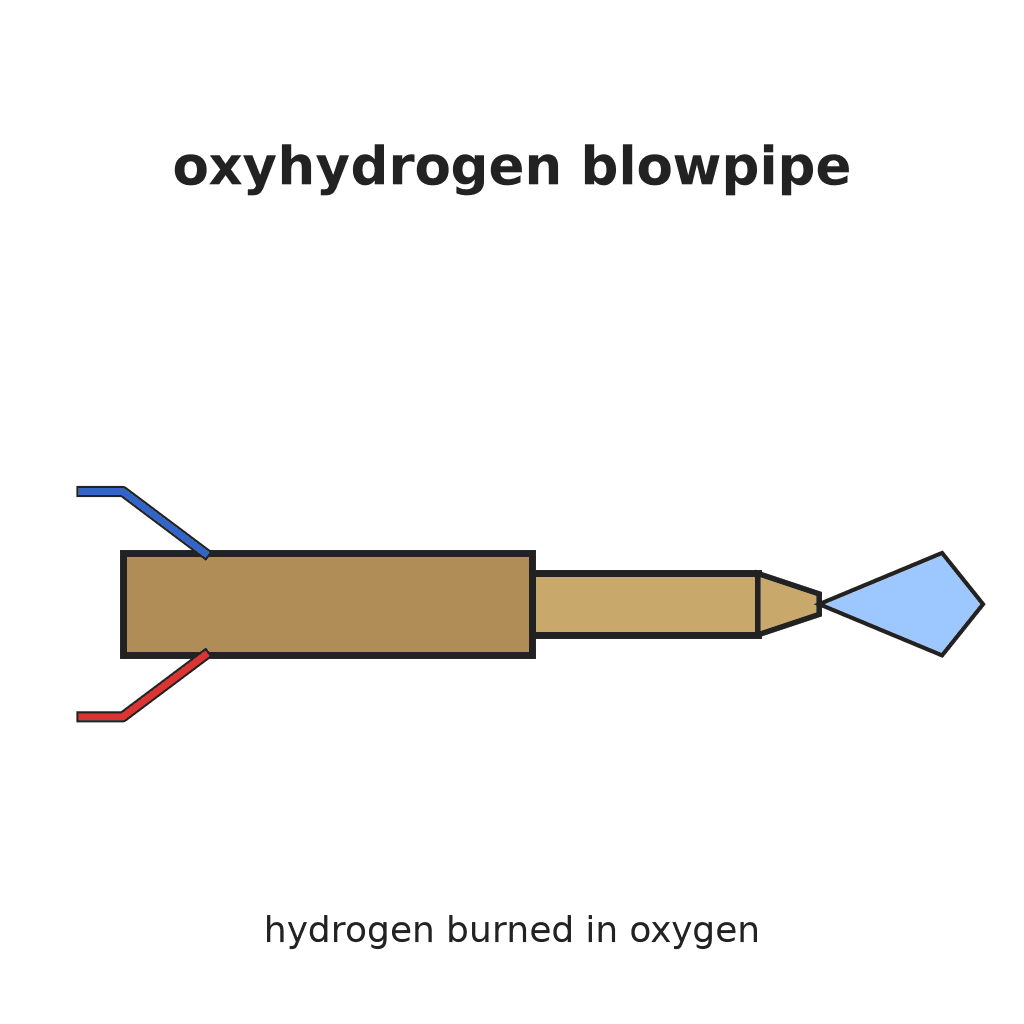
Oxyhydrogen Blowpipe: Brass Tube-in-Tube, the Gases Meeting at the Nozzle (Work, 1892)
A blowpipe that burns hydrogen in a jet of oxygen for a very hot brazing and melting flame. H. B. Stocks (Work, 1892) builds it like his cheap gas blowpipe: a fine brass tube for the oxygen, centred inside an outer brass tube (no more than 1/4 in. bore) that carries the hydrogen, joined by a three-way tube.
The two gases must not mix until they reach the nozzle; each comes from its own reservoir through its own tap.
Source: H. B. Stocks, "How to Prepare Cheap Blowpipes", Work, 2 July 1892, p. 250, with his reply "Oxyhydrogen Blowpipe", Work, 3 December 1892, p. 605 (Fig. 3).
මධ්යම
Unknown
උපදෙස්
1
1
Read Stocks
Read Stocks
"The oxyhydrogen blowpipe for brazing ... is practically the same as the blowpipe shown at p. 250 ..., but the brass pipe should not be more than 1/4 in. internal diameter; the inner tube for oxygen about 1/12 in. internal diameter, and should reach to the mouth of the outer tube. It can then be filed down, if required."
2
2
Cut the tubes
Cut the tubes
Cut the brass tubes: the outer (hydrogen) tube, not more than 1/4 in. bore, threaded at one end; a curved side tube for the hydrogen supply, threaded at one end; a short straight tube for the oxygen supply, threaded at one end; and the inner oxygen tube, about 1/12 in. bore. For his gas blowpipe Stocks used 4 in., 5 1/2 in. (curved), 3 1/2 in. and 5 1/2 in.; the lengths for the brazing pipe are not given and he says the sizes may be changed. How the tube is curved is not given.
මෙම පියවර සඳහා ද්රව්ය:
 පිත්තල නළය4 කැබලි
අවශ්ය මෙවලම්:
 යකඩ කපන කියත
 ඉස්කුරුප්පු කැපීමේ කට්ටලය
 නොදන්නා හැඩගැන්වීමේ ක්රමය
 නොදන්නා මිනුම්
3
3
Centre the oxygen tube
Centre the oxygen tube
Cut a small strip of thin sheet brass (Stocks: full 3/4 in. by 1/2 in.), turn it into a ring and solder it on one end of the inner tube. File the ring down until it pushes into the threaded end of the short oxygen tube, and solder it inside.
මෙම පියවර සඳහා ද්රව්ය:
 පිත්තල තහඩුව1 small strip
 ටින්-ඊයම් පෑස්සුම1 කැබැල්ල
අවශ්ය මෙවලම්:
 තහඩු කපන කතුර
 කියතුරු (අත් කියතුර)
 පෑස්සුම් කූරු
 ෆ්ලක්ස්
4
4
Assemble
Assemble
Screw the oxygen tube into one end of the three-way tube, screw the outer tube on the other end and see that the inner tube is exactly in its centre. Screw the curved hydrogen tube into the side branch. Fit a tap on each supply (Fig. 3; type not given).
මෙම පියවර සඳහා ද්රව්ය:
 නූල් කැපූ නළ සවිකිරීම1 three-way tube
 නොදන්නා කපාටය2 one per gas
5
5
Set the nozzle
Set the nozzle
The inner oxygen tube should reach to the mouth of the outer tube. Light it with hydrogen in the outer tube and oxygen in the inner, each from its own reservoir; if the flame shows a white patch, the inner tube is off centre or too long: file it down a little until correct. Never let the gases mix before the nozzle.
අවශ්ය මෙවලම්:
කියතුරු (අත් කියතුර) හයිඩ්රජන්
 ඔක්සිජන්
ද්රව්ය
5- 4 කැබලිස්ථානගත
- 1 small stripස්ථානගත
- 1 කැබැල්ලස්ථානගත
- 1 three-way tubeස්ථානගත
- 2 one per gasස්ථානගත
අවශ්ය මෙවලම්
10- ස්ථානගත
- ස්ථානගත
- ස්ථානගත
- ස්ථානගත
- ස්ථානගත
- ස්ථානගත
- 2 vendors sell this, none ship to you yetස්ථානගත
- ස්ථානගත
- ස්ථානගත
- ස්ථානගත
මෙම සැලසුම සාදන්නේ
CC0 පොදු වසම
මෙම බ්ලූප්රින්ට් CC0 යටතේ නිකුත් කර ඇත. ඔබට අවසර නොමැතිව පිටපත් කිරීම, වෙනස් කිරීම, බෙදා හැරීම සහ භාවිතා කිරීම කළ හැක.
බ්ලූප්රින්ට් හරහා නිෂ්පාදන මිලදී ගැනීමෙන් නිර්මාතෘට සහාය වන්න නිර්මාතෘ කොමිසම විකුණුම්කරුවන් විසින් නියම කළ, හෝ මෙම බ්ලූප්රින්ට්හි නව අනුවාදයක් සාදා ආදායම බෙදා ගැනීමට ඔබේ බ්ලූප්රින්ට්හි සම්බන්ධතාවයක් ලෙස ඇතුළත් කරන්න.