කලාව
රූපලාවණ්ය සහ සුවතාව
ශිල්පය
සංස්කෘතිය සහ ඉතිහාසය
විනෝදාස්වාදය
පරිසරය
ආහාර සහ පාන
ප්රතිලෝම ඉංජිනේරු
විද්යාවන්
ක්රීඩා
තාක්ෂණය
පැළඳිය හැකි


Small Series-Wound Electric Motor with Laminated Field and 12-Slot Ring Armature (Robertson, Boy Mechanic 1913)
A real workshop-built DC motor: a field of riveted sheet-iron plates bored to 2-3/4 in, a 12-slot laminated ring armature on a brass spider, a 12-segment brass commutator insulated with mica, gauze brushes, and series windings of cotton-covered magnet wire.
උසස්
Several weekends
උපදෙස්
1
1
Read the Boy Mechanic
Read the Boy Mechanic
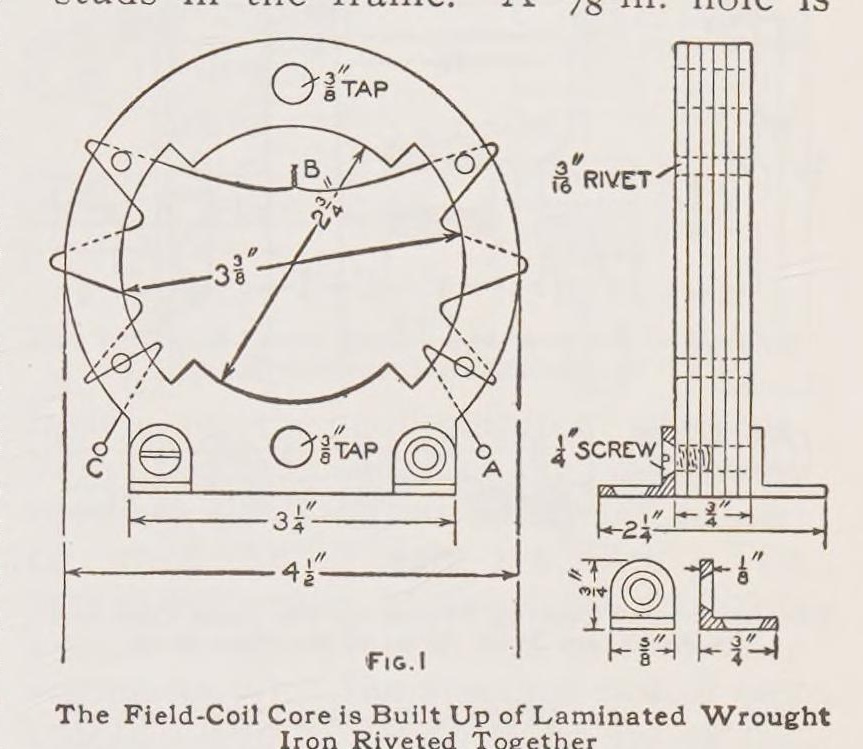
"The field frame of the motor, Fig. 1, is composed of wrought sheet iron."
2
2
Field frame
Field frame
Mark a template 1/16 in larger than Fig. 1, cut enough sheet-iron plates to make 3/4 in, drill four rivet holes and rivet them. Mark the bore with dividers set at 1/8 in, drill 1/4 in holes round it and file to shape. Bore to 2-3/4 in on a lathe; mark the field core at 3-3/8 in and the outside at 4-1/2 in and finish to the marks.
මෙම පියවර සඳහා ද්රව්ය:
 මෘදු වානේ තහඩුව1 කැබැල්ල
 වානේ රිවට්1 කැබැල්ල
අවශ්ය මෙවලම්:
 ඉරි අඳින උල
 තුඩු දෙකේ මිනුම් කවකටුව
 අත් විදුම
 කියතුරු (අත් කියතුර)
 ලෝහ කරකැවුම් යන්ත්රය
 මිටිය
3
3
Studs, lugs and bearings
Studs, lugs and bearings
Drill and tap two 3/8 in holes 3-5/8 in apart for the bearing studs (Fig. 2) and 1/4 in holes for feet bent from 1/8 in brass or iron. Make the bearing supports from 1/8 in brass with a 5/8 in hole and a 5/8 in brass rod soldered in and drilled for the shaft. Fit them after the armature is made: wrap paper round the armature, set it in the field, slip the bearings on and solder them, then check it turns freely.
මෙම පියවර සඳහා ද්රව්ය:
 පිත්තල තහඩුව1 කැබැල්ල
 පිත්තල දණ්ඩ1 කැබැල්ල
 මෘදු වානේ වටකුරු දණ්ඩ1 කැබැල්ල
 ටින්-ඊයම් පෑස්සුම1 කැබැල්ල
අවශ්ය මෙවලම්:
 ඉස්කුරුප්පු කැපීමේ කට්ටලයලෝහ කරකැවුම් යන්ත්රය
 පෑස්සුම් කූරුඅත් විදුම
4
4
Armature core
Armature core
Cut two 1/8 in wrought-iron outer plates and enough No. 24 sheet iron to make over 3/4 in (Fig. 5), drill six 1/8 in holes and rivet. Anneal at cherry red and cool in ashes. Bore to 1-11/16 in, fit a brass spider turned from 3/4 in brass on the machine-steel shaft with a setscrew, solder, turn the outside and face it to 3/4 in. File 12 slots 1/4 in deep and 7/16 in wide.
මෙම පියවර සඳහා ද්රව්ය:
මෘදු වානේ තහඩුව1 කැබැල්ලවානේ රිවට්1 කැබැල්ලපිත්තල දණ්ඩ1 කැබැල්ලමෘදු වානේ වටකුරු දණ්ඩ1 කැබැල්ලඅවශ්ය මෙවලම්:
 කම්මල් උදුනලෝහ කරකැවුම් යන්ත්රයකියතුරු (අත් කියතුර)අත් විදුම
5
5
Commutator
Commutator
Turn a piece of 3/4 in i.d. brass pipe to 3/4 in long, chamfer both ends at 60 deg, divide into 12, drill and tap a 1/8 in hole in each segment for a brass pin, turn the pins to 1-1/4 in outside and slit them for the wires. Saw it into 12 bars, fit them on turned fibre ends with 12 mica strips between, clamp with the nut and true up.
මෙම පියවර සඳහා ද්රව්ය:
 පිත්තල නළය1 කැබැල්ලපිත්තල දණ්ඩ1 කැබැල්ල
 Vulcanized Fibre Sheet1 කැබැල්ල
 මයිකා තහඩුව1 කැබැල්ල
අවශ්ය මෙවලම්:
ලෝහ කරකැවුම් යන්ත්රයඉස්කුරුප්පු කැපීමේ කට්ටලය යකඩ කපන කියත
6
6
Brushes
Brushes
Make the brush holder of fibre (Fig. 8) and studs of 5/16 in brass rod (Fig. 9). Roll brass or copper wire gauze and flatten it to 1/8 x 1/4 in, solder one end, and fit the holder on the bearing with a setscrew.
මෙම පියවර සඳහා ද්රව්ය:
Vulcanized Fibre Sheet1 කැබැල්ලපිත්තල දණ්ඩ1 කැබැල්ල කම්බි දැල / තිරය1 කැබැල්ලටින්-ඊයම් පෑස්සුම1 කැබැල්ල
අවශ්ය මෙවලම්:
පෑස්සුම් කූරුකියතුරු (අත් කියතුර)7
7
Wind the field
Wind the field
Insulate the field cores with 1/64 in fibre and end washers 1-1/8 x 1-1/2 in (softened in warm water, then glued). Wind each side with four layers (about 50 ft) of No. 18 double-cotton-covered wire, A to B and C to B, and join the ends at B.
මෙම පියවර සඳහා ද්රව්ය:
Vulcanized Fibre Sheet1 කැබැල්ල එනැමල් ආලේපිත තඹ කම්බිය1 කැබැල්ල
 දැව ඇලවුම1 කැබැල්ල
8
8
Wind the armature
Wind the armature
Line the ring and spider with 1/16 in fibre and the slots with 1/64 in fibre channels. Wind each slot with about 12 ft of No. 21 wire, 40 turns in four layers of 10, shellacking each layer, leaving 2 in ends. Join each coil's start to the next coil's finish and solder the joints to the commutator pins.
මෙම පියවර සඳහා ද්රව්ය:
Vulcanized Fibre Sheet1 කැබැල්ලඑනැමල් ආලේපිත තඹ කම්බිය1 කැබැල්ල ෂෙලැක් වාර්නිෂ්1 කැබැල්ලටින්-ඊයම් පෑස්සුම1 කැබැල්ල
අවශ්ය මෙවලම්:
පෑස්සුම් කූරු9
9
Mount and wire
Mount and wire
Screw the motor to a wood base 8 x 6 x 1 in with two terminals and a switch. Wire it in series: field end A to a terminal, field end C to one brush stud, the other brush through the switch to the other terminal.
මෙම පියවර සඳහා ද්රව්ය:
 දෘඪ දැව පුවරුව1 කැබැල්ල
 බයින්ඩිං පෝස්ට්1 කැබැල්ල
 ටොගල් ස්විචය1 කැබැල්ල
 ලී ඉස්කුරුප්පු1 කැබැල්ල
අවශ්ය මෙවලම්:
 අත් හැරවුම් විදුම සහ තුඩ
10
10
Troubleshooting
Troubleshooting
Motor troubleshooting.
Flow
Loading...
11
11
History and honest limits
History and honest limits
From W. A. Robertson in **The Boy Mechanic, Book 1** (Popular Mechanics, 1913), pp. 345-347 (checked on the archive.org scan boymechanic0000unse_n5a8). Sizes not in the text are in his Figs. 1-9; enamelled wire for cotton-covered and the low-voltage advice are ours.
ද්රව්ය
17- 1 කැබැල්ලස්ථානගත
- 1 කැබැල්ලස්ථානගත
- 1 කැබැල්ලස්ථානගත
- 1 කැබැල්ලස්ථානගත
- 1 කැබැල්ලස්ථානගත
- 3 කැබලිස්ථානගත
- 1 කැබැල්ලස්ථානගත
- 1 කැබැල්ලස්ථානගත
- 1 කැබැල්ලස්ථානගත
- 1 කැබැල්ලස්ථානගත
- 1 කැබැල්ලස්ථානගත
- 1 කැබැල්ලස්ථානගත
- 1 කැබැල්ලස්ථානගත
- 1 කැබැල්ලස්ථානගත
- ස්ථානගත
- ස්ථානගත
- 1 කැබැල්ලස්ථානගත
අවශ්ය මෙවලම්
11- ස්ථානගත
- ස්ථානගත
- ස්ථානගත
- ස්ථානගත
- ස්ථානගත
- ස්ථානගත
- ස්ථානගත
- 2 vendors sell this, none ship to you yetස්ථානගත
- ස්ථානගත
- ස්ථානගත
- ස්ථානගත
මෙම සැලසුම සාදන්නේ
සම්බන්ධ බ්ලූප්රින්ට්
මෙම බ්ලූප්රින්ට් දැනුම බෙදා ගනී — ශිල්ප ක්රම, ද්රව්ය හෝ මූලධර්ම

CC0 පොදු වසම
මෙම බ්ලූප්රින්ට් CC0 යටතේ නිකුත් කර ඇත. ඔබට අවසර නොමැතිව පිටපත් කිරීම, වෙනස් කිරීම, බෙදා හැරීම සහ භාවිතා කිරීම කළ හැක.
බ්ලූප්රින්ට් හරහා නිෂ්පාදන මිලදී ගැනීමෙන් නිර්මාතෘට සහාය වන්න නිර්මාතෘ කොමිසම විකුණුම්කරුවන් විසින් නියම කළ, හෝ මෙම බ්ලූප්රින්ට්හි නව අනුවාදයක් සාදා ආදායම බෙදා ගැනීමට ඔබේ බ්ලූප්රින්ට්හි සම්බන්ධතාවයක් ලෙස ඇතුළත් කරන්න.