කලාව
රූපලාවණ්ය සහ සුවතාව
ශිල්පය
සංස්කෘතිය සහ ඉතිහාසය
විනෝදාස්වාදය
පරිසරය
ආහාර සහ පාන
ප්රතිලෝම ඉංජිනේරු
විද්යාවන්
ක්රීඩා
තාක්ෂණය
පැළඳිය හැකි
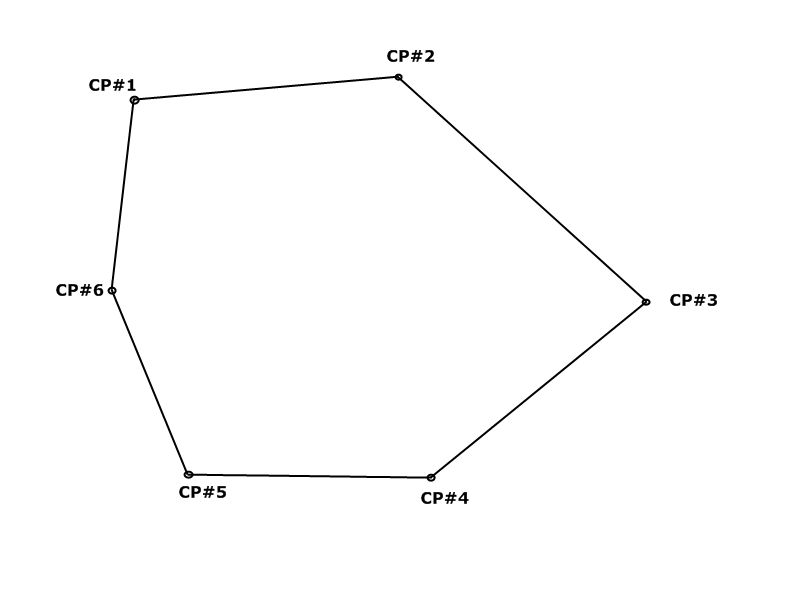


Running a Closed Traverse
A plane table maps what it can see from a couple of stations. To survey a whole site — round a building, through woodland, along a boundary — you walk a chain of stations from one to the next, measuring the length of each leg and the angle at each corner, and finish back where you began.
The reason it closes is the reason anyone trusts it. You know in advance what the angles of a closed polygon must add up to, and you know the trip must end at its own starting point. Both are checks nature provides for free, and the difference between what you measured and what must be true is your error — measured, not estimated.
This rung is the arithmetic heart of surveying. It is also where a survey stops being a collection of readings and becomes a set of coordinates you can build from.
උසස්
2 days
උපදෙස්
1
1
Choose and mark the stations
Choose and mark the stations
Pick stations that are intervisible, on firm ground, safe to stand on, and as few as the site allows. Drive a peg with a nail in its head at each, and number them.
Fewer, longer legs are better than many short ones: angular error enters once per station, so every extra corner is another chance to be wrong, while a longer leg costs you nothing extra in angle. Mark them well enough to find again — a survey you cannot reoccupy cannot be extended or checked.
මෙම පියවර සඳහා ද්රව්ය:
 ලී ඇණ12 කැබලි
 සින්ක් ආලේප කළ ඇණ20 කැබලි
 මිනුම් කොඩි හා ඇණ කට්ටලය1 කට්ටලය
අවශ්ය මෙවලම්:
 නියපොතු සහිත මිටිය
2
2
Measure every leg twice, in both directions
Measure every leg twice, in both directions
Tape each leg forwards and then backwards. The two should agree to within about a thousandth of the length; if they do not, measure again before moving on.
A blunder in a distance — a whole tape length missed, a misread metre — is the single most damaging error in a traverse, and unlike small random errors it cannot be adjusted away. It is also the easiest to catch, because a blunder never repeats identically. Measuring twice costs minutes; finding a 30-metre blunder after you have plotted everything costs the whole day.
අවශ්ය මෙවලම්:
 මිනුම් පටිය
3
3
Measure the angle at each station, both faces
Measure the angle at each station, both faces
At each station sight back to the previous one and forward to the next, and read the included angle. Then invert the telescope, swing it through, and read the same angle on the other face.
Averaging the two faces cancels most of the instrument's own mechanical errors in one move — it is the angular equivalent of balancing the sights when levelling. Always turn the angle the same way around the traverse, clockwise or anticlockwise, and never mix the two: it is a mistake that produces perfectly plausible numbers.
අවශ්ය මෙවලම්:
 බෑවුම් මානයක් සහිත මාලිමාව (Brunton ආකාරයේ)
 කැමරා ත්රිපාදය
4
4
Check the angles before you leave
Check the angles before you leave
The interior angles of a closed polygon with n sides must sum to (n-2)×180 degrees. Add yours up on the spot.
If the sum is out by more than a small tolerance, one angle is wrong, and you are still standing on the site where it can be remeasured. Doing this check at the desk that evening means going back. This is the same principle as the co-spot and the control slide in the two batches before this one: build the check into the work, not after it.
5
5
Reduce the traverse to coordinates
Reduce the traverse to coordinates
Jupyter සටහන් පොත පූරණය වෙමින්…
6
6
Plot it and look at it
Plot it and look at it
Plot the adjusted coordinates on squared paper at a sensible scale, and compare the shape with the site you just walked.
Coordinates are easy to get wrong in ways arithmetic checks cannot catch — a bearing carried the wrong way, an angle used as exterior instead of interior — and every one of those produces a plot that looks obviously wrong to anyone who was there. This is the plane table's lesson applied in reverse: draw it, because your eyes check things no column of figures can.
මෙම පියවර සඳහා ද්රව්ය:
 ප්රස්තාර කඩදාසි10 කැබලි
අවශ්ය මෙවලම්:
 රූලක්
රූලක් කෝණමානය
ද්රව්ය
4- 12 කැබලිස්ථානගත
- 20 කැබලිස්ථානගත
- 1 කට්ටලයස්ථානගත
- 10 කැබලිස්ථානගත
අවශ්ය මෙවලම්
6- ස්ථානගත
- 1 vendor sell this, none ship to you yetස්ථානගත
- ස්ථානගත
- ස්ථානගත
- ස්ථානගත
සම්බන්ධ බ්ලූප්රින්ට්
මෙම බ්ලූප්රින්ට් දැනුම බෙදා ගනී — ශිල්ප ක්රම, ද්රව්ය හෝ මූලධර්ම

CC0 පොදු වසම
මෙම බ්ලූප්රින්ට් CC0 යටතේ නිකුත් කර ඇත. ඔබට අවසර නොමැතිව පිටපත් කිරීම, වෙනස් කිරීම, බෙදා හැරීම සහ භාවිතා කිරීම කළ හැක.
බ්ලූප්රින්ට් හරහා නිෂ්පාදන මිලදී ගැනීමෙන් නිර්මාතෘට සහාය වන්න නිර්මාතෘ කොමිසම විකුණුම්කරුවන් විසින් නියම කළ, හෝ මෙම බ්ලූප්රින්ට්හි නව අනුවාදයක් සාදා ආදායම බෙදා ගැනීමට ඔබේ බ්ලූප්රින්ට්හි සම්බන්ධතාවයක් ලෙස ඇතුළත් කරන්න.