Building a Roman Concrete Dome — The Unreinforced Vault That Crowned the Pantheon
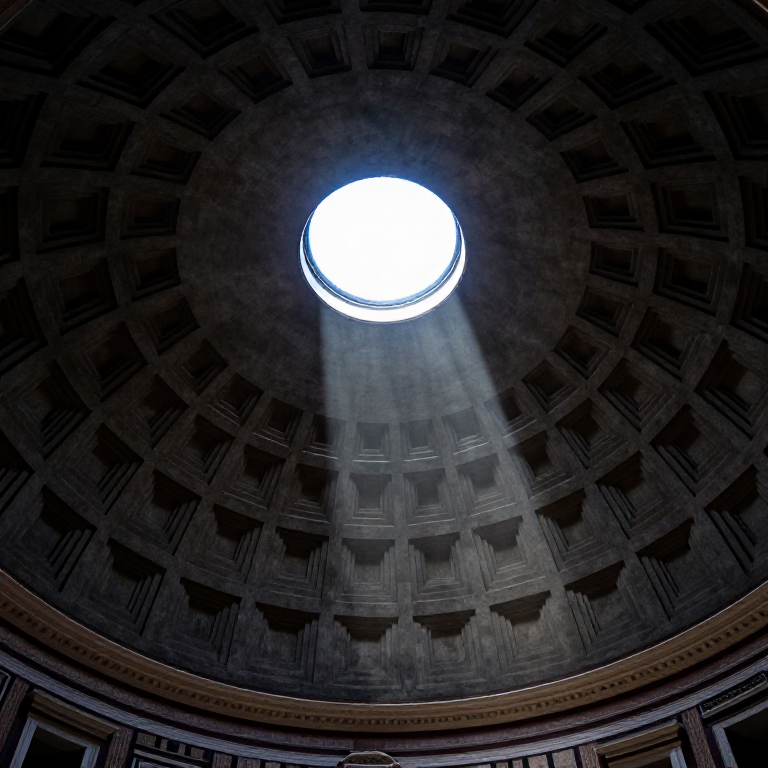
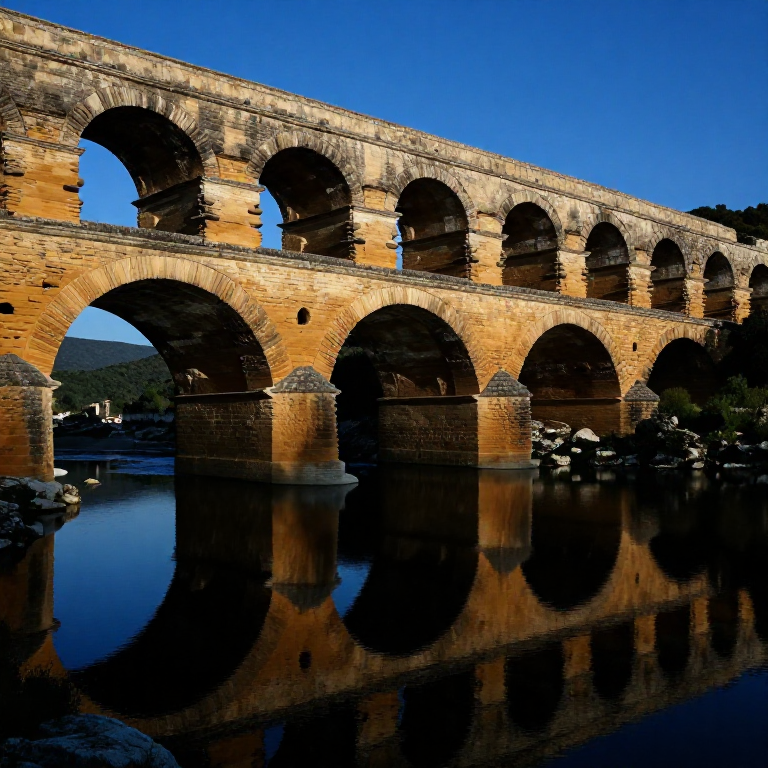
The Roman concrete dome is one of the most astonishing structural achievements in the history of architecture. The Pantheon in Rome, completed around 125 AD under Hadrian, remains the largest unreinforced concrete dome ever built — its interior diameter of 43.3 metres was unsurpassed for 1,300 years, until the construction of the Florence Cathedral in 1436. The dome is open to the sky at its apex through an oculus 8.3 metres wide, which provides all the building's light and serves as a structural compression ring.
Roman domes were made possible by opus caementicium — Roman concrete — which differs fundamentally from modern concrete in two ways. First, the binder is not Portland cement but pozzolanic mortar: slaked lime mixed with pozzolana, a volcanic ash found in abundance around Rome and Naples. When pozzolana reacts with lime and water, it produces calcium silicate hydrate — an extremely durable binder that sets even underwater. Second, Roman concrete is not poured in a single mix but laid in horizontal courses using aggregate of varying density: heavy volcanic tuff and brick rubble near the base, lighter vesicular lava higher up, and pumice stone near the crown. This deliberate aggregate grading reduces the dome's dead weight at the most critical zone — the crown — where tensile hoop stresses are highest.
The coffered (sunken panel) interior of the Pantheon dome removes an estimated 50% of the concrete volume at the upper courses, further reducing weight without sacrificing the structural shell. Every coffer and the oculus itself contribute to the same engineering principle: get mass out of the upper dome where it would generate tensile cracks. The result is a dome that has stood without reinforcing steel for nearly 1,900 years — longer than any steel-reinforced structure has yet been tested.
ညွှန်ကြားချက်များ
Design the dome geometry and establish the spring line
Design the dome geometry and establish the spring line
A hemispherical dome's geometry is defined by a single measurement: the interior radius. Mark the centre point on the prepared circular foundation and drive a pivot stake at the exact centre. Attach a cord equal to the interior radius to the pivot and mark out a perfect circle — this is the spring line, the level at which the dome departs from the vertical drum wall. Verify that the circle is level at all points using a water level (a tube filled with water, reading identical heights at both ends). Any deviation in the spring line will cause the dome to lean or develop unequal stress distribution.
Materials for this step:
 Hemp Cord20 မီတာ
Tools needed:
 Wooden Stake
Build the supporting drum wall to full height
Build the supporting drum wall to full height
The cylindrical drum wall below the dome carries the dome's weight and must be massively thick — in the Pantheon, the drum walls are 6 metres thick, incorporating relieving arches of brick that channel loads around voids. For smaller domes, build the drum in concentric rings of concrete and brick to the full height of the spring line. Embed radial brick arches within the drum mass as the wall rises; these act as internal relieving arches that distribute vertical loads to eight thickened piers, preventing uniform settlement. Ensure the top of the drum is perfectly level before beginning the dome itself.
Materials for this step:
 Calcium Carbonate (Crushed Limestone)100 ကီလို
 Coarse Sand80 ကီလို
Tools needed:
 Hammer (2 kg)
Construct the wooden centring formwork
Construct the wooden centring formwork
The formwork (centring) is a temporary wooden framework that supports the concrete during construction. For a dome, the centring must form the exact interior curved surface. Build radial timber ribs rising from a central post to the spring line, each bent or cut to the dome's radius of curvature. Cover the ribs with closely spaced curved planks (lagging) to create a continuous shuttering surface. The entire assembly must be strong enough to carry the wet weight of concrete without deflecting — a deflection of even 2 cm during construction permanently distorts the dome geometry. Coat all wooden surfaces with olive oil or tallow so the concrete releases cleanly when the formwork is struck.
Materials for this step:
 Hardwood Block20 ခု
 Iron Nails100 ခု
Tools needed:
 Hand Saw
Prepare the pozzolanic mortar
Prepare the pozzolanic mortar
Roman concrete (opus caementicium) derives its strength from pozzolanic mortar — a mixture of slaked lime and pozzolana volcanic ash. Slake quicklime (calcium oxide) by slowly adding water to dry lumps of burnt limestone in a stone trough, stirring constantly. The slaking reaction is strongly exothermic: the lime will hiss, steam, and reach 150°C — stand back and wear hand protection. Allow the slaked lime putty to mature for at least 24 hours before use. Mix the lime putty with pozzolana ash at approximately 1 part lime to 2 parts pozzolana by volume, adding water to produce a workable mortar of stiff paste consistency.
Materials for this step:
Calcium Carbonate (Crushed Limestone)50 ကီလိုCoarse Sand30 ကီလိုGrade the aggregate: heavy basalt and tuff for the base courses
Grade the aggregate: heavy basalt and tuff for the base courses
Roman engineers deliberately varied the aggregate material by height — a technique confirmed by core samples from the Pantheon. At the dome's base (lowest 7 metres of the Pantheon dome), use dense aggregate: broken basalt, travertine chips, and brick rubble. These heavyweight aggregates are acceptable here because the base courses experience compressive stresses and the added mass contributes to the structure's stability against overturning. Sort aggregate into pieces 3–8 cm across and mix with mortar at approximately 1 part mortar to 2 parts aggregate by volume.
Pour the lower dome courses in horizontal rings
Pour the lower dome courses in horizontal rings
Place the concrete in horizontal bands (courses), not radial wedges. Each horizontal ring is structurally self-contained — it can support its own weight while the mortar below cures before the next layer is added. Place the mortar and aggregate by hand in 15–20 cm lifts, ramming each layer firmly with a wooden staff to eliminate voids. The concrete must be stiff enough that it does not slump off the curved formwork, yet wet enough to fill every gap. Work around the full circumference of each ring before starting the next — maintain constant ring height to avoid creating seams that could become failure planes.
Transition to lighter aggregate (tufa) in the middle courses
Transition to lighter aggregate (tufa) in the middle courses
At approximately one-third of the dome's rise, switch from basalt and brick aggregate to lighter volcanic tuff (tufa) — a porous, lightweight volcanic stone with a density of approximately 1,200 kg/m³ compared to 2,700 kg/m³ for basalt. Tufa provides adequate compressive strength while significantly reducing the mass at higher elevations. In the Pantheon, the middle courses use a mix of tufa and brick chips. Continue laying in horizontal rings at the same thickness, maintaining the mortar ratio. The reduced weight of the middle courses dramatically lowers the hoop (circumferential) tension stresses that cause domes to crack at the equator.
Mark and cut the coffers in each successive course
Mark and cut the coffers in each successive course
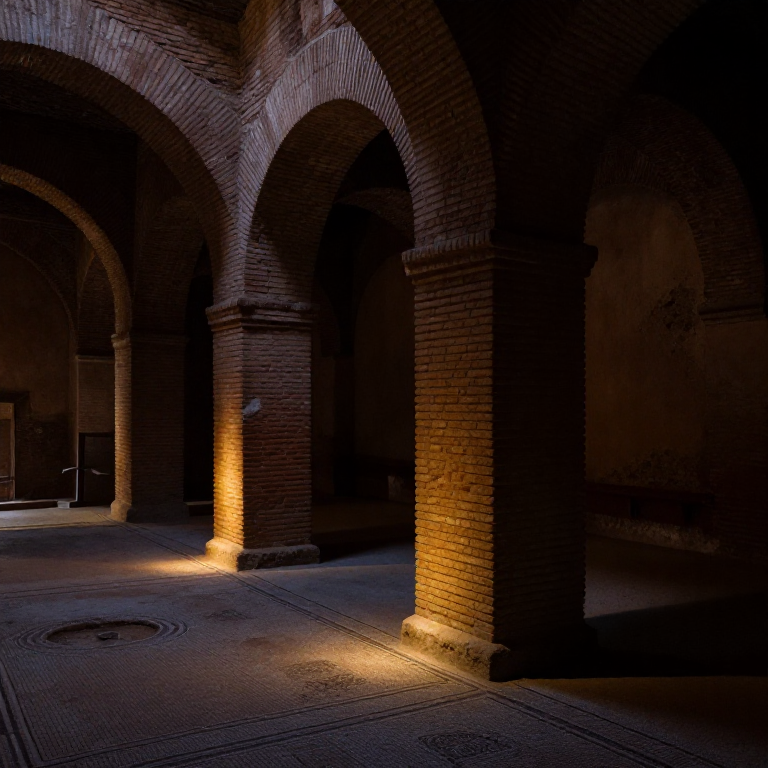
The coffering pattern (28 rows of 5 coffers in the Pantheon) is laid out by dividing the dome into equal vertical sectors using plumb lines from the oculus centre. As each course is laid, embed wooden box forms (roughly 50 × 50 × 15 cm, reducing in size higher up) in the wet concrete to create the sunken coffers. The boxes are removed after the mortar has initially set, leaving void panels separated by ribs of full-thickness concrete. Each coffer removes approximately 50% of the concrete from that section, while the remaining ribs carry all structural loads. The result is a dome shell that is significantly lighter at every upper course than a solid pour would be.
Materials for this step:
Hardwood Block10 ခုTransition to pumice aggregate for the upper courses
Transition to pumice aggregate for the upper courses
At approximately two-thirds of the dome's rise, switch to pumice aggregate — a highly vesicular (bubble-filled) volcanic glass with a density of only 400–900 kg/m³, less than half the weight of tufa and one-third the weight of basalt. Pumice has adequate compressive strength for the thin shell of the upper dome. This final material change removes thousands of kilograms of dead load from the zone where tensile stresses are highest (near the crown, the dome skin is in biaxial tension). Pumice is the lightest natural stone aggregate available to Roman builders and its use at the crown of the Pantheon is one of the key factors in the dome's 1,900-year survival.
Form the oculus compression ring
Form the oculus compression ring
The oculus — the open circular eye at the dome's crown — is not a weakness but a structural feature. As the dome rises toward the apex, lay a circular brick ring (approximately 1 metre wide and 1 metre thick for a large dome) using specially wedge-shaped (voussoir) bricks that lock together in compression. This ring acts like the keystone of an arch in three dimensions: it converts the radial forces from the converging dome shell into a compressive hoop, allowing the crown to remain open without collapse. For a dome of 10 metres diameter, the oculus ring should be approximately 1.5–2 metres in diameter, providing an opening of approximately 1 metre for light.
Allow the concrete to cure for at least 28 days before striking formwork
Allow the concrete to cure for at least 28 days before striking formwork
Pozzolanic Roman concrete cures more slowly than modern Portland cement concrete but ultimately achieves greater durability. Keep all exposed surfaces moist by covering with wet cloth or clay; do not allow direct sun to dry the surface, as this causes shrinkage cracking. Allow a minimum of 28 days of curing before considering striking any formwork — for thick sections over 1 metre, 60–90 days is safer. Do not apply any structural load to the dome during curing. Monitor the concrete surface daily for hairline cracks; any crack wider than 0.5 mm should be investigated before proceeding.
Strike the formwork (centring) carefully from the centre outward
Strike the formwork (centring) carefully from the centre outward
Strike (remove) the wooden centring by gradually lowering it — traditionally done with sand-filled boxes that drain slowly to let the centring descend without shock. Never remove the formwork suddenly. Begin by lowering the central post slightly to transfer load to the dome itself; watch for any cracking or movement. If the dome settles without cracking, continue lowering over 3–7 days until the full centering is free. Remove the wooden planks and ribs from the interior. Any small surface imperfections can be patched with mortar. The dome is now self-supporting — an arch in three dimensions that will become stronger over decades as the pozzolanic mortar continues to carbonate and harden.
Apply waterproofing and finish coats to the exterior
Apply waterproofing and finish coats to the exterior
Apply a waterproof render to the exterior dome surface to protect the concrete from rain penetration and freeze-thaw damage. Roman builders used a hydraulic lime plaster (opus signinum — lime mixed with crushed brick dust) that is water-resistant. Apply in two coats: a 10 mm scratch coat keyed into the rough concrete surface, followed after 7 days by a 5 mm smooth finish coat. The exterior of the Pantheon was originally covered in bronze sheets — a level of cladding appropriate to a major public building. For structural purposes, the render coat alone provides adequate weatherproofing.
Materials for this step:
Calcium Carbonate (Crushed Limestone)20 ကီလိုပစ္စည်းများ
5- Placeholder
- 110 ကီလိုPlaceholder
- 30 ခုPlaceholder
- 100 ခုPlaceholder
Connected Blueprint Materials
ဆက်စပ် အစီအစဉ်များ
ဤအစီအစဉ်များသည် အသိပညာမျှဝေသည် — နည်းပညာ၊ ပစ္စည်း သို့မဟုတ် မူများ
Related blueprints
Other builds that share materials, tools, or techniques with this one.
CC0 အများပိုင်
ဤအစီအစဉ်ကို CC0 အောက်တွင် ထုတ်ဝေထားသည်။ ခွင့်ပြုချက်မလိုဘဲ ကူးယူ၊ ပြင်ဆင်၊ ဖြန့်ဝေ နှင့် အသုံးပြုနိုင်သည်။
အစီအစဉ်မှတစ်ဆင့် ကုန်ပစ္စည်းများဝယ်ယူ၍ ဖန်တီးသူကို ပံ့ပိုးပါ ဖန်တီးသူ ကော်မရှင် ရောင်းချသူက သတ်မှတ်သည်၊ သို့မဟုတ် ဤအစီအစဉ်၏ ဗားရှင်းအသစ်ဖန်တီး၍ ဝင်ငွေခွဲဝေရန် သင့်အစီအစဉ်တွင် ချိတ်ဆက်မှုအဖြစ် ထည့်သွင်းပါ။