ပူးပေါင်းဆောင်ရွက်ခြင်း
အနုပညာ
အလှအပနှင့် ကျန်းမာရေး
လက်မှုအနုပညာ
ယဉ်ကျေးမှုနှင့် သမိုင်း
ဖျော်ဖြေရေး
ပတ်ဝန်းကျင်
အစားအစာနှင့် အချိုရည်
ပြောင်းပြန်အင်ဂျင်နီယာပညာ
သိပ္ပံပညာများ
အားကစား
နည်းပညာ
ဝတ်ဆင်နိုင်သောပစ္စည်းများ
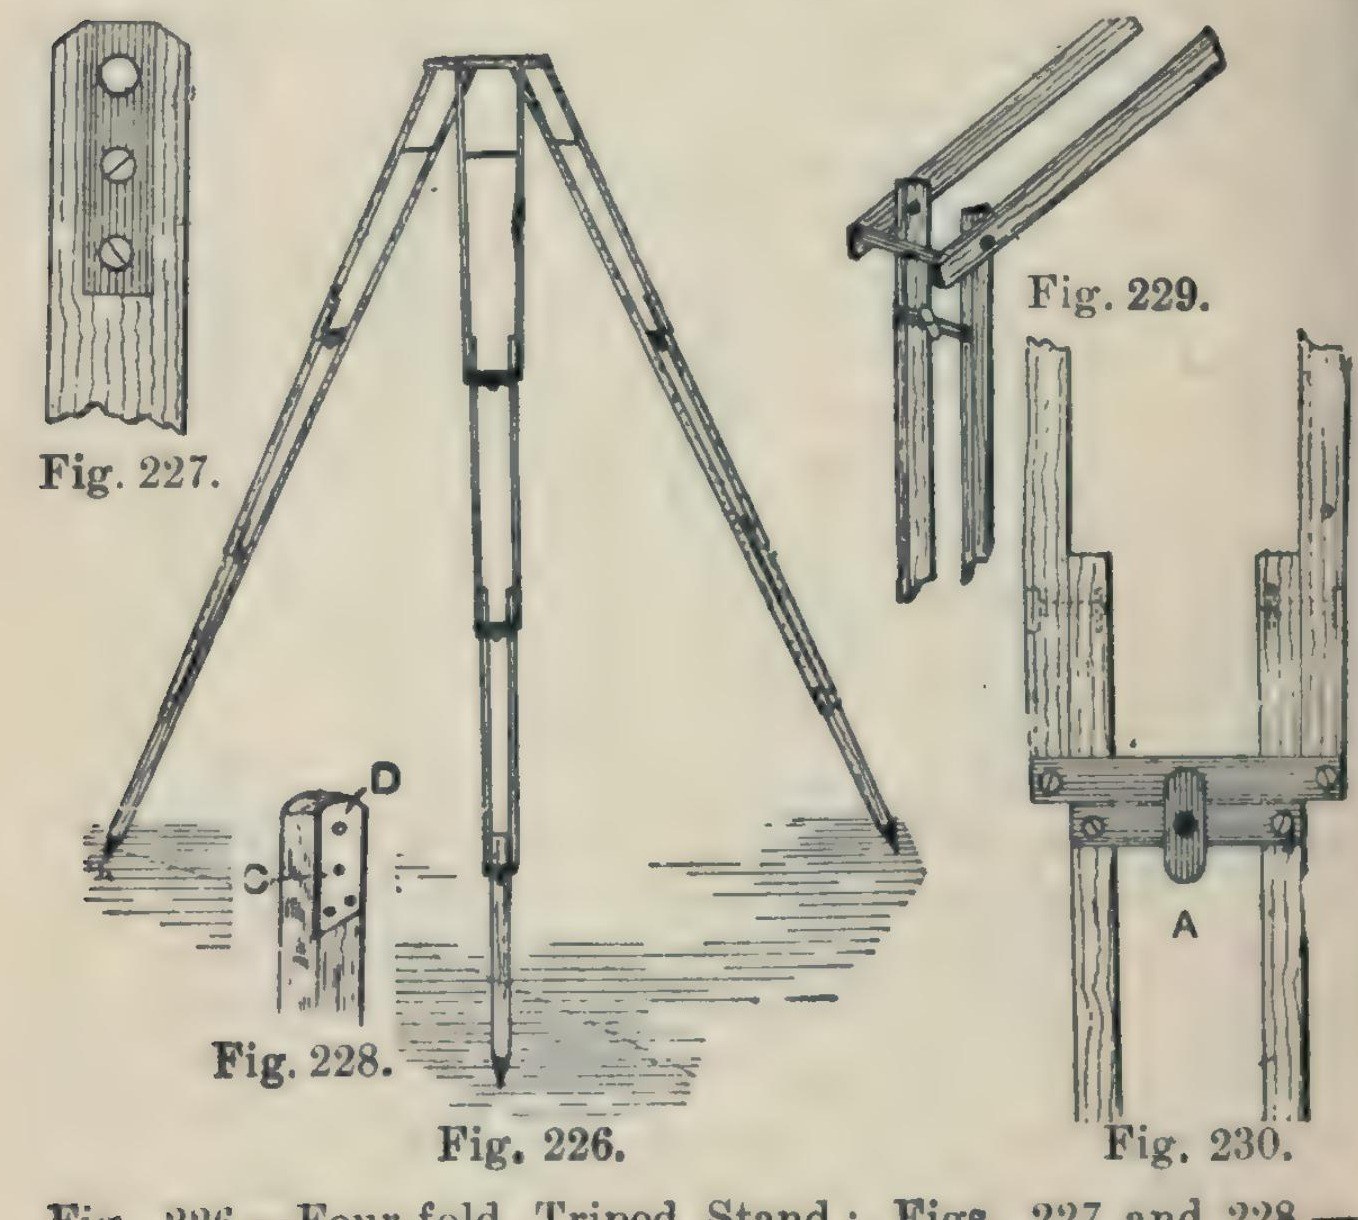


Camera Tripod: a Four-Fold Ash Tripod Stand (Hasluck, 1902)
A light, compact folding camera stand: three legs, each of seven ash laths riveted so it folds in four, locked open by brass buttons, on a triangular ash top with brass pins and a hole for the camera screw.
Hasluck says the same method makes stands that fold in three or two.
Source: Paul N. Hasluck, Photographic Cameras and Accessories (1902), pp. 153-157. Picture: Figs. 226-230 of the book.
အလယ်အလတ်
Unknown
ညွှန်ကြားချက်များ
1
1
Cut the ash laths
Cut the ash laths
Cut laths of good ash, true and square or the stand won't be rigid, and round the edges slightly: six 17 1/4 x 5/8 x 3/8 in, six 16 x 5/8 x 3/8 in, six 15 1/2 x 5/8 x 3/8 in, and three 14 x 5/8 x 5/8 in.
ဤအဆင့်အတွက် ကုန်ကြမ်းများ:
 အက်ရှ်သစ်သားပြား1 21 laths
လိုအပ်သော ကိရိယာများ:
 ကျောရိုးပါလွှ
 သစ်ချောစက်ငယ်
2
2
Fit the top ends and stretcher
Fit the top ends and stretcher
On each 17 1/4 in lath let in flush a 1/16 in brass plate, 1 1/4 in long, with a 3/16 in hole 1/4 in from the top, held by two countersunk brass screws; bore the wood to match and take off the top corners. On one lath of each pair cut a groove inside, about 3/16 in deep and 3 1/2 in long, starting 2 in from the top, and hinge a 1/8 in brass rod stretcher in it on a pin. On the other lath cut a curved groove 1 1/2 in long, 3/16 in wide, with a small hole at the bottom where the rod catches.
ဤအဆင့်အတွက် ကုန်ကြမ်းများ:
 ကြေးဝါပြား1 1/16 in plates
 သစ်သားဝက်အူများ1 small brass screws
 ကြေးဝါချောင်း1 1/8 in stretcher
လိုအပ်သော ကိရိယာများ:
 သံဖြတ်လွှဘောင်နှင့် လွှသွားများ
 သတ္တုရိုက်တံ
 လက်တူးစက်
 သစ်သားဆောက်များ
 ဝက်အူလှည့် − ပြားချပ်
3
3
Bore and rivet the legs
Bore and rivet the legs
Bore the rivet holes: in the long laths 1 3/4 in from the lower end, counterbored so the copper rivet head sits flush, then 1/8 in through; in the 16 in and 15 1/2 in laths 1/2 in and 1 3/4 in from the ends; in each 14 in piece 1/2 in from one end, and taper its other end for a pointed iron shoe or a steel point and ferrule. Rivet the 21 laths into three legs with 1/8 in copper rivets and washers: a 16 in lath inside each 17 1/4 in one, a 15 1/2 in lath inside that, the 14 in foot between the last pair. Rivets flush, just tight enough to fold but not loose.
ဤအဆင့်အတွက် ကုန်ကြမ်းများ:
 ကြေးနီရစ်ဗက်1 1/8 in, with washers
 မသိရှိသေးသော သတ္တု3 iron shoes or steel points
လိုအပ်သော ကိရိယာများ:
 လက်လှည့် သံစူးနှင့် ထိပ်လက်တူးစက်
 ရစ်ဗက်တူ
4
4
Add cross strips and lock buttons
Add cross strips and lock buttons
Screw 1/16 in brass strips across the bottom ends of each pair of laths (Fig. 229). Under them screw strips carrying a small brass button riveted at the centre; turned, the button hooks over the strip above and locks the joint open (Fig. 230).
ဤအဆင့်အတွက် ကုန်ကြမ်းများ:
ကြေးဝါပြား1 cross strips, buttonsသစ်သားဝက်အူများ1 ခုလိုအပ်သော ကိရိယာများ:
သံဖြတ်လွှဘောင်နှင့် လွှသွားများသတ္တုရိုက်တံဝက်အူလှည့် − ပြားချပ်ရစ်ဗက်တူ5
5
Make the top
Make the top
Plane ash to 1/2 in and draw an equilateral triangle with 8 1/2 in sides. Bisect the angles; 2 in from each corner draw a line at right angles, go 1/2 in in along the sides, and mark three rectangles 2 7/8 x 3/4 in; cut the outline (Fig. 231). Fix a 3/16 in brass rod, one end tapered, across each rectangle, bored 3/8 in from the outer edge and projecting about 1/2 in, for the legs to hang on. Bore a 1/4 in hole in the centre for the camera screw and glue felt on top.
ဤအဆင့်အတွက် ကုန်ကြမ်းများ:
အက်ရှ်သစ်သားပြား1 topကြေးဝါချောင်း3 3/16 in pins သိုးမွေးဖယ်လ်1 ခု
 တိရစ္ဆာန်ကော်1 ခု
လိုအပ်သော ကိရိယာများ:
သစ်ချောစက်ငယ်ကျောရိုးပါလွှလက်လှည့် သံစူးနှင့် ထိပ်လက်တူးစက်6
6
Finish
Finish
Glasspaper and varnish the wood, and lacquer the brass.
ဤအဆင့်အတွက် ကုန်ကြမ်းများ:
 ရှဲလက် ဗာနစ်1 varnish
 မသိသော ပစ္စည်း1 brass lacquer
လိုအပ်သော ကိရိယာများ:
 သဲစက္ကူ
ပစ္စည်းများ
10- 1 topနေရာယူပစ္စည်း
- 1 cross strips, buttonsနေရာယူပစ္စည်း
- 1 ခုနေရာယူပစ္စည်း
- 3 3/16 in pinsနေရာယူပစ္စည်း
- 1 1/8 in, with washersနေရာယူပစ္စည်း
- 3 iron shoes or steel pointsနေရာယူပစ္စည်း
- 1 ခုနေရာယူပစ္စည်း
- 1 ခုနေရာယူပစ္စည်း
- 1 varnishနေရာယူပစ္စည်း
- 1 brass lacquerနေရာယူပစ္စည်း
လိုအပ်သော ကိရိယာများ
10- နေရာယူပစ္စည်း
- နေရာယူပစ္စည်း
- နေရာယူပစ္စည်း
- နေရာယူပစ္စည်း
- နေရာယူပစ္စည်း
- နေရာယူပစ္စည်း
- နေရာယူပစ္စည်း
- နေရာယူပစ္စည်း
- နေရာယူပစ္စည်း
- နေရာယူပစ္စည်း
ဤဘလူးပရင့်က ပြုလုပ်သည်

CC0 အများပိုင်
ဤအစီအစဉ်ကို CC0 အောက်တွင် ထုတ်ဝေထားသည်။ ခွင့်ပြုချက်မလိုဘဲ ကူးယူ၊ ပြင်ဆင်၊ ဖြန့်ဝေ နှင့် အသုံးပြုနိုင်သည်။
အစီအစဉ်မှတစ်ဆင့် ကုန်ပစ္စည်းများဝယ်ယူ၍ လက်မှုပညာရှင်ကို ပံ့ပိုးပါ လက်မှုပညာရှင် ကော်မရှင် ရောင်းချသူက သတ်မှတ်သည်၊ သို့မဟုတ် ဤအစီအစဉ်၏ ဗားရှင်းအသစ်ဖန်တီး၍ ဝင်ငွေခွဲဝေရန် သင့်အစီအစဉ်တွင် ချိတ်ဆက်မှုအဖြစ် ထည့်သွင်းပါ။