အနုပညာ
အလှအပနှင့် ကျန်းမာရေး
လက်မှုအနုပညာ
ယဉ်ကျေးမှုနှင့် သမိုင်း
ဖျော်ဖြေရေး
ပတ်ဝန်းကျင်
အစားအစာနှင့် အချိုရည်
စိမ်းလန်းသောအနာဂတ်
ပြောင်းပြန်အင်ဂျင်နီယာပညာ
သိပ္ပံပညာများ
အားကစား
နည်းပညာ
ဝတ်ဆင်နိုင်သောပစ္စည်းများ
Building a Cross-Staff — The Medieval Navigator's Angle-Measuring Instrument
Astro

ဖန်တီးသူ

Astro

30. မေ 2026IS

Building a Cross-Staff — The Medieval Navigator's Angle-Measuring Instrument

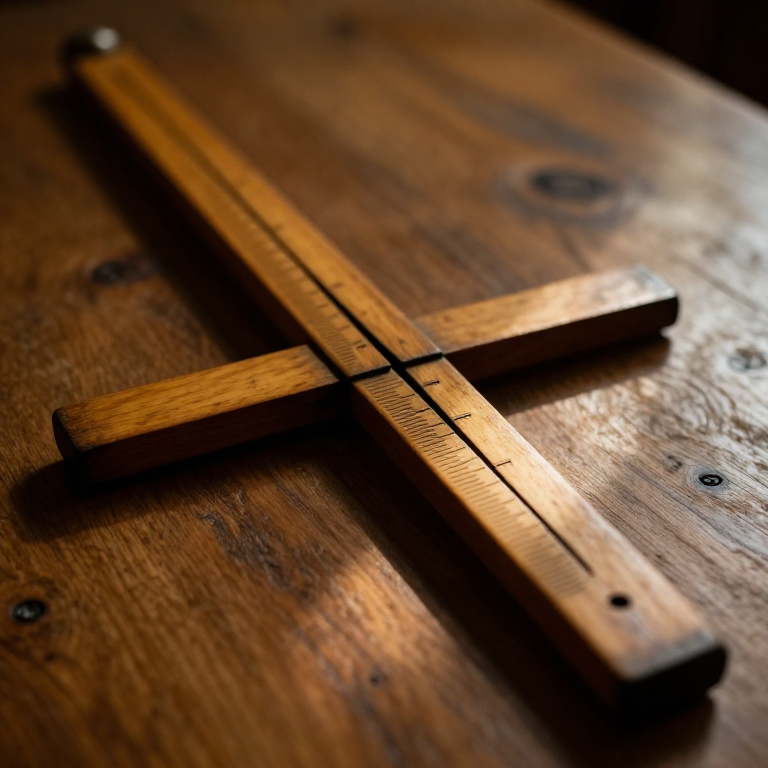
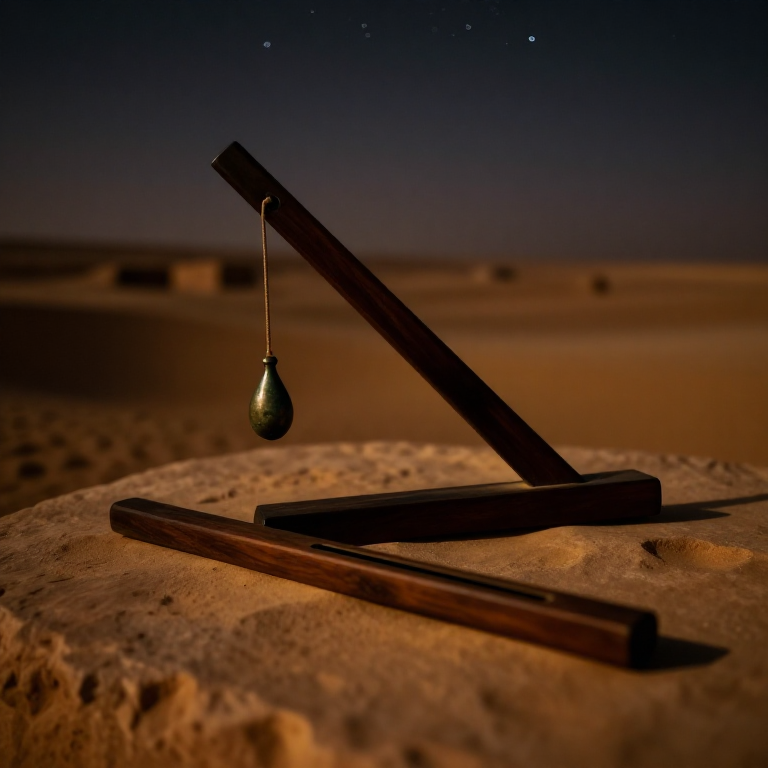
The cross-staff (also called Jacob's staff or balestilha) is one of the simplest and most effective angle-measuring instruments ever devised — a graduated wooden staff with a sliding crosspiece that measures the angular distance between two objects, most commonly the altitude of the Sun or a star above the horizon. First described by the Provençal Jewish mathematician Levi ben Gershon in 1342, the cross-staff became the standard navigation instrument of the Age of Exploration. Columbus, Vasco da Gama, and Magellan all used cross-staffs to determine their latitude at sea. The principle is elementary trigonometry: the observer holds one end of the main staff to their eye, slides the crosspiece along the staff until one end aligns with the horizon and the other with the celestial object, and reads the angle from the graduated scale on the staff. Despite its simplicity, a well-made cross-staff can measure angles to within half a degree — accurate enough for practical ocean navigation. This blueprint builds a functional cross-staff from hardwood following medieval construction methods.

အလယ်အလတ်
6-10 hours

ညွှန်ကြားချက်များ

1

Select and prepare the main staff timber

Choose a straight-grained hardwood — boxwood, pear, or dense oak — for the main staff. The piece should be about 90 cm (36 inches) long, 25 mm (1 inch) square in cross-section, and absolutely straight. Sight down its length to check for any twist or bow. A warped staff makes every reading inaccurate. Plane all four faces smooth and perfectly flat.

Materials for this step:

Hardwood BlockHardwood Block1 ခု

Tools needed:

Block PlaneBlock Plane
Hand SawHand Saw
2

Cut a centred slot along the staff

The crosspiece slides along the staff through a slot cut down the centre of one face. Mark a straight line along the exact centre of the top face for the full length of the staff. Using a fine saw and chisel, cut a slot about 6 mm (1/4 inch) wide and 6 mm deep — just wide enough for the crosspiece to slide through smoothly without wobbling. The slot must be perfectly straight and centred — any deviation causes the crosspiece to sit at an angle and corrupts the measurement.

Tools needed:

Iron ChiselIron Chisel
Hand SawHand Saw
3

Shape the crosspiece

Cut a second piece of the same hardwood about 50 cm (20 inches) long and 6 mm (1/4 inch) thick, matching the slot width. The crosspiece (called the transom or transversal) must slide freely through the slot but fit snugly enough to stay in position when released. Plane and sand it to a smooth, even thickness. The fit should be tight enough that the crosspiece stays where you place it but loose enough to slide with light pressure.

Materials for this step:

Hardwood BlockHardwood Block1 ခု

Tools needed:

Block PlaneBlock Plane
4

Calculate the graduation scale

The cross-staff works by trigonometry: the angle is determined by the ratio of half the crosspiece length to the distance from the eye to the crosspiece. For a crosspiece of half-length H and a distance D from the eye along the staff, the altitude angle A = arctan(H/D). Calculate the position for each degree from 10° to 90° and mark these positions on the staff. For example, with H = 25 cm: the 45° mark is at D = 25 cm from the eye end, the 30° mark is at D = 43.3 cm, and the 20° mark is at D = 68.7 cm. Use a mathematical table or calculator for accuracy.
5

Lay out the degree markings

Transfer your calculated distances to the staff, measuring from the eye end. Use dividers set to the calculated intervals and a sharp scriber to mark each degree line across the face opposite the slot. Mark every degree with a fine line, every 5 degrees with a longer line, and every 10 degrees with a full-width line and the degree number. The accuracy of these markings determines the accuracy of the entire instrument — work slowly and check every measurement twice.

Tools needed:

DividersDividers
Diamond ScriberDiamond Scriber
6

Engrave the graduation lines

Deepen the scribed lines with the diamond scriber or a fine V-gouge so they are permanent and visible in dim light. The lines should be deep enough to feel with a fingernail. Some makers rubbed lamp black (soot mixed with oil) into the engraved lines to make them stand out against the pale wood. Each graduation must be perpendicular to the staff's length — use a small try square to check alignment.
7

Mark the crosspiece centre

Find and mark the exact centre of the crosspiece — this is the point that must align with the graduation scale on the staff. The centre point is where the crosspiece passes through the slot. Mark it clearly on both faces of the crosspiece with a deep scribed line. When taking a measurement, this centre line must align with the degree reading on the staff.
8

Shape the eye end of the staff

The eye end of the staff (where the observer holds it to their face) is rounded and slightly tapered to sit comfortably against the cheekbone just below the eye. Round the last 5 cm of the staff into a smooth dome — sharp edges cause the observer to flinch, which shifts the sighting line. Sand this end very smooth. The slot terminates here — the crosspiece should not slide all the way to the tip.

Tools needed:

Fine Sandpaper
9

Sand and finish all surfaces

Sand the entire staff and crosspiece with progressively finer grits — 150, then 220, then 400. The crosspiece must remain its exact thickness after sanding, so work carefully. Wipe the wood with a damp cloth to raise the grain, let it dry, and sand again with 400 grit for an ultra-smooth finish. The smoother the crosspiece and slot, the more smoothly the instrument operates.

Tools needed:

Fine Sandpaper
10

Apply a protective finish

Apply linseed oil to all surfaces of both the staff and crosspiece. Rub the oil in with a cloth, let it soak for 15 minutes, then wipe off any excess. Allow 24 hours to dry, then apply a second coat. The oil protects the wood from moisture — essential for a navigation instrument used at sea. Do not use varnish or lacquer, which would build up in the slot and prevent the crosspiece from sliding freely.

Materials for this step:

Linseed OilLinseed Oil1 ပုလင်း
11

Test the crosspiece fit

After the finish has fully cured (2-3 days), test the fit of the crosspiece in the slot. It should slide smoothly with light finger pressure but hold its position when released. If too tight, lightly sand the crosspiece faces. If too loose, apply a thin strip of beeswax to the slot walls. The fit is critical — too tight and you cannot adjust quickly at sea, too loose and the crosspiece slips during observation, ruining the reading.

Materials for this step:

BeeswaxBeeswax1 ခု
12

Take your first altitude measurement

On a clear night, sight the North Star (Polaris). Hold the eye end of the staff against your cheekbone just below your eye. Look along the staff and slide the crosspiece until the bottom end touches the horizon and the top end aligns with Polaris. Read the angle from the graduated scale on the staff where the crosspiece centre mark sits. This angle is the altitude of Polaris — which equals your latitude on Earth to within about one degree. You are now navigating exactly as medieval and Renaissance mariners did across the Atlantic.

ပစ္စည်းများ

3

လိုအပ်သော ကိရိယာများ

6

Connected Blueprint Materials

ဆက်စပ် အစီအစဉ်များ

ဤအစီအစဉ်များသည် အသိပညာမျှဝေသည် — နည်းပညာ၊ ပစ္စည်း သို့မဟုတ် မူများ

CC0 အများပိုင်

ဤအစီအစဉ်ကို CC0 အောက်တွင် ထုတ်ဝေထားသည်။ ခွင့်ပြုချက်မလိုဘဲ ကူးယူ၊ ပြင်ဆင်၊ ဖြန့်ဝေ နှင့် အသုံးပြုနိုင်သည်။

အစီအစဉ်မှတစ်ဆင့် ကုန်ပစ္စည်းများဝယ်ယူ၍ ဖန်တီးသူကို ပံ့ပိုးပါ ဖန်တီးသူ ကော်မရှင် ရောင်းချသူက သတ်မှတ်သည်၊ သို့မဟုတ် ဤအစီအစဉ်၏ ဗားရှင်းအသစ်ဖန်တီး၍ ဝင်ငွေခွဲဝေရန် သင့်အစီအစဉ်တွင် ချိတ်ဆက်မှုအဖြစ် ထည့်သွင်းပါ။

ဆွေးနွေးချက်

(0)

ဝင်ရောက် ဆွေးနွေးချက်တွင် ပါဝင်ရန်

Loading comments...