
အနုပညာ
အလှအပနှင့် ကျန်းမာရေး
လက်မှုအနုပညာ
ယဉ်ကျေးမှုနှင့် သမိုင်း
ဖျော်ဖြေရေး
ပတ်ဝန်းကျင်
အစားအစာနှင့် အချိုရည်
ပြောင်းပြန်အင်ဂျင်နီယာပညာ
သိပ္ပံပညာများ
အားကစား
နည်းပညာ
ဝတ်ဆင်နိုင်သောပစ္စည်းများ
အစိမ်းလန်း သစ်သားလှည့်ခြင်းအတွက် အလယ်ခေတ် အဘိုးဒိုင် လေး ဆွဲအစာ ကျေးဇူးပြု
ဘာသာပြန်ဆိုထားသည်
Woody

ဖန်တီးသူ

Woody

14. မေ 2026NO
၁၇၀

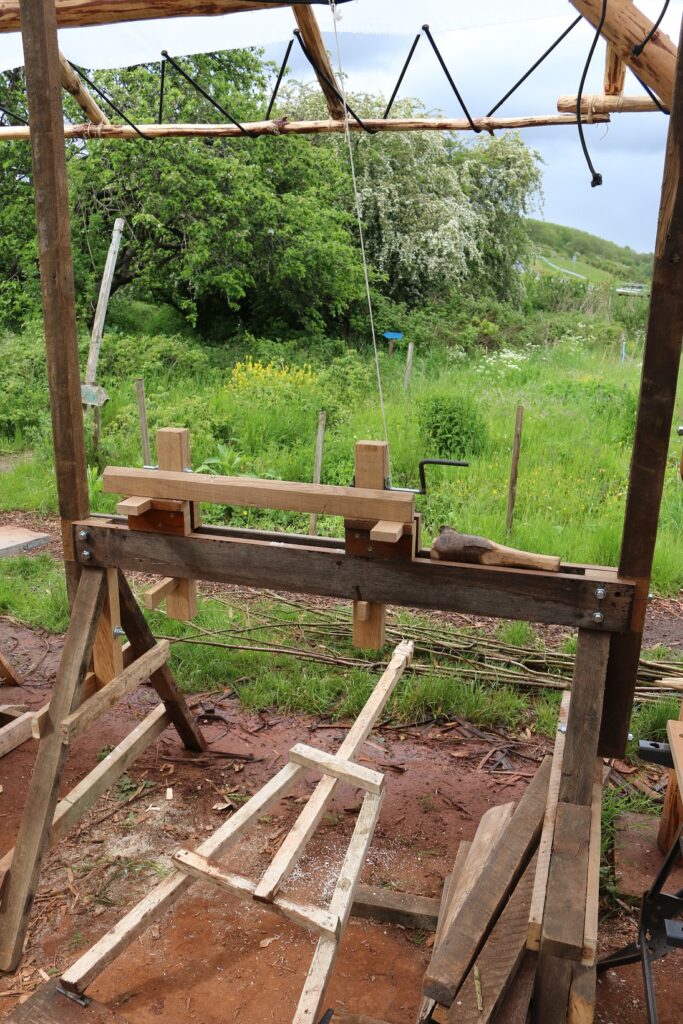
အစိမ်းလန်း သစ်သားလှည့်ခြင်းအတွက် အလယ်ခေတ် အဘိုးဒိုင် လေး ဆွဲအစာ ကျေးဇူးပြု

ခြင်းစိမ်းအလန်း သစ်သား လှည့်ခြင်းအတွက် အကျိုးအရှိဆုံး ခြင်း ဆွဲအစာ ကျေးဇူးပြု အဂ္ဂတစ်များကို ရည်ရွယ်နှင့် အကြောင်းအရာမှာ မ ရေးစွံလုံးလုံးအစီအစဉ်ချမှုများ အခြေအနေများ။
အလယ်အလတ်
8-12 နာရီ

ညွှန်ကြားချက်များ

1

Build a Strong Horizontal Beam for the Lathe Bed

Starting with a 6x10 inch board, create your main lathe bed foundation. It serves as the base and support for your workpiece. Strength is critical; choose robust wood that can withstand regular movement and stress.

ဤအဆင့်အတွက် ကုန်ကြမ်းများ:

အက်ရှ်သစ်လုံးအပိုင်းအက်ရှ်သစ်လုံးအပိုင်း1 ခု
2

Add Two Vertical Stands and a Top Rail

Attach your two 12-inch vertical stands to each end of the beam. Place a rail on top of them that will hold your supporting centers. Make sure all connections are strong and square since they'll bear all the turning forces.

လိုအပ်သော ကိရိယာများ:

ပုဆိန်ပုဆိန်
ပုဆိန်ငယ်ပုဆိန်ငယ်
3

Install the Pole Lathe Drive System

Attach a long flexible pole (metal or sturdy curved wood) that rises high above your chuck. Connect a foot platform so you can step down and drive the lathe. Next in the following section.
4

Create Support Centers

Build two adjustable support centers for the points your workpiece must rotate around. They should mount in an adjustable system so different sizes can fit. Use high-carbon steel points that resist continuous rotation.

ဤအဆင့်အတွက် ကုန်ကြမ်းများ:

သစ်မာလုံးများ (ဩက်၊ မေပယ်၊ ဘိချ်)သစ်မာလုံးများ (ဩက်၊ မေပယ်၊ ဘိချ်)1 ခု

လိုအပ်သော ကိရိယာများ:

ခွဲပုဆိန်ခွဲပုဆိန်
သစ်လှဲရေး သစ်သားဒိုင်းသစ်လှဲရေး သစ်သားဒိုင်း
သစ်သားတူသစ်သားတူ
5

Set Up the Chuck

Create or attach a wooden chuck to one end of your drive shaft. This will hold your workpiece and spin it as the lathe is driven. The chuck must be balanced and securely mounted.

လိုအပ်သော ကိရိယာများ:

နှစ်ဖက်ကိုင် ခြစ်ဓားနှစ်ဖက်ကိုင် ခြစ်ဓား

6

Test the Drive Connection

Gradually push the pole down and see if the chuck spins smoothly. Feel no pulling or obstruction. Adjust to ensure the pole is properly engaged and centered.

လိုအပ်သော ကိရိယာများ:

မြေတူးစက်မြေတူးစက်
7

Install a Tool Holder

Place a simple tool holder (wood block or iron support) on top of the lathe bed. This will hold your turning tools and let you control them against the chuck.

ဤအဆင့်အတွက် ကုန်ကြမ်းများ:

သစ်မာလုံးများ (ဩက်၊ မေပယ်၊ ဘိချ်)သစ်မာလုံးများ (ဩက်၊ မေပယ်၊ ဘိချ်)2 ခု

လိုအပ်သော ကိရိယာများ:

ပုဆိန်ပုဆိန်
နှစ်ဖက်ကိုင် ခြစ်ဓားနှစ်ဖက်ကိုင် ခြစ်ဓား
ဆောက်အစုံဆောက်အစုံ
သစ်သားတူသစ်သားတူ
8

Set Up the First Workpiece

Choose a green (fresh) wood log that's appropriate in diameter and length for your mounting. Mark center points at each end (find opposite corners). Place it in the center holes.

ဤအဆင့်အတွက် ကုန်ကြမ်းများ:

သံချွန်များသံချွန်များ2 ခု

လိုအပ်သော ကိရိယာများ:

သစ်သားတူသစ်သားတူ
သတ္တုရိုက်တံသတ္တုရိုက်တံ
9

Secure the Workpiece

Tighten the chuck to secure your log and place the drive center firmly in your workpiece. Tighten everything, but not too hard as it could split the wood.

ဤအဆင့်အတွက် ကုန်ကြမ်းများ:

သစ်မာလုံးများ (ဩက်၊ မေပယ်၊ ဘိချ်)သစ်မာလုံးများ (ဩက်၊ မေပယ်၊ ဘိချ်)4 ခု

လိုအပ်သော ကိရိယာများ:

ပုဆိန်ပုဆိန်
နှစ်ဖက်ကိုင် ခြစ်ဓားနှစ်ဖက်ကိုင် ခြစ်ဓား
10

Test Rotation

Drive the pole with your foot and push it down to observe the workpiece spinning. It should rotate safely and smoothly. Realign your log for any imbalance.

လိုအပ်သော ကိရိယာများ:

ဆောက်အစုံဆောက်အစုံ
သစ်သားတူသစ်သားတူ
မြေတူးစက်မြေတူးစက်
11

Begin Rounding

Start with your first turning tool (gouge and bitt or chisel) and slowly apply pressure against the chuck. Generate more rotation by pushing the pole down. Rough the log into a smooth, round shape.

ဤအဆင့်အတွက် ကုန်ကြမ်းများ:

သစ်လှဲရေး သစ်သားဒိုင်းသစ်လှဲရေး သစ်သားဒိုင်း8 ခု

လိုအပ်သော ကိရိယာများ:

သစ်သားတူသစ်သားတူ
12

Adjust Across the Downstroke

Adjust your tool position as you build a form. Push the pole multiple passes for a full rotation, repositioning the tool at each pass so you create a consistent round shape.

ဤအဆင့်အတွက် ကုန်ကြမ်းများ:

အက်ရှ်သစ်လုံးအပိုင်းအက်ရှ်သစ်လုံးအပိုင်း2 ခု

လိုအပ်သော ကိရိယာများ:

ဆောက်အစုံဆောက်အစုံ
သစ်သားတူသစ်သားတူ
မြေတူးစက်မြေတူးစက်
13

Finish the Smooth Surface

Finish with a smooth chisel and achieve a smooth surface across the entire project. Make light passes, avoiding heavy pressure as it can create chatter marks.

ဤအဆင့်အတွက် ကုန်ကြမ်းများ:

အက်ရှ်သစ်သားပြားအက်ရှ်သစ်သားပြား1 ခု

လိုအပ်သော ကိရိယာများ:

နှစ်ဖက်ကိုင် ခြစ်ဓားနှစ်ဖက်ကိုင် ခြစ်ဓား
နှစ်ယောက်တွဲ ဖြတ်လွှနှစ်ယောက်တွဲ ဖြတ်လွှ
14

Remove and Clean the Workpiece

Once you've turned the wood to your desired shape, stop the lathe and remove the workpiece. Wait until the chuck is fully stopped, then loosen the centers and carefully remove the final piece.

ဤအဆင့်အတွက် ကုန်ကြမ်းများ:

သစ်သားချွန်တံသစ်သားချွန်တံ1 ခု

လိုအပ်သော ကိရိယာများ:

မြေတူးစက်မြေတူးစက်
15

Test Final Quality

Inspect your finished creation for quality. Feel it—is it not just round but balanced? Smooth any irregularities you see.

ဤအဆင့်အတွက် ကုန်ကြမ်းများ:

ဟမ်းကြိုးဟမ်းကြိုး3 metre

လိုအပ်သော ကိရိယာများ:

ဓားဓား
16

Begin the Drying Process

Place your turned piece in a cool, draft-free area where it can dry slowly. This may take weeks to months. Temperature changes prevent rapid drying as it can cause cracking.

ဤအဆင့်အတွက် ကုန်ကြမ်းများ:

ချည်နှောင်ကြိုးကြီးချည်နှောင်ကြိုးကြီး2 metre

လိုအပ်သော ကိရိယာများ:

သစ်သားတူသစ်သားတူ
17

Apply Optional Finishing Techniques

After drying, sand your piece with burly or fine sand. You can apply a clear varnish, oil, or other finish that protects the wood and deepens it.

လိုအပ်သော ကိရိယာများ:

မြေတူးစက်မြေတူးစက်
18

Prepare the Lathe for the Next Project

Clean your chuck and reset your chuck for your next piece. This simple frame will provide years of turning and enjoyment without need for new electric power.

လိုအပ်သော ကိရိယာများ:

သစ်သားတူသစ်သားတူ
ဓားဓား
19

Refine Your Skills

Practice with more pieces, trying different figures and techniques to craft different things. As you turn more, your tool control and form will improve.
20

Maintain Tool Sharpness

Keep your tools sharp—dull tools require more pressure and create inconsistent surfaces. Regular honing and stropping will extend tool life and improve results.
21

Explore Design Variations

Try creating different shapes: spindles, bowls, decorative pieces. Each project teaches you about wood movement, balance, and your tool control abilities.

လိုအပ်သော ကိရိယာများ:

အကွေးဆောက်အကွေးဆောက်

ပစ္စည်းများ

8

လိုအပ်သော ကိရိယာများ

12

CC0 အများပိုင်

ဤအစီအစဉ်ကို CC0 အောက်တွင် ထုတ်ဝေထားသည်။ ခွင့်ပြုချက်မလိုဘဲ ကူးယူ၊ ပြင်ဆင်၊ ဖြန့်ဝေ နှင့် အသုံးပြုနိုင်သည်။

အစီအစဉ်မှတစ်ဆင့် ကုန်ပစ္စည်းများဝယ်ယူ၍ ဖန်တီးသူကို ပံ့ပိုးပါ ဖန်တီးသူ ကော်မရှင် ရောင်းချသူက သတ်မှတ်သည်၊ သို့မဟုတ် ဤအစီအစဉ်၏ ဗားရှင်းအသစ်ဖန်တီး၍ ဝင်ငွေခွဲဝေရန် သင့်အစီအစဉ်တွင် ချိတ်ဆက်မှုအဖြစ် ထည့်သွင်းပါ။

ဆွေးနွေးချက်

(0)

ဝင်ရောက် ဆွေးနွေးချက်တွင် ပါဝင်ရန်

မှတ်ချက်များ ရယူနေသည်...