ပူးပေါင်းဆောင်ရွက်ခြင်း
အနုပညာ
အလှအပနှင့် ကျန်းမာရေး
လက်မှုအနုပညာ
ယဉ်ကျေးမှုနှင့် သမိုင်း
ဖျော်ဖြေရေး
ပတ်ဝန်းကျင်
အစားအစာနှင့် အချိုရည်
ပြောင်းပြန်အင်ဂျင်နီယာပညာ
သိပ္ပံပညာများ
အားကစား
နည်းပညာ
ဝတ်ဆင်နိုင်သောပစ္စည်းများ
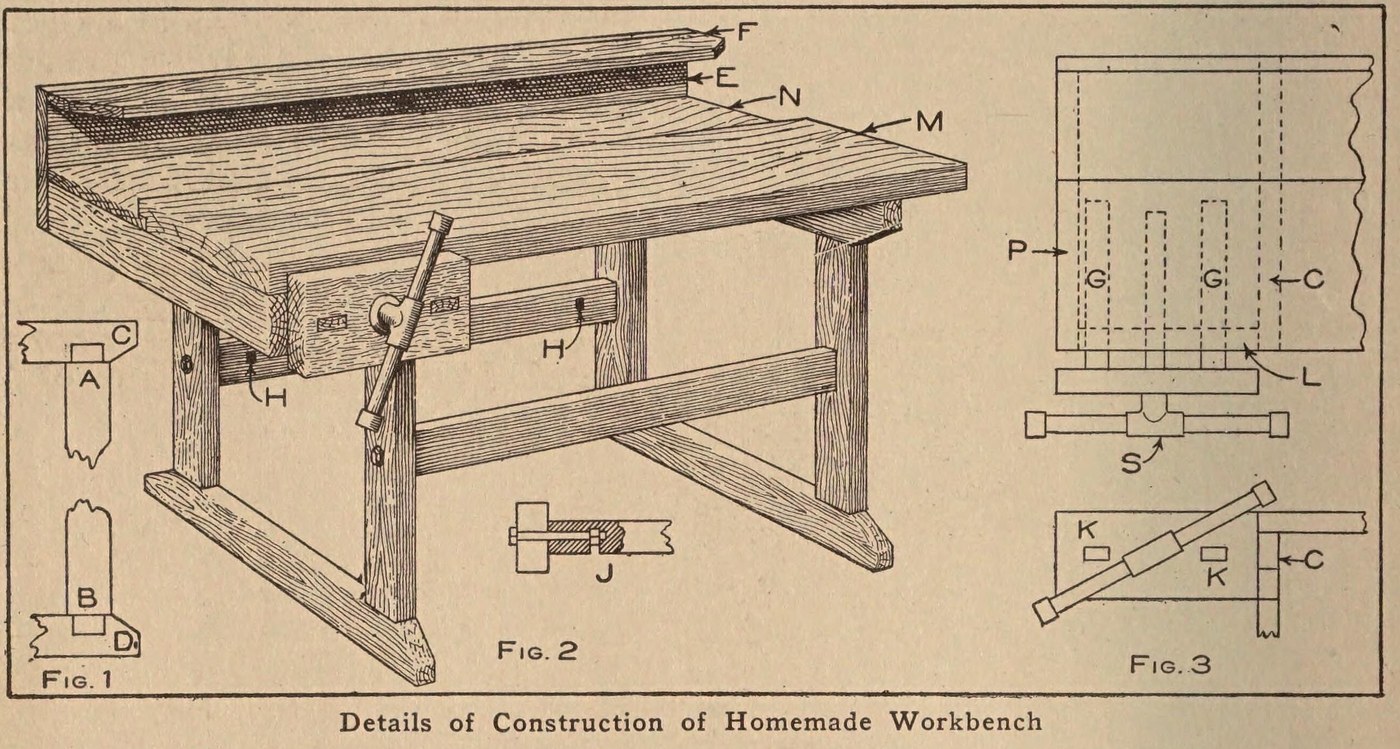


Workbench: a Pine Bench with a Laminated Maple Top and Vise (Boy Mechanic, 1913)
The same pine bench with a harder top: 14 maple strips set on edge, glued and screwed together, with a back board, a tool rack and a wooden vise on an iron bench screw.
Source: C. E. McKinney, Jr., 'Homemade Workbench', The Boy Mechanic, Book 1 (1913), pp. 442-443. Picture: Figs. 1-3 of the book.
အလယ်အလတ်
Unknown
ညွှန်ကြားချက်များ
1
1
Make the two leg frames
Make the two leg frames
Cut four 2 x 4 in pine legs 23 in long with a tenon on each end 1/2 in thick, 3 1/2 in wide and 1 1/2 in long (Fig. 1, A and B). Cut four crosspieces of the same stock 20 in long, mortised in the narrow edge 1 1/4 in from each end, and slope their corners from the leg out to the middle. Fit each pair of legs to a pair of crosspieces to make the two supports.
ဤအဆင့်အတွက် ကုန်ကြမ်းများ:
 ထင်းရှူးသစ်1 2 x 4 in: legs, crosspieces
လိုအပ်သော ကိရိယာများ:
 လက်လွှ
 အပေါက်ထွင်းဆောက်
 တူ
2
2
Brace them together
Brace them together
Join the supports with two 2 x 4 in braces 24 in long, ends sawn square. Bore through each leg and 4 in into the centre of each brace end, bore an intersecting hole on the back of each brace for the nut, and draw each joint tight with a 3/8 x 6 in bolt (Fig. 2, J). A cross brace on the back stops rocking when planing.
ဤအဆင့်အတွက် ကုန်ကြမ်းများ:
ထင်းရှူးသစ်1 2 x 4 in: braces ခေါင်းလုံး ဘော့4 3/8 x 6 in
လိုအပ်သော ကိရိယာများ:
လက်လွှ လက်လှည့် သံစူးနှင့် ထိပ်
 ညှိနိုင်သောလက်ညှပ်
3
3
Build up the maple top
Build up the maple top
Make the main top M of 14 maple strips 7/8 in thick, 2 in wide and 3 1/2 ft long, set on edge, each glued and screwed to the next, all with the grain one way so it planes smooth. Rabbet its back edge 1/2 in to take a back board N of the same length, 8 1/2 in wide and 7/8 in thick. Screw the top to the top crosspieces with long screws.
ဤအဆင့်အတွက် ကုန်ကြမ်းများ:
 မသိသော ပစ္စည်း14 maple strips 7/8 x 2 in x 3 1/2 ft
 သစ်သားကော်1 ခု
 ထင်းရှူးပျဉ်ပြား1 back board
 သစ်သားဝက်အူများ1 ခု
လိုအပ်သော ကိရိယာများ:
လက်လွှ သစ်ချောစက်ငယ်
 ဝက်အူလှည့် − ပြားချပ်
4
4
Add the tool rack
Add the tool rack
Nail a board E 10 in wide to the back of the bench and fasten a 2 1/2 in board F on top of it at right angles; both 7/8 in thick and 3 1/2 ft long. Bore holes or cut notches in F to hold tools.
ဤအဆင့်အတွက် ကုန်ကြမ်းများ:
ထင်းရှူးပျဉ်ပြား2 7/8 in, 3 1/2 ft သံချွန်များ1 ခု
လိုအပ်သော ကိရိယာများ:
လက်လှည့် သံစူးနှင့် ထိပ်လက်လွှတူ5
5
Fit the vise
Fit the vise
Fasten an iron bench screw in a 2 x 6 in block 12 in long. Mortise two guide rails 7/8 x 1 1/2 in and 20 in long into the block; they slide in mortises in a 2 x 4 piece L bolted under the top, which holds the bench-screw nut between the two mortises. Nail L to a top crosspiece and to a 2 x 4 piece P bolted under the top at the end (Fig. 3).
ဤအဆင့်အတွက် ကုန်ကြမ်းများ:
ထင်းရှူးသစ်1 2 x 6 block, 2 x 4 pieces, guide rails သစ်သားထွင်း ခုံတပ်ဝက်အူ1 ခုခေါင်းလုံး ဘော့1 for L and Pသံချွန်များ1 ခု
လိုအပ်သော ကိရိယာများ:
လက်လွှအပေါက်ထွင်းဆောက်လက်လှည့် သံစူးနှင့် ထိပ်ညှိနိုင်သောလက်ညှပ်တူပစ္စည်းများ
8- 1 2 x 6 block, 2 x 4 pieces, guide railsနေရာယူပစ္စည်း
- 1 for L and Pနေရာယူပစ္စည်း
- 14 maple strips 7/8 x 2 in x 3 1/2 ftနေရာယူပစ္စည်း
- 1 ခုနေရာယူပစ္စည်း
- 2 7/8 in, 3 1/2 ftနေရာယူပစ္စည်း
- 1 ခုနေရာယူပစ္စည်း
- 2 ခုနေရာယူပစ္စည်း
- နေရာယူပစ္စည်း
ဤဘလူးပရင့်က ပြုလုပ်သည်

CC0 အများပိုင်
ဤအစီအစဉ်ကို CC0 အောက်တွင် ထုတ်ဝေထားသည်။ ခွင့်ပြုချက်မလိုဘဲ ကူးယူ၊ ပြင်ဆင်၊ ဖြန့်ဝေ နှင့် အသုံးပြုနိုင်သည်။
အစီအစဉ်မှတစ်ဆင့် ကုန်ပစ္စည်းများဝယ်ယူ၍ လက်မှုပညာရှင်ကို ပံ့ပိုးပါ လက်မှုပညာရှင် ကော်မရှင် ရောင်းချသူက သတ်မှတ်သည်၊ သို့မဟုတ် ဤအစီအစဉ်၏ ဗားရှင်းအသစ်ဖန်တီး၍ ဝင်ငွေခွဲဝေရန် သင့်အစီအစဉ်တွင် ချိတ်ဆက်မှုအဖြစ် ထည့်သွင်းပါ။