Хамтын ажиллагаа
УРЛАГ
ГОО САЙХАН БА ЭРҮҮЛ МЭНД
ГАРААР ХИЙСЭН
СОЁЛ БА ТҮҮХ
ҮЗВЭР НААДАМ
БАЙГАЛЬ ОРЧИН
ХООЛ БА УНДАА
УРВУУ ИНЖЕНЕРЧЛЭЛ
ШИНЖЛЭХ УХААН
СПОРТ
ТЕХНОЛОГИ
ӨМСДӨГ ХЭРЭГСЭЛ
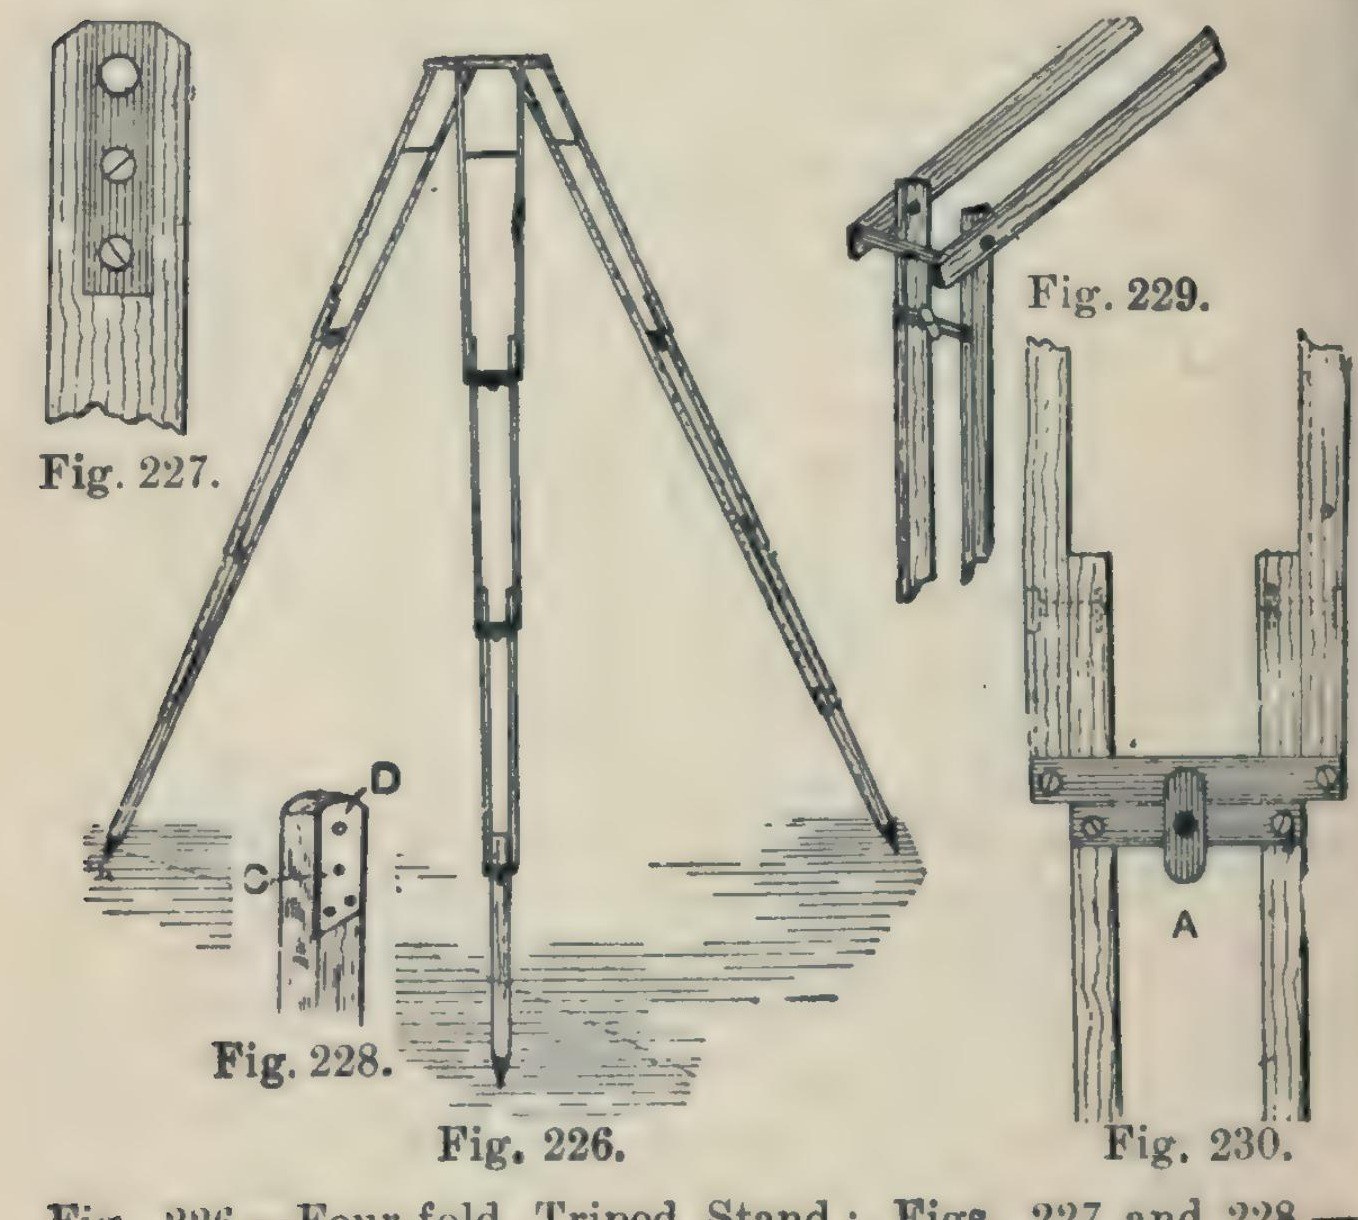


Camera Tripod: a Four-Fold Ash Tripod Stand (Hasluck, 1902)
A light, compact folding camera stand: three legs, each of seven ash laths riveted so it folds in four, locked open by brass buttons, on a triangular ash top with brass pins and a hole for the camera screw.
Hasluck says the same method makes stands that fold in three or two.
Source: Paul N. Hasluck, Photographic Cameras and Accessories (1902), pp. 153-157. Picture: Figs. 226-230 of the book.
Дунд шат
Unknown
Зааварчилгаа
1
1
Cut the ash laths
Cut the ash laths
Cut laths of good ash, true and square or the stand won't be rigid, and round the edges slightly: six 17 1/4 x 5/8 x 3/8 in, six 16 x 5/8 x 3/8 in, six 15 1/2 x 5/8 x 3/8 in, and three 14 x 5/8 x 5/8 in.
Энэ алхмын материал:
 Хаданмодны банз1 21 laths
Шаардлагатай багаж:
 Нуруутай хөрөө
 Блок рубанк
2
2
Fit the top ends and stretcher
Fit the top ends and stretcher
On each 17 1/4 in lath let in flush a 1/16 in brass plate, 1 1/4 in long, with a 3/16 in hole 1/4 in from the top, held by two countersunk brass screws; bore the wood to match and take off the top corners. On one lath of each pair cut a groove inside, about 3/16 in deep and 3 1/2 in long, starting 2 in from the top, and hinge a 1/8 in brass rod stretcher in it on a pin. On the other lath cut a curved groove 1 1/2 in long, 3/16 in wide, with a small hole at the bottom where the rod catches.
Энэ алхмын материал:
 Гуулин хуудас1 1/16 in plates
 Модны шураг1 small brass screws
 Гуулин баганз1 1/8 in stretcher
Шаардлагатай багаж:
 Төмөр хөрөөний хүрээ ба ир
 Металлын гилбэр
 Гар өрөм
 Модны цүүцнүүд
 Хавтгай хошуут халив
3
3
Bore and rivet the legs
Bore and rivet the legs
Bore the rivet holes: in the long laths 1 3/4 in from the lower end, counterbored so the copper rivet head sits flush, then 1/8 in through; in the 16 in and 15 1/2 in laths 1/2 in and 1 3/4 in from the ends; in each 14 in piece 1/2 in from one end, and taper its other end for a pointed iron shoe or a steel point and ferrule. Rivet the 21 laths into three legs with 1/8 in copper rivets and washers: a 16 in lath inside each 17 1/4 in one, a 15 1/2 in lath inside that, the 14 in foot between the last pair. Rivets flush, just tight enough to fold but not loose.
Энэ алхмын материал:
 Зэсэн ривет1 1/8 in, with washers
 Тодорхойгүй металл3 iron shoes or steel points
Шаардлагатай багаж:
 Гар мушгиур өрөм ба үзүүрГар өрөм
 Ривет алх
4
4
Add cross strips and lock buttons
Add cross strips and lock buttons
Screw 1/16 in brass strips across the bottom ends of each pair of laths (Fig. 229). Under them screw strips carrying a small brass button riveted at the centre; turned, the button hooks over the strip above and locks the joint open (Fig. 230).
Энэ алхмын материал:
Гуулин хуудас1 cross strips, buttonsМодны шураг1 ширхэгШаардлагатай багаж:
Төмөр хөрөөний хүрээ ба ирМеталлын гилбэрХавтгай хошуут халивРивет алх5
5
Make the top
Make the top
Plane ash to 1/2 in and draw an equilateral triangle with 8 1/2 in sides. Bisect the angles; 2 in from each corner draw a line at right angles, go 1/2 in in along the sides, and mark three rectangles 2 7/8 x 3/4 in; cut the outline (Fig. 231). Fix a 3/16 in brass rod, one end tapered, across each rectangle, bored 3/8 in from the outer edge and projecting about 1/2 in, for the legs to hang on. Bore a 1/4 in hole in the centre for the camera screw and glue felt on top.
Энэ алхмын материал:
Хаданмодны банз1 topГуулин баганз3 3/16 in pins Ноосон эсгий1 ширхэг
 Амьтны цавуу1 ширхэг
Шаардлагатай багаж:
Блок рубанкНуруутай хөрөөГар мушгиур өрөм ба үзүүрГар өрөм6
6
Finish
Finish
Glasspaper and varnish the wood, and lacquer the brass.
Энэ алхмын материал:
 Шеллак лак1 varnish
 Тодорхойгүй материал1 brass lacquer
Шаардлагатай багаж:
 Элсэн цаас
Материал
10- 1 topТүр орлуулагч
- 1 cross strips, buttonsТүр орлуулагч
- 1 ширхэгТүр орлуулагч
- 3 3/16 in pinsТүр орлуулагч
- 1 1/8 in, with washersТүр орлуулагч
- 3 iron shoes or steel pointsТүр орлуулагч
- 1 ширхэгТүр орлуулагч
- 1 ширхэгТүр орлуулагч
- 1 varnishТүр орлуулагч
- 1 brass lacquerТүр орлуулагч
Шаардлагатай багаж
10- Түр орлуулагч
- Түр орлуулагч
- Түр орлуулагч
- Түр орлуулагч
- Түр орлуулагч
- Түр орлуулагч
- Түр орлуулагч
- Түр орлуулагч
- Түр орлуулагч
- Түр орлуулагч
Энэ загвараар хийдэг

CC0 Нийтийн домэйн
Энэ загвар CC0 дор гаргагдсан. Та зөвшөөрөл авахгүйгээр хуулах, өөрчлөх, түгээх, ашиглах боломжтой.
Загвараар дамжуулан бүтээгдэхүүн худалдаж авч Бүтээгчийг дэмжээрэй Бүтээгчийн шимтгэл Борлуулагчаар тогтоосон, эсвэл энэ загварын шинэ хувилбар үүсгэж орлогоо хуваахын тулд өөрийн загварт холбоос болгон оруулна уу.