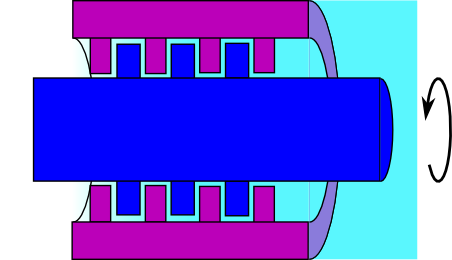


Labyrinth Seal
Зааварчилгаа
Cut the rotor grooves
Cut the rotor grooves
Ridges on the shaft sleeve that will interleave with the housing.
- Cut a rotor sleeve 50 mm long from 30 mm aluminium round bar, bored 16.0 mm to fit the shaft.
- Turn or file five annular grooves in its outer surface, each 3 mm wide and 3 mm deep, spaced 3 mm apart.
- Keep every groove square-sided and the same depth.
- Deburr the ridge edges but leave them sharp-cornered.
Sharp corners are deliberate. Each ridge edge forces the flow to separate and form a vortex in the following chamber, and that turbulence is where the pressure is lost. Round the corners off and the fluid follows the surface smoothly, losing far less — a labyrinth with soft edges leaks noticeably more than one with crisp ones.
Consistency between grooves matters more than the exact dimensions. Five identical stages each drop the same fraction of pressure; one oversize groove is a shortcut that wastes the stages around it.Энэ алхмын материал:
 Хөнгөн цагаан дугуй баганз1 ширхэг
Шаардлагатай багаж:
 Төмөр хөрөөний хүрээ ба ир
 Гилбэрийн иж бүрдэл
 Ширээний хавчаар
 Дижитал штангенциркуль 6 инч
 Утасгүй өрөм
 Өрмийн үзүүрийн иж бүрдэл
Machine the matching stator
Machine the matching stator
The housing carries the mating ridges, offset so they interleave.
- Bore a housing from 50 mm aluminium bar to just clear the rotor's ridge diameter — aim for 0.3 mm radial clearance.
- Cut five internal grooves to match, but OFFSET by half a pitch so housing ridges sit opposite rotor grooves.
- Split the housing lengthwise into two halves so it can be assembled over the rotor.
- Bolt the halves together with M5 × 30 socket head cap screws × 4, M5 flat washers × 8 and M5 hex nuts × 4.
The clearance is the whole performance figure. Leakage through a labyrinth depends steeply on the gap, so halving the clearance cuts leakage dramatically. Real turbine labyrinths run clearances measured in tenths of a millimetre, and some use abradable coatings so the ridges cut their own minimum clearance on first run.
Splitting the housing is what makes this buildable by hand. A one-piece stator would have to be assembled by sliding the rotor in, which is impossible once the ridges interleave.Энэ алхмын материал:
Хөнгөн цагаан дугуй баганз1 ширхэг Хавтгай угаагуур8 ширхэг
 Зургаан талт эрэг4 ширхэг
Шаардлагатай багаж:
Төмөр хөрөөний хүрээ ба ирУтасгүй өрөмӨрмийн үзүүрийн иж бүрдэлГилбэрийн иж бүрдэл Зургаан талт түлхүүрийн иж бүрдэлДижитал штангенциркуль 6 инч
Prove it does not touch
Prove it does not touch
The defining property, and it is easy to demonstrate.
- Assemble rotor and stator on a shaft in bearings.
- Spin the shaft by hand and let it coast.
- Time the coast-down, then repeat with the lip seal from the previous blueprint fitted instead.
- Run the labyrinth continuously for several minutes and feel it — it stays cold.
Шаардлагатай багаж:
 Секунд хэмжигчЗургаан талт түлхүүрийн иж бүрдэлДижитал штангенциркуль 6 инч
Measure leakage against the number of stages
Measure leakage against the number of stages
Each stage takes a bite out of the pressure. Find out how big a bite.
- Connect a low-pressure air or water supply to one end and measure the flow that escapes.
- Block off two of the five stages — shim the grooves — and repeat.
- Block off two more, leaving one stage, and repeat.
- Plot leakage against stage count.
Энэ алхмын материал:
 Өнгөт зузаан цаасны багц1 баглаа
Шаардлагатай багаж:
Секунд хэмжигчДижитал штангенциркуль 6 инчWhere nothing else will do, and history
Where nothing else will do, and history
Labyrinth seals own the extremes. Steam and gas turbines run them because no contacting seal survives those speeds and temperatures; a jet engine's shaft seals are labyrinths. Large electric motors and industrial gearboxes use them because a seal that never wears means a bearing housing that never needs that particular service. And because they cannot fail by wearing out, they are chosen where access is difficult or a shutdown is expensive.
The bearing-protector version is the one most people meet: a labyrinth fitted to a pump or motor bearing housing whose job is not to keep oil in but to keep water and dust OUT. Used that way, the fact that it leaks slightly outward is an advantage — outward flow means nothing gets in.
The elegance is worth naming. Every other seal here fights the leak with contact force, and pays in wear. The labyrinth defeats it with geometry alone: no moving parts beyond the shaft itself, no consumables, no adjustment, no failure mode. It is the same instinct as the crowned pulley — solve the problem with a SHAPE rather than a part.
Its honest limit, stated plainly: it cannot hold pressure at standstill, and it cannot hold a liquid level against gravity for long. Machines that must be leak-free when stopped combine a labyrinth for running duty with a contacting seal for standstill — using both approaches rather than choosing between them, exactly as the gearbox pairs a cone clutch with a dog clutch.
Материал
4- 1 ширхэгТүр орлуулагч
- 8 ширхэгТүр орлуулагч
- 4 ширхэгТүр орлуулагч
- 1 баглааТүр орлуулагч
Шаардлагатай багаж
8- Түр орлуулагч
- Түр орлуулагч
- Түр орлуулагч
- Түр орлуулагч
- Түр орлуулагч
- Түр орлуулагч
- Түр орлуулагч
- Түр орлуулагч
Холбоотой загварууд
Эдгээр загварууд мэдлэг хуваалцдаг — арга техник, материал эсвэл зарчим

CC0 Нийтийн домэйн
Энэ загвар CC0 дор гаргагдсан. Та зөвшөөрөл авахгүйгээр хуулах, өөрчлөх, түгээх, ашиглах боломжтой.
Загвараар дамжуулан бүтээгдэхүүн худалдаж авч Бүтээгчийг дэмжээрэй Бүтээгчийн шимтгэл Борлуулагчаар тогтоосон, эсвэл энэ загварын шинэ хувилбар үүсгэж орлогоо хуваахын тулд өөрийн загварт холбоос болгон оруулна уу.