УРЛАГ
ГОО САЙХАН БА ЭРҮҮЛ МЭНД
ГАРААР ХИЙСЭН
СОЁЛ БА ТҮҮХ
ҮЗВЭР НААДАМ
БАЙГАЛЬ ОРЧИН
ХООЛ БА УНДАА
НОГООН ИРЭЭДҮЙ
УРВУУ ИНЖЕНЕРЧЛЭЛ
ШИНЖЛЭХ УХААН
СПОРТ
ТЕХНОЛОГИ
ӨМСДӨГ ХЭРЭГСЭЛ
Building a Mural Quadrant — The Wall-Mounted Instrument for Precise Star Positions
Astro

Зохиогч

Astro

30. Тавдугаар сар 2026IS
2
0
0
1
0

Building a Mural Quadrant — The Wall-Mounted Instrument for Precise Star Positions

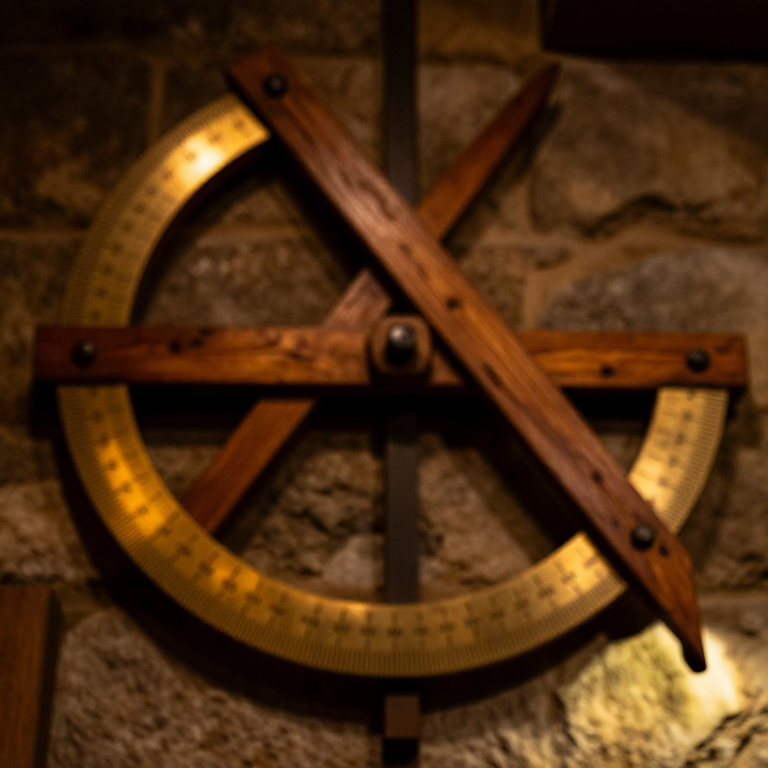
A mural quadrant is a large quarter-circle arc mounted permanently on a wall aligned precisely north-south. It is the most accurate instrument available for measuring the altitude of celestial objects without a telescope. The observer sights a star through pinholes on a moveable arm that pivots at the centre of the arc, and reads the altitude from degree markings on the curved scale. The larger the quadrant, the more finely the degrees can be subdivided and the more accurate the readings. Tycho Brahe (1546–1601) built mural quadrants with radii of nearly two metres at his observatory Uraniborg on the island of Hven, achieving accuracy of about one arcminute — a remarkable feat without optical aid. His catalogue of over a thousand star positions, measured with instruments like this, later enabled Johannes Kepler to discover that planetary orbits are ellipses. This blueprint builds a functional wooden mural quadrant with a radius of about one metre — large enough to measure star altitudes to within a quarter of a degree.

Дээд шат
12-20 hours

Зааварчилгаа

1

Select the wall and check alignment

A mural quadrant must be mounted on a wall that runs exactly east-west, so the quadrant face points due south (in the Northern Hemisphere) or due north (in the Southern Hemisphere). This alignment means the quadrant lies in the meridian plane — the plane containing the observer, the zenith, and the celestial poles. Any star crosses the meridian at its highest point in the sky (called culmination), and it is at this moment that the quadrant measures the star's altitude most accurately. Use a magnetic compass corrected for local declination, or observe where the Sun reaches its highest point at local noon, to establish the true north-south line.
2

Build the quadrant frame

Cut a quarter-circle arc from thick hardwood planks with a radius of about 100 cm. The arc can be built up from several shorter curved pieces joined together, as a single curved plank this large would be difficult to find. Alternatively, cut the arc from a large plywood panel. The frame also needs two straight radial arms — one horizontal and one vertical — meeting at the pivot point in the upper corner. These arms and the arc form a rigid triangular frame. Add diagonal braces for stiffness — any flexing of the frame introduces errors.

Materials for this step:

Hardwood BlockHardwood Block2 ширхэг

Tools needed:

Hand SawHand Saw
Iron ChiselIron Chisel
3

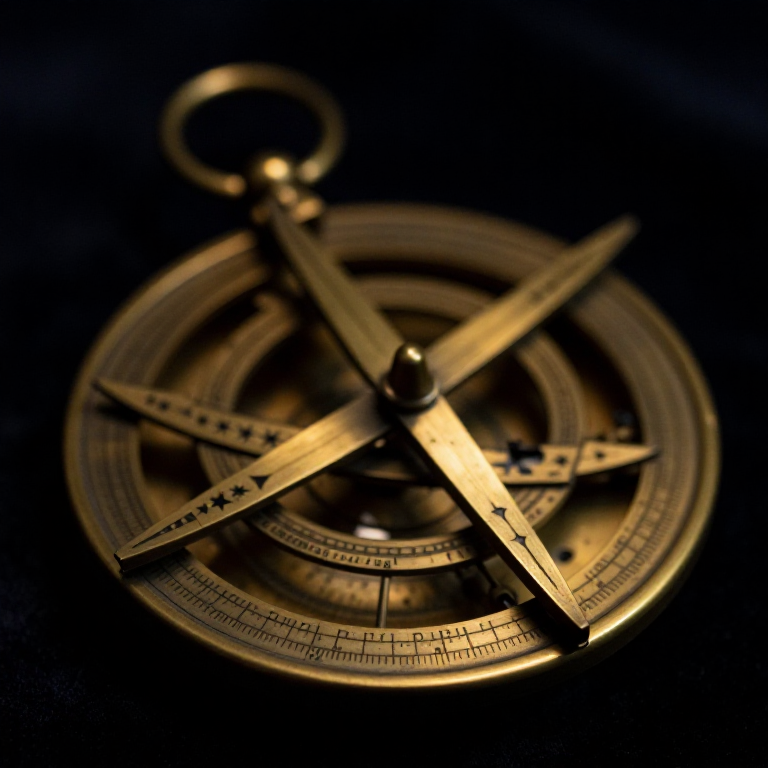
Attach a brass graduated arc

Bend a strip of brass (about 20 mm wide and 1 mm thick) around the outer edge of the wooden arc and fix it with small brass screws. This brass strip will carry the degree markings. Brass holds engraved lines more permanently than wood and is less affected by humidity changes. The strip must follow the arc perfectly — any gaps or bumps between the brass and the wood introduce angular errors.

Materials for this step:

Brass StripBrass Strip2 метр
4

Engrave the degree scale

Divide the 90-degree arc into equal degrees using dividers and a diamond scriber. Start by bisecting the arc to find 45 degrees, then trisect to find 30 and 60 degrees, then subdivide further. Mark every degree with a fine line, every 5 degrees with a longer line, and every 10 degrees with a full-length line and the number. With a 100 cm radius, each degree spans about 17.5 mm — large enough to subdivide each degree into 6 parts (10 arcminutes each) for finer readings. Number from 0 at the horizontal to 90 at the vertical (zenith).

Tools needed:

DividersDividers
Diamond ScriberDiamond Scriber
5

Build the sighting arm (alidade)

The sighting arm is a straight wooden or brass bar that pivots at the centre of the arc (the upper corner where the two radial arms meet). It must be exactly as long as the radius of the arc — 100 cm — so its free end sweeps along the graduated scale. At each end of the sighting arm, mount a small brass plate (sight vane) with a tiny pinhole. The observer looks through the pinhole at the pivot end and aligns the far pinhole with the star.

Materials for this step:

Brass StripBrass Strip1 метр
6

Install the pivot pin

Drill a precise hole at the centre point of the arc — the upper corner where the horizontal and vertical arms meet. Insert a smooth brass pin or bolt as the pivot. The sighting arm rotates freely on this pin. The pivot must have zero play — any looseness allows the arm to shift sideways, which changes the reading. Use a brass bushing if necessary to achieve a snug, smooth fit.

Materials for this step:

Brass RodBrass Rod1 ширхэг
7

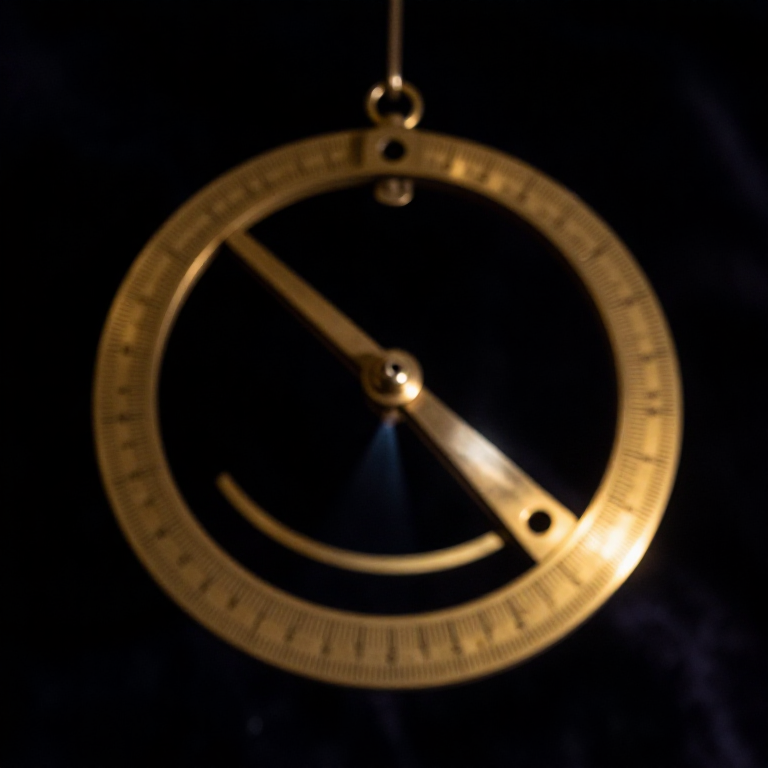
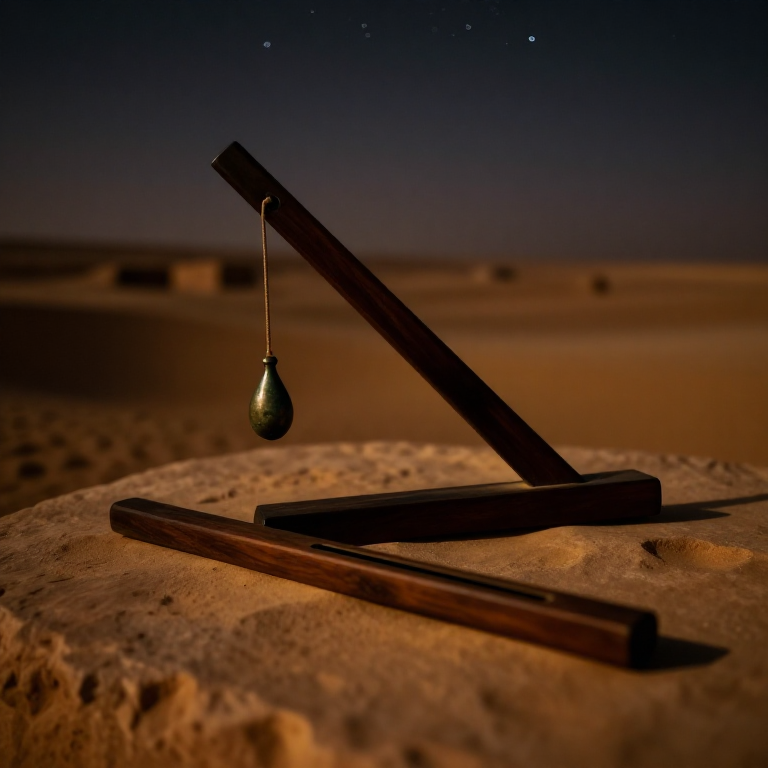
Add a plumb line for vertical reference

Hang a plumb line (a thin cord with a heavy weight) from the pivot point. When the quadrant is properly mounted, the plumb line should hang exactly along the vertical radial arm and the weight should rest at the 90-degree mark on the scale. If the plumb line does not align with the vertical arm, the quadrant is not truly vertical and must be shimmed until it is. Check this alignment every observing session — walls settle, wood warps.
8

Mount the quadrant on the wall

Fix the quadrant firmly to the east-west wall with heavy brackets or lag bolts. The pivot point should be at a comfortable eye height for the observer — about 160-170 cm from the ground. The quadrant face must be perfectly vertical (check with the plumb line) and perfectly in the meridian plane (the plane of true north-south). Any tilt away from vertical or rotation away from the meridian introduces systematic errors in every measurement.

Tools needed:

Hand SawHand Saw
9

Add illumination for the scale

At night, the graduated scale must be illuminated so the observer can read the angle while the sighting arm is pointed at a star. Tycho Brahe used candles or oil lamps positioned to light the scale without blinding the observer. A small shielded lantern placed to one side of the arc, angled so light falls on the brass scale but does not enter the observer's eye, is the traditional solution. Modern builders may use a dim red LED — red light preserves the eye's dark adaptation.
10

Calibrate using the pole star

On a clear night, swing the sighting arm until Polaris (the North Star) is centred in both pinholes. Read the altitude from the scale — this should equal your geographic latitude (within about one degree, since Polaris is not exactly at the celestial pole). Compare your reading with your known latitude. Any difference is a systematic error in the quadrant's mounting or scale — adjust the mount or note the correction to apply to all future readings.
11

Observe a star's meridian transit

Choose a bright star and wait for it to cross the meridian — the moment when it reaches its highest altitude as it passes due south. You will see the star slowly rise in altitude as it approaches the meridian, pause, and then begin to descend. Record the maximum altitude reading — this is the star's meridian altitude. Combined with your latitude and the date, this single number tells you the star's declination (its celestial coordinate equivalent to latitude on Earth), accurate to a fraction of a degree.
12

Build a star catalogue

Measure the meridian altitude of every bright star you can see over the course of several months. Record the star name, date, time of meridian transit, and the altitude reading. From each observation, calculate the star's declination. This is exactly how Tycho Brahe built the most accurate star catalogue of the pre-telescope era — 1,004 stars measured over twenty years at Uraniborg. Your quadrant can achieve similar accuracy: with careful work, each star position will be accurate to about 10-15 arcminutes, compared to Tycho's remarkable 1-2 arcminutes with his much larger instruments.

Материал

3

Шаардлагатай багаж

4

Connected Blueprint Materials

CC0 Нийтийн домэйн

Энэ загвар CC0 дор гаргагдсан. Та зөвшөөрөл авахгүйгээр хуулах, өөрчлөх, түгээх, ашиглах боломжтой.

Загвараар дамжуулан бүтээгдэхүүн худалдаж авч Бүтээгчийг дэмжээрэй Бүтээгчийн шимтгэл Борлуулагчаар тогтоосон, эсвэл энэ загварын шинэ хувилбар үүсгэж орлогоо хуваахын тулд өөрийн загварт холбоос болгон оруулна уу.

Хэлэлцүүлэг

(0)

Нэвтрэх хэлэлцүүлэгт нэгдэхийн тулд

Loading comments...