Хамтын ажиллагаа
УРЛАГ
ГОО САЙХАН БА ЭРҮҮЛ МЭНД
ГАРААР ХИЙСЭН
СОЁЛ БА ТҮҮХ
ҮЗВЭР НААДАМ
БАЙГАЛЬ ОРЧИН
ХООЛ БА УНДАА
УРВУУ ИНЖЕНЕРЧЛЭЛ
ШИНЖЛЭХ УХААН
СПОРТ
ТЕХНОЛОГИ
ӨМСДӨГ ХЭРЭГСЭЛ
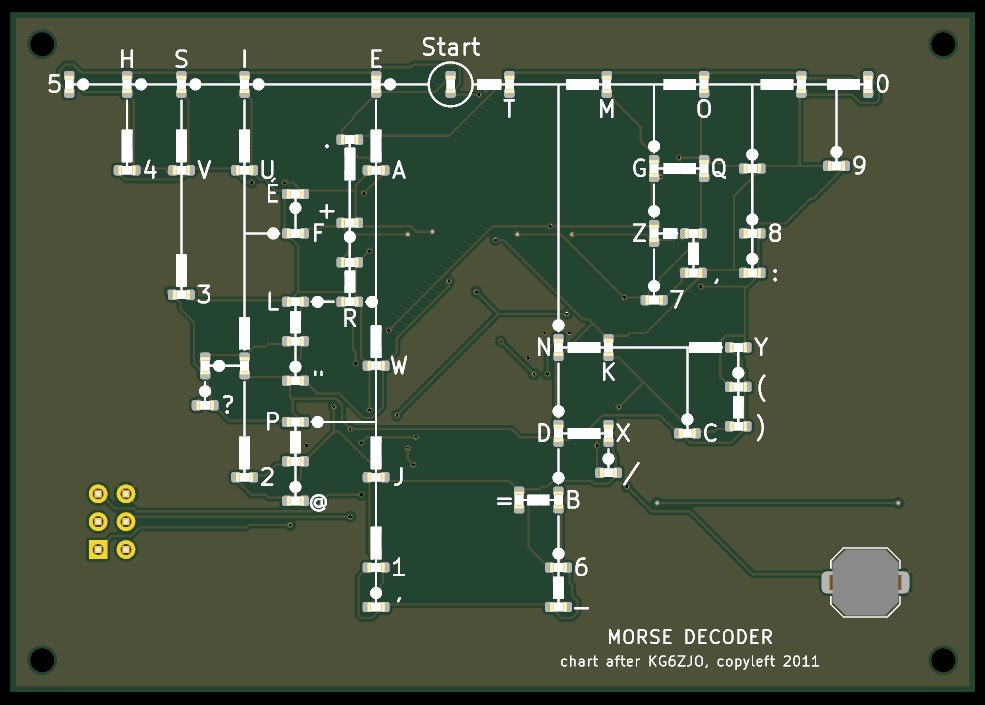


Pocket Morse Code Learning Board - v.2
The complete pocket Morse decoder, 88 x 62 mm: every letter, the figures 0-9, the thirteen punctuation signs of the international code and the accented E, each with its own LED on Dave Nathanson's decoding chart. Press the key short for a dot and long for a dash, and the LED of the character you have reached lights; pause, and it blinks.
It runs on one CR2032 coin cell and sleeps between uses. The board was drawn with Youblob's Draw PCB, and its checks pass, but it has not been built yet.
Дээд шат
About 1 day, plus board delivery
Зааварчилгаа
1
1
LED current and keying speed
LED current and keying speed
Jupyter дэвтэр ачаалж байна…
2
2
The letters-only board, before it
The letters-only board, before it
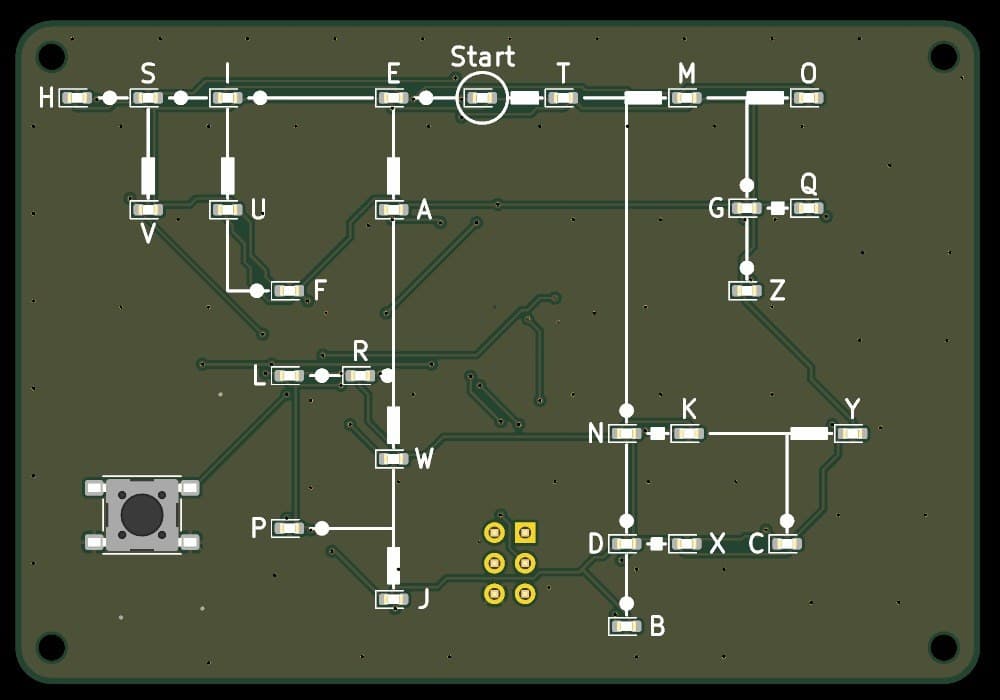
The same design with 27 LEDs. This one adds the figures and the signs, 59 LEDs in all.
3
3
Read the chart
Read the chart
Dave Nathanson's (KG6ZJO) complete chart adds the figures to his letters: "A-Z and Numbers (I left off the punctuation & symbols for simplicity)". This board adds them back from ITU-R M.1677-1 on new branches: . , : ? ' - / ( ) " = + @ and the accented E. Eight unlabelled LEDs are waypoints on the way to a figure or sign.
4
4
The schematic
The schematic
ATmega328P on its internal 8 MHz clock, straight from the coin cell; 59 LEDs charlieplexed on nine lines (PC0-PC5, PD0, PD1, PD3) through 300 Ω resistors; the key on INT0; a 2x3 ISP footprint.
KiCanvas үзүүлэгчийг ачаалж байна...
Мэргэжлийн PCB дизайн үзүүлэгч
5
5
The board
The board
Two layers, 88 x 62 mm. The chart, LEDs and key on the front; the chip, resistors, capacitors and cell holder on the back.
KiCanvas үзүүлэгчийг ачаалж байна...
Мэргэжлийн PCB дизайн үзүүлэгч
6
6
Order the board
Order the board
Open the board in KiCad and plot Gerber and drill files (File > Fabrication Outputs). Order a two-layer board, 1.6 mm thick, from any board maker that takes Gerbers.
Энэ алхмын материал:
 Хэвлэмэл хэлхээний хавтан1 ширхэг
Шаардлагатай багаж:
 Arduino IDE суулгасан компьютер
7
7
Solder the parts
Solder the parts
Back first: paste and reflow U1, R1-R10, C1-C3 and the cell holder BT1 with hot air. Then the front: the 59 red LEDs D1-D59 with pad 1 (cathode) as the board's assembly drawing shows, and the key SW1, a two-pad 6 x 6 mm switch to match its footprint. J1 is optional. Clean off the flux, then test each LED's direction with the meter's diode test.
Энэ алхмын материал:
 ATmega328P микроконтроллер1 ширхэг
 Чип LED59 ширхэг
 Чип резистор10 ширхэг
 Керамик чип конденсатор3 ширхэг
 Товчлуур1 ширхэг
 Зайны суурь1 ширхэг
 Гагнуурын паст (хар тугалгагүй)1 ширхэг
 Гагнуурын утас1 ширхэг
Шаардлагатай багаж:
 Халуун агаарын засварын станц
 Гагнуурын хэрэгсэл
 Хурц үзүүртэй хямсаа
 Флюс
 Томруулагч шил
 Мультиметр
 Изопропилийн спирт 99 %
8
8
The firmware
The firmware
pocket_morse_decoder_complete.ino: every timing is a named constant at the top of the sketch. Board in the Arduino IDE: Arduino Pro or Pro Mini, ATmega328P (3.3V, 8 MHz).
pocket_morse_decoder_complete.inoarduino
9
9
Set the fuses and upload
Set the fuses and upload
Do not use Burn Bootloader: the Pro board setting expects a crystal, and this board has none. Hold an ISP programmer's 2x3 pins on J1 and set the internal 8 MHz clock: avrdude -c usbasp -p m328p -U lfuse:w:0xE2:m -U hfuse:w:0xD9:m -U efuse:w:0xFF:m. Then, in the Arduino IDE, use Sketch > Upload Using Programmer.
Шаардлагатай багаж:
 AVR ISP програмлагчArduino IDE суулгасан компьютер
10
10
Print the back shell
Print the back shell
An open-front tray, 92.6 x 66.6 x 8.3 mm, with four standoffs for M2 screws, a notch and floor opening to slide the cell out and an opening under J1. PLA, 0.2 mm layers, 20 % infill, printed on its floor.
11
11
Fit the shell
Fit the shell
The standoffs hold the board 6.7 mm above the floor: measure your cell holder with a cell in it before you print. Check the holder's open end faces the board's bottom edge, where the shell's cell notch is. Slide in a CR2032 and screw the board into the shell with four M2 x 8 self-tapping screws.
Энэ алхмын материал:
 PLA утас1 ширхэг
 Өөрөө утас гаргадаг шураг4 ширхэг
 CR2032 зоос батарей1 ширхэг
Шаардлагатай багаж:
 FDM 3D хэвлэгч
 Верньер штатахуун (штангенциркуль)
 Нарийн халивны багц
12
12
Troubleshooting
Troubleshooting
Pocket Morse decoder troubleshooting.
Flow
Loading...
13
13
History and honest limits
History and honest limits
The letters and figures follow **Dave Nathanson**'s (KG6ZJO) complete chart of 2011, shared as copyleft. Where the signs sit is ours; their codes are ITU-R M.1677-1's. The board, sizes, parts and timings are ours, drawn with Youblob's Draw PCB: its ERC and DRC pass with no errors and every LED's wiring, code and label was checked against the firmware by script, but it has not been built, flashed or tested.
Материал
12- 1 ширхэгТүр орлуулагч
- 1 ширхэгТүр орлуулагч
- 59 ширхэгТүр орлуулагч
- 10 ширхэгТүр орлуулагч
- 3 ширхэгТүр орлуулагч
- Түр орлуулагч
- Түр орлуулагч
- 1 ширхэгТүр орлуулагч
- 1 ширхэгТүр орлуулагч
- 1 ширхэгТүр орлуулагч
- 4 ширхэгТүр орлуулагч
- 1 ширхэгТүр орлуулагч
Шаардлагатай багаж
12- Түр орлуулагч
- Түр орлуулагч
- 2 vendors sell this, none ship to you yetТүр орлуулагч
- Түр орлуулагч
- Түр орлуулагч
- Түр орлуулагч
- Түр орлуулагч
- Түр орлуулагч
- Түр орлуулагч
- Түр орлуулагч
- Түр орлуулагч
- Түр орлуулагч
Загварын файлууд
1Энэ загвараар хийдэг

Холбоотой загварууд
Эдгээр загварууд мэдлэг хуваалцдаг — арга техник, материал эсвэл зарчим


CC0 Нийтийн домэйн
Энэ загвар CC0 дор гаргагдсан. Та зөвшөөрөл авахгүйгээр хуулах, өөрчлөх, түгээх, ашиглах боломжтой.
Загвараар дамжуулан бүтээгдэхүүн худалдаж авч Бүтээгчийг дэмжээрэй Бүтээгчийн шимтгэл Борлуулагчаар тогтоосон, эсвэл энэ загварын шинэ хувилбар үүсгэж орлогоо хуваахын тулд өөрийн загварт холбоос болгон оруулна уу.