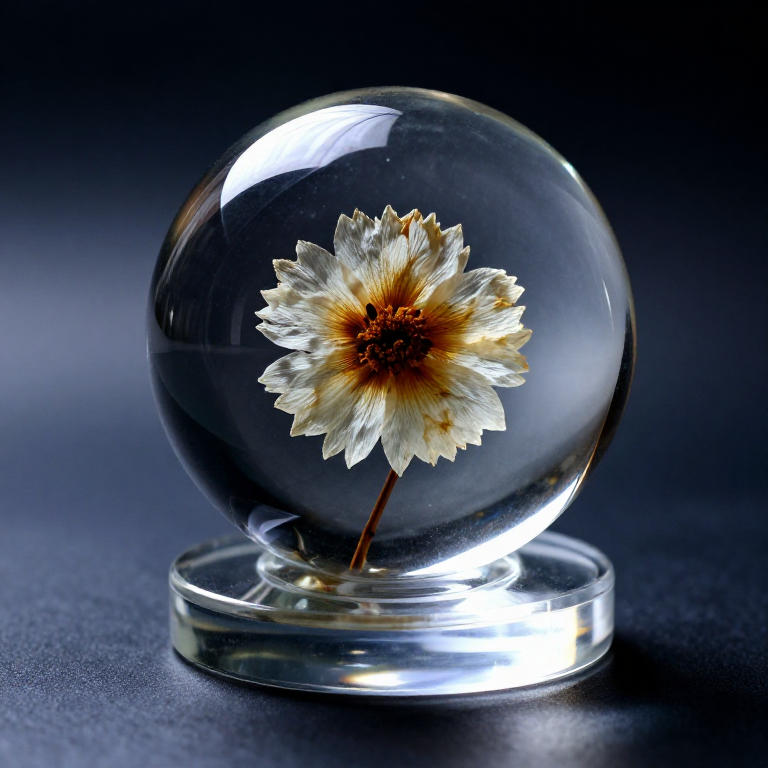
Casting Clear Epoxy Resin Paperweights — Embedding Objects in Resin
Зааварчилгаа
Prepare the Workspace and Moulds
Prepare the Workspace and Moulds
Work in a well-ventilated area on a protected surface (resin is extremely difficult to remove from surfaces once cured). Ensure the workspace is dust-free — any dust or fibres that settle into uncured resin are permanently trapped. Level the work surface — uncured resin is a liquid and will cure lopsided on an uneven surface. Prepare silicone moulds by ensuring they are clean and dry. Silicone moulds do not require release agent because cured epoxy does not bond to silicone. If embedding dried flowers, ensure they are completely dry (moisture causes clouding) and optionally seal them with a thin coat of resin or clear sealant first to prevent air trapped in the petals from forming bubbles.
Materials for this step:
Tools needed:
 Graduated Mixing Cups (50-Pack)
 Resin Mixing Cups & Stir Sticks (100-Pack)
 Nitrile Gloves
 Heat Gun
 Sandpaper
Measure and Mix the Resin
Measure and Mix the Resin
Measure the resin and hardener in the exact ratio specified by the manufacturer (typically 1:1 or 2:1 by volume). Use separate graduated cups for each component. Pour the hardener into the resin (or as directed) and stir slowly and thoroughly for a minimum of 3-5 minutes, scraping the sides and bottom of the cup. Insufficient mixing causes soft spots or sticky patches that never fully cure. Stir slowly to minimize air incorporation — vigorous stirring creates bubbles that can be difficult to remove. The mixed resin should be uniformly clear with no visible streaks or swirls of unmixed components. If adding colour, add pigment sparingly (1-3 drops per 100ml) and stir in after the resin and hardener are fully combined.
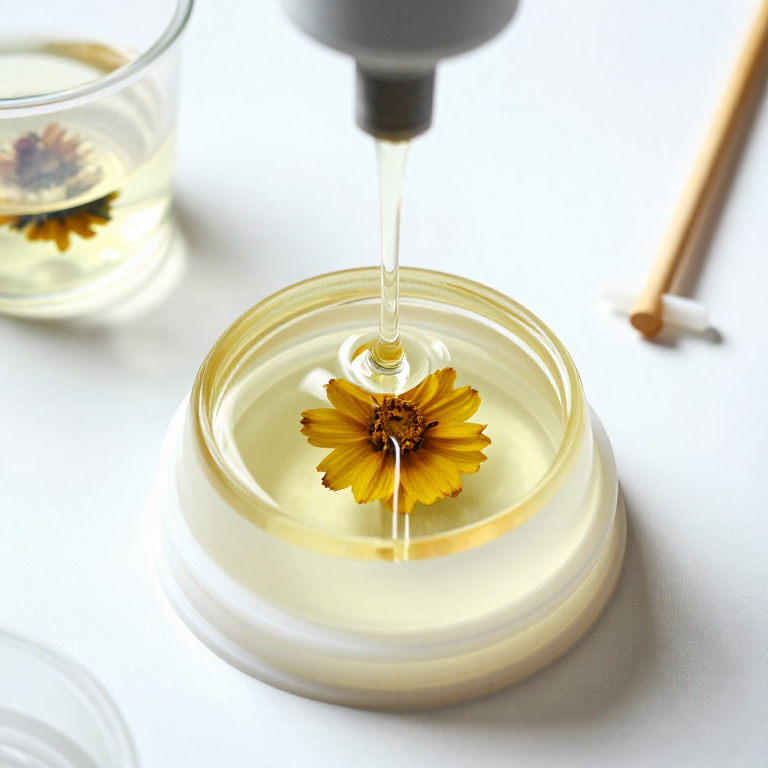
Pour in Layers and Position Objects
Pour in Layers and Position Objects
For embedding objects at a specific depth (rather than sinking to the bottom), pour the resin in layers. Pour the first layer to the depth where you want the object to float, and allow it to partially cure until it is gel-like (tacky but holding its shape — typically 4-8 hours depending on the product). Place the object on the gelled surface, then pour the second layer of freshly mixed resin over it. The partially cured first layer bonds with the fresh second layer, and the gel consistency supports the object at the desired height. For simple castings without layering, pour the entire volume at once and place objects immediately — lightweight items float and heavy items sink, so plan accordingly.
Remove Bubbles and Cure
Remove Bubbles and Cure
After each pour, pass a heat gun or kitchen torch briefly over the resin surface (1-2 seconds, 5-10cm distance). The heat thins the surface tension and pops any air bubbles that have risen to the top. Do not overheat — excessive heat can cause the resin to yellow, crack, or cure unevenly. Cover the mould loosely with a box or plastic dome to prevent dust from settling on the uncured surface. Allow the resin to cure undisturbed for the manufacturer's specified time — typically 24-72 hours for a full cure at room temperature. Higher ambient temperature accelerates curing; lower temperature slows it. The resin transitions from liquid to gel to solid over this period. Do not disturb the mould during curing.
Demould and Polish
Demould and Polish
Once fully cured (hard, not tacky, no fingerprint when pressed firmly), flex the silicone mould to release the casting. Silicone moulds produce a glossy surface finish on the resin that contacts the mould walls. The exposed top surface (which was open to air during curing) may be slightly tacky or matte — sand it flat with 400-grit wet sandpaper, then progressively through 800, 1200, 2000, and 3000 grit. Polish the sanded surface with a plastic polishing compound (Novus #2 or similar) and a soft cloth to restore optical clarity. The finished piece should be crystal clear, with the embedded object appearing to float in glass. Well-mixed, properly cured casting resin does not yellow for years when kept out of direct UV sunlight. For UV protection, apply a UV-resistant clear coat or display the piece away from windows.
Материал
4- 200-500ml total mixed volume ширхэгPlaceholder
- Decorative Objectsas desired ширхэг
- 1-2 moulds ширхэгPlaceholder
- a few drops ширхэгPlaceholder
Related blueprints
Other builds that share materials, tools, or techniques with this one.


CC0 Нийтийн домэйн
Энэ загвар CC0 дор гаргагдсан. Та зөвшөөрөл авахгүйгээр хуулах, өөрчлөх, түгээх, ашиглах боломжтой.
Загвараар дамжуулан бүтээгдэхүүн худалдаж авч Бүтээгчийг дэмжээрэй Бүтээгчийн шимтгэл Борлуулагчаар тогтоосон, эсвэл энэ загварын шинэ хувилбар үүсгэж орлогоо хуваахын тулд өөрийн загварт холбоос болгон оруулна уу.