УРЛАГ
ГОО САЙХАН БА ЭРҮҮЛ МЭНД
ГАРААР ХИЙСЭН
СОЁЛ БА ТҮҮХ
ҮЗВЭР НААДАМ
БАЙГАЛЬ ОРЧИН
ХООЛ БА УНДАА
НОГООН ИРЭЭДҮЙ
УРВУУ ИНЖЕНЕРЧЛЭЛ
ШИНЖЛЭХ УХААН
СПОРТ
ТЕХНОЛОГИ
ӨМСДӨГ ХЭРЭГСЭЛ
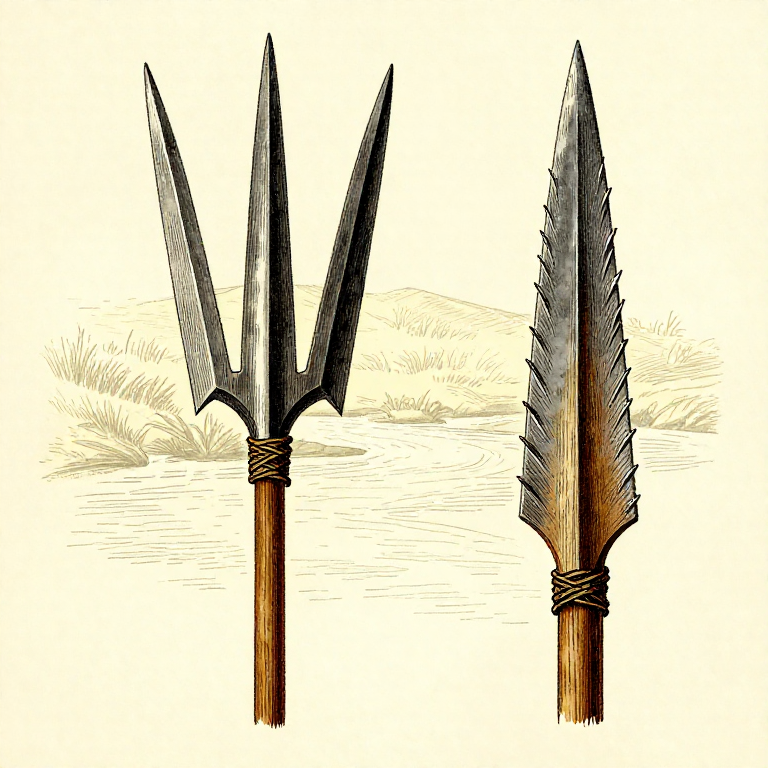
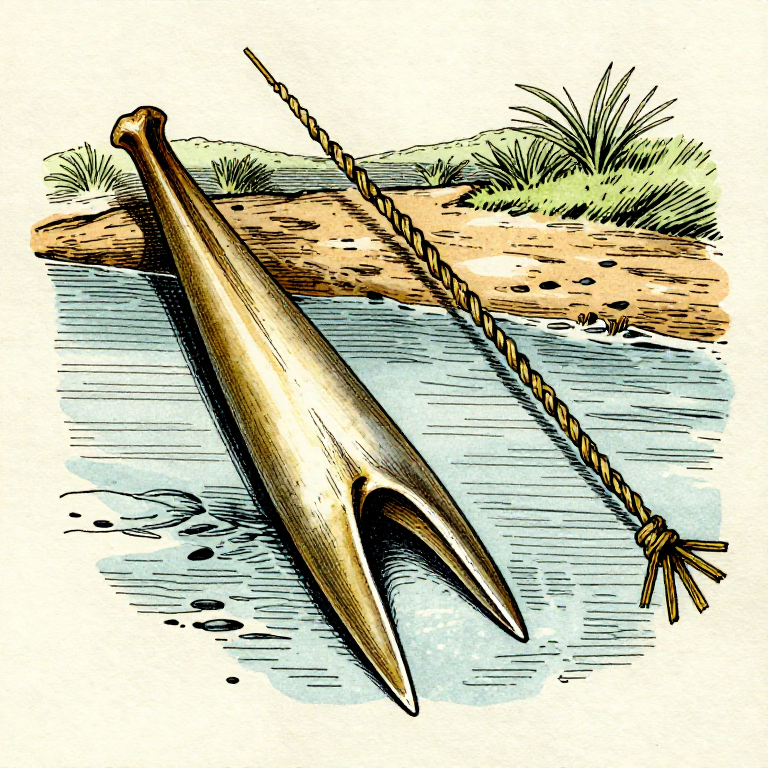
Making a Fishing Spear (Leister) — Multi-Pronged Fish Gig
The leister is a multi-pronged fishing spear designed to trap fish between its tines rather than impale them on a single point. This design solves the fundamental problem of spearfishing: a single-pointed spear slides off the slippery, curved body of a fish more often than it penetrates. The leister's two or three inward-angled prongs converge on the fish from multiple angles, gripping it between the barbed tines. Archaeological examples from Mesolithic Europe date to at least 10,000 years ago, and the design remained in use worldwide well into the 19th century. The classic leister has a central hardwood shaft with two flexible side prongs that spread apart on impact and spring back to grip the fish. This blueprint teaches the complete construction of a three-pronged leister from natural materials, including the critical barb-carving technique that prevents caught fish from sliding off.
Дунд шат
2-3 hours
Зааварчилгаа
1
1
Select a Straight Hardwood Shaft
Select a Straight Hardwood Shaft
Cut a straight hardwood sapling (ash, hazel, hickory, or birch) 2 to 2.5 metres long and 2.5 to 3 cm in diameter. The shaft must be straight enough to thrust accurately from 1 to 2 metres distance. Remove bark and all side branches. Let it dry for a few days if time permits — a slightly dried shaft is lighter and stiffer than green wood, improving thrust accuracy.
Materials for this step:
 Hardwood Sapling1 ширхэг
2
2
Split the Tip for the Centre Prong
Split the Tip for the Centre Prong
Using a sharp flint blade, carve the top 15 to 20 cm of the shaft into a sharp point. This centre prong is the primary penetrating point of the leister. Fire-harden the point by holding it 10 to 15 cm above hot coals for 2 to 3 minutes, rotating continuously. The heat drives out moisture and hardens the wood fibres without charring. The surface should turn golden brown.
3
3
Select and Shape Two Side Prongs
Select and Shape Two Side Prongs
Find two springy, flexible hardwood branches (hazel, willow, or young ash) each 30 to 40 cm long and 8 to 12 mm in diameter. These will be the outer tines that grip the fish. Carve each into a gentle taper ending in a sharp point. The prongs must be flexible enough to spread apart on impact and spring back to grip, but stiff enough to penetrate scales.
Materials for this step:
Hardwood Sapling2 ширхэг4
4
Carve Inward-Facing Barbs on the Side Prongs
Carve Inward-Facing Barbs on the Side Prongs
On the inner face of each side prong (the face that will face the centre prong), carve 2 to 3 small barbs using a flint blade. Cut toward the tip at a steep angle, lifting a thin sliver of wood that stands up like a hook. These barbs prevent the fish from sliding backward off the prong. The barbs should angle toward the tip — when a fish pushes against them, they dig in rather than fold flat.
5
5
Fire-Harden the Side Prong Tips
Fire-Harden the Side Prong Tips
Hold each side prong tip near hot coals and rotate slowly until the last 5 to 8 cm turns golden brown and feels noticeably harder when scraped with a fingernail. Do not char the wood black — charring weakens it. Fire hardening is especially important for the barbs, which must resist breaking off when they catch against fish scales and bone.
6
6
Prepare the Shaft for Prong Attachment
Prepare the Shaft for Prong Attachment
Score two shallow channels on opposite sides of the shaft, starting 15 cm below the tip and running 8 to 10 cm downward. These channels seat the butt ends of the side prongs, preventing them from rotating out of alignment. The channels should be just deep enough to cradle the prong ends flush with the shaft surface.
7
7
Position and Bind the Side Prongs
Position and Bind the Side Prongs
Lay each side prong in its channel with the barbed tips pointing inward, angled toward the centre prong at approximately 15 to 20 degrees. The tips of the side prongs should extend 5 to 8 cm beyond the centre prong tip and spread 4 to 6 cm apart at their widest point. Wrap the base of each prong tightly to the shaft with soaked sinew or rawhide strips.
Materials for this step:
 Sinew Thread2 ширхэг
8
8
Reinforce the Binding
Reinforce the Binding
Once the initial sinew wraps are in place, add a second layer of binding 3 to 4 cm above the first. The two binding points prevent the prongs from twisting on impact. Apply warm pine pitch or birch tar over both bindings to waterproof the sinew — wet sinew softens and loosens, and a fishing spear will be constantly wet during use.
9
9
Adjust the Prong Spread
Adjust the Prong Spread
Check that both side prongs are symmetrically positioned and spread evenly from the centre prong. The gap between the centre prong tip and each side prong should be 2 to 3 cm — wide enough to straddle a fish body but narrow enough that the barbs can grip. Gently bend the prongs inward or outward to adjust. The prongs should converge slightly toward the centre, creating a natural pinching action.
10
10
Test the Grip Mechanism
Test the Grip Mechanism
Push the leister prongs against a piece of green wood roughly the diameter of a fish body. The side prongs should spread apart on contact, then spring back to grip the wood between the barbs. If the prongs are too stiff to spread, thin them slightly with a blade. If too flexible, select thicker prong material. The fish must be pinched firmly enough that it cannot wriggle free.
11
11
Practice Thrusting Technique
Practice Thrusting Technique
Stand at the water's edge in shallow water where fish are visible. Hold the leister with both hands, dominant hand near the balance point and the other at the butt end. Aim 10 to 15 cm below where the fish appears due to light refraction bending the image upward. Thrust fast and straight — do not throw the leister. Pin the fish against the stream bottom and slide your hand down to grip the fish before lifting.
12
12
Maintain and Repair After Use
Maintain and Repair After Use
After each fishing session, rinse the leister in fresh water and dry it. Check the sinew bindings for looseness — rewrap if needed. Replace broken barbs by carving new ones. If a side prong cracks, replace it entirely — a broken prong is useless and a cracked one is unpredictable. A well-maintained leister lasts an entire fishing season before the prongs need replacing.
Материал
2- 3 ширхэгPlaceholder
- 2 ширхэгPlaceholder
Connected Blueprint Materials
Холбоотой загварууд
Эдгээр загварууд мэдлэг хуваалцдаг — арга техник, материал эсвэл зарчим
Related blueprints
Other builds that share materials, tools, or techniques with this one.

Making a Leather Sling — The Shepherd's Projectile Weaponsurvival
Making Rope from Stinging Nettle Fibre — Plant Bast Extraction and Reverse Twistsurvival
Making Rope from Inner Bark — Twisted Bast Fibre Cordagesurvival

Building a Prehistoric Smokehouse — Semi-Permanent Pole Frame for Meat and Fish Preservationsurvival
Setting a Simple Snare Trap on a Game Trail — Cordage Loop Huntingsurvival
Making a Bone Fish Gorge — The Oldest Fishing Devicesurvival
CC0 Нийтийн домэйн
Энэ загвар CC0 дор гаргагдсан. Та зөвшөөрөл авахгүйгээр хуулах, өөрчлөх, түгээх, ашиглах боломжтой.
Загвараар дамжуулан бүтээгдэхүүн худалдаж авч Бүтээгчийг дэмжээрэй Бүтээгчийн шимтгэл Борлуулагчаар тогтоосон, эсвэл энэ загварын шинэ хувилбар үүсгэж орлогоо хуваахын тулд өөрийн загварт холбоос болгон оруулна уу.