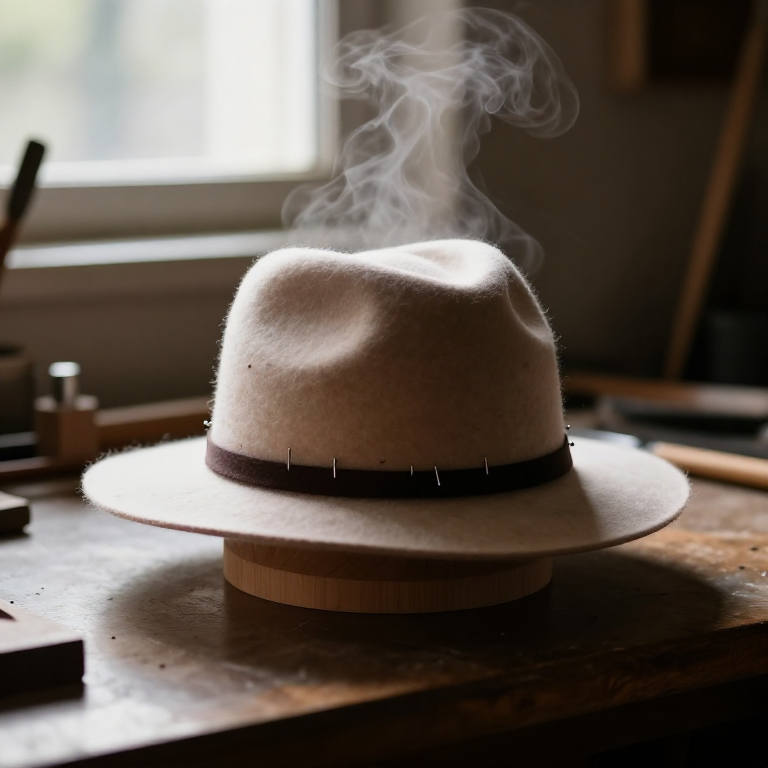


Blocking a Felt Hat
A felt hat is not cut and sewn. It is a single seamless piece of matted wool, softened with steam and stretched over a wooden form until it takes and keeps that shape. There is no pattern, no seam, no fitting — the hat is made by persuading a flat-ish cone of felt to become a three-dimensional object, and then letting it dry hard.
The material arrives ready for this. A millinery hood is a felt cone; a capeline is a cone with a wide brim already attached, for hats that need one. Both come pre-stiffened, usually with shellac, which is what lets the finished shape hold.
Steam is the whole trick. Wool felt is a mat of interlocking scaled fibres, and steam swells and relaxes those scales so they can slide past each other. Steam it thoroughly and the felt stretches like clay; steam it half-heartedly and it fights back, springs off the block, and dries with the memory of the shape you failed to give it.
Instrucciones
Measure the head
Measure the head
Measure around the head just above the ears, where the hat will sit. Add 10 mm for the ribbon that goes inside the band. That figure is the crown block size you need.
Choose hood or capeline
Choose hood or capeline
A plain cone hood gives a crown and a narrow brim at most. A capeline carries a wide brim already. Pick by the brim you want — you cannot add felt later.
Materiales para este paso:
 Capelina de fieltro de lana1 pieza
Check the felt for thin patches
Check the felt for thin patches
Hold the felt up to a light. Thin patches show through as bright spots and will stretch first and tear. Position any thin area where it will be cut away or hidden under the band.
Steam the felt thoroughly
Steam the felt thoroughly
Hold the felt in steam, moving constantly, for 2 to 3 minutes until it is limp and floppy right through. Thorough steaming is the whole job. Steam must penetrate every interlocking fibre — under-steamed felt will not hold its shape and will be weaker when dry.
Herramientas necesarias:
 Vaporizador de prendas
Pull the crown down over the block
Pull the crown down over the block
Push the softened cone down over the crown block, working with flat palms from the top down. Pull evenly all round — pulling harder on one side sets a permanent lopsided crown.
Herramientas necesarias:
 Horma de sombrero - de madera, copa
Tie off the block cord at the base
Tie off the block cord at the base
Tie a blocking cord tightly into the groove at the base of the crown block. This fixes the headline and stops the felt creeping back up as it dries.
Materiales para este paso:
 Cordón de bloqueo2 metros
Work out the wrinkles
Work out the wrinkles
Steam any wrinkle again locally and stroke it outward toward the brim with the heel of your hand. Never pinch a wrinkle flat — that sets a crease you cannot remove.
Herramientas necesarias:
Vaporizador de prendasPin the crown down
Pin the crown down
Push blocking pins through the felt into the block just below the cord, at 30 mm intervals all the way round. Angle them downward so tension pulls them tighter, not out.
Materiales para este paso:
 Alfileres de bloqueo1 paquete
Block the brim
Block the brim
Slide the brim block up under the surplus felt, steam the brim area again, and stretch it flat and even out to the rim. Pin it down all round.
Herramientas necesarias:
 Horma de sombrerero — de madera, para el alaVaporizador de prendas
Dry fully on the block
Dry fully on the block
Leave it on the block to dry completely at room temperature — overnight at minimum, 24 hours in humid weather. Removing a damp hat undoes everything; the felt relaxes straight back toward the cone it used to be.
Cut the brim to width
Cut the brim to width
With the hat still pinned, run a marker at a fixed distance from the crown all the way round, then cut on that line with sharp shears. Cutting off the block guarantees an uneven brim.
Herramientas necesarias:
 Tijeras de sastre
Wire the brim edge
Wire the brim edge
Lay millinery wire along the brim edge, overlap the ends by 40 mm, and stitch it down with a blanket stitch. The wire is what holds a brim shape against gravity and weather.
Materiales para este paso:
 Alambre de sombrerería (acero, 9 m)1 pieza
Herramientas necesarias:
 Juego de agujas e hilo de sombrerería
Stitch in the grosgrain sweatband
Stitch in the grosgrain sweatband
Stitch grosgrain ribbon inside the headline with small stitches that do not show outside. The sweatband is what makes the hat comfortable and what takes the wear.
Materiales para este paso:
 Cinta de gro1 metro
Herramientas necesarias:
Juego de agujas e hilo de sombrereríaHistory & Context
History & Context
Felt is older than weaving. Matted wool needs no loom — only fibre, moisture, heat and agitation. Wool fibres are covered in microscopic scales; work them together wet and warm and the scales interlock and ratchet, and the mat never comes apart. That makes felt one of the oldest textiles humans have, and it is why a felt hat can be one continuous piece with no seam anywhere.
Why steam and not just water. Steam carries far more energy than hot water at the same temperature and penetrates the mat faster and more evenly. It swells and relaxes the fibre scales so they slide instead of gripping — which is exactly the opposite of the felting process that made the material. When the hat dries, the scales lock again in the new shape. Milliners have kept steaming rather than soaking for a reason: the search literature is blunt that steaming is the old way and works best.
The block is the pattern. There is no paper pattern in blocking. The wooden block is the design, which is why milliners accumulate and guard collections of blocks, and why block-makers were a specialist trade. A hat shape going out of fashion meant a block going idle for thirty years — and blocks were kept, because fashion returns.
Stiffener. Commercial hoods and capelines arrive pre-stiffened, traditionally with shellac, which is what lets the blocked shape hold. Some milliners add more stiffener for a crisper result; a common modern workshop substitute is a 50/50 mix of PVA and water, chosen because it does not dry to a white film. Both are legitimate; the shellac route is the historical one.
The hatter's disease — and why this blueprint is safe. Historic fur felting, not wool, used mercury nitrate to make animal fur mat properly. The mercury poisoned generations of hatters, causing the tremors and neurological damage behind the phrase "mad as a hatter". That process is long abandoned and it is not this one: wool felts through mechanical agitation alone and needs no mercury or any other toxic agent. The history is worth knowing precisely because the modern craft carries none of it.
Materiales
5- 1 piezaMarcador de posición
- 2 metrosMarcador de posición
- 1 paqueteMarcador de posición
- Marcador de posición
- 1 metroMarcador de posición
Herramientas requeridas
5- Marcador de posición
- Marcador de posición
- Marcador de posición
- Marcador de posición
- Marcador de posición
Este plano hace
CC0 Dominio público
Este Blueprint se publica bajo CC0. Eres libre de copiar, modificar, distribuir y usar este trabajo para cualquier propósito, sin pedir permiso.
Apoya al Maker comprando productos a través de su Blueprint, donde gana una Comisión del Maker establecida por los vendedores, o crea una nueva iteración de este Blueprint e inclúyela como conexión en tu propio Blueprint para compartir ingresos.