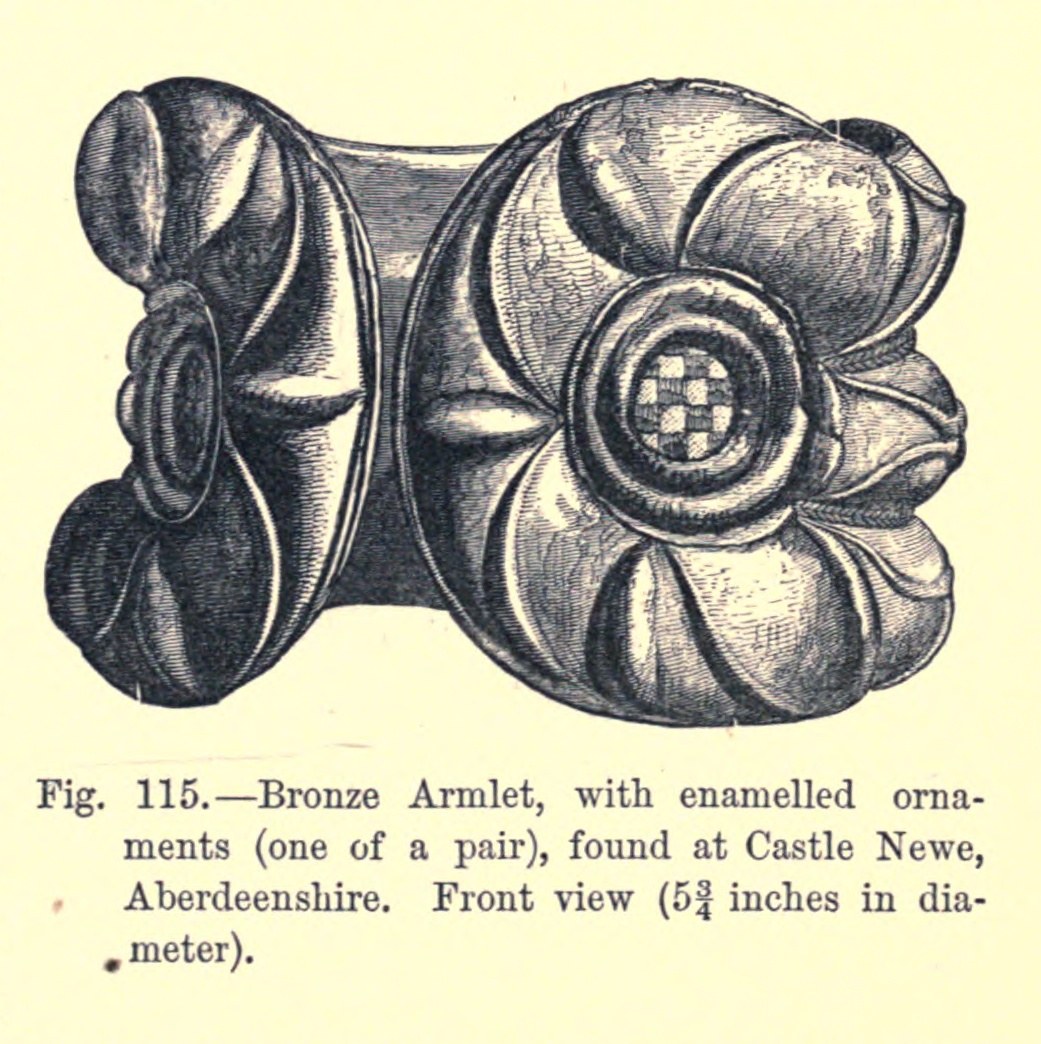


Celtic Bronze Armlet
The massive armlets of north-east Scotland are among the heaviest personal ornaments of Iron Age Britain — thick cast bronze, deeply modelled, with flaring terminals and a coloured inset staring out of each end. Only about fifteen are known, almost all Scottish, and they were being made and worn in roughly AD 50-150, while the Roman army was on the frontier to the south.
The making is the interesting part. They were cast flat by the lost-wax process and only then curved to shape, by annealing and hammering — because casting a heavy curved ring in one go invites porosity and traps the core.
This blueprint follows that sequence at a manageable scale: model in wax, cast flat, anneal, bend, finish, inset.
Instrucciones
Measure the arm, then add for the gap
Measure the arm, then add for the gap
Measure around the upper arm and design the armlet as an open ring — a C, not a closed circle. The gap is how it goes on, and it is a feature of the originals, not a fault.
Herramientas necesarias:
 Regla
ReglaDraw the design flat
Draw the design flat
Draw the armlet unrolled: a straight bar with a terminal at each end. Everything is modelled in this flat state — the curve comes later.
Model the wax flat
Model the wax flat
Build the pattern in modelling wax on a flat board, to the full thickness you want in metal. Massive armlets are genuinely massive — thin them and the whole character goes.
Materiales para este paso:
 Perlas de cera de abeja200 g
Divide the body into ribs
Divide the body into ribs
Cut two lengthwise channels down the body so it reads as three long ribs. This is the defining structure of the Scottish massive armlets and it is what catches the light along the arm.
Model the relief in curves, not lines
Model the relief in curves, not lines
Work the ornament in moderate relief using scrolls, trumpet-shaped swellings and paired curves. The vocabulary is curvilinear throughout — straight lines and geometric repeats belong to a different tradition.
Model a recess in each terminal
Model a recess in each terminal
Leave a shallow oval seat in each terminal for the coloured inset. Making it now in wax is far easier than cutting it in cast bronze later.
Sprue and invest the pattern
Sprue and invest the pattern
Attach wax sprues at the thickest sections and invest the pattern in refractory. A heavy casting needs generous feeding or it shrinks hollow inside.
Materiales para este paso:
 Arena de moldeo3 kg
Burn out and dry the mould completely
Burn out and dry the mould completely
Burn out the wax and hold the mould hot until it is bone dry. Any moisture left in a mould flashes to steam when the bronze goes in and throws molten metal back out.
Pour the bronze with full protection
Pour the bronze with full protection
Melt bronze and pour in one steady stream, wearing a face shield, leather gloves, boots and natural-fibre clothing, outdoors or under real extraction.
Materiales para este paso:
 Chatarra de latón500 g
Herramientas necesarias:
 Guantes de cuero
 Gafas de seguridad estancas
Cut off the sprues and clean the casting
Cut off the sprues and clean the casting
Break out the casting, saw off the sprues and file the stubs back. Work the surface only enough to see the form — final finishing comes after bending.
Herramientas necesarias:
 Juego de limas de aguja
Anneal before bending
Anneal before bending
Heat the casting to a dull red and let it cool. Cast bronze bent cold cracks — annealing is not optional here, it is the step that makes the whole flat-casting approach work.
Curve it gradually over a form
Curve it gradually over a form
Bend the annealed casting around a wooden or steel former in small increments, working along its length rather than forcing the middle. Re-anneal whenever it starts to resist.
True the terminals to face each other
True the terminals to face each other
Adjust until both terminals sit level and point outward equally. On the originals the two terminals are the visual event and any twist between them shows immediately.
Make and fit the coloured insets
Make and fit the coloured insets
Make a small disc of coloured glass with a simple chequer pattern and bed it into each terminal recess. Analysis of the Castle Newe and Drummond Castle armlets at the British Museum showed these insets are glass, not enamel, made separately and fixed in place — a correction to what was believed for a long time.
Materiales para este paso:
 Cuentas de vidrio4 piezas
Polish and wear-test
Polish and wear-test
Polish the high surfaces and leave the recesses darker so the relief reads. Then wear it: a heavy armlet that catches on clothing or pinches at the gap has the wrong curve, and only wearing it tells you.
History & Context
History & Context
A small, tight group. Around fifteen massive armlets are known, almost all from Scotland and concentrated in the north-east. The best known are the pairs from Castle Newe in Aberdeenshire and from Drummond Castle. They are dated to roughly AD 50-150 — a Roman Iron Age date, made by peoples of the region often described as proto-Pictish, and contemporary with Roman military activity further south.
Cast flat, then curved. The technical study is unusually clear on this: they were cast by the lost-wax process in a flat state, then curved to shape by annealing and hammering, with the inlay fitted afterwards. That order is a real engineering decision. Casting a thick curved ring risks porosity in the heavy sections and makes the mould far harder to build; casting flat gives a sound, feedable casting and moves the difficulty into a forming operation that bronze tolerates well once annealed.
Glass, not enamel. The coloured insets were long described as enamel. Scientific examination at the British Museum Research Laboratory showed the Castle Newe and Drummond Castle insets to be glass — made separately, patterned as a simple chequerboard in an oval frame, and fixed in place with iron discs. It is a good example of a confident published description being overturned by analysis, and the sort of correction worth repeating rather than quietly dropping.
What they were for. These are heavy, conspicuous, expensive objects made in small numbers, several of them found as pairs. That combination points to display and status rather than daily wear, though who wore them and on what occasions is not recoverable from the objects alone. Saying "we do not know" is more accurate than any of the confident stories attached to them.
Materiales
4- Marcador de posición
- 3 kgMarcador de posición
- 500 gMarcador de posición
- 4 piezasMarcador de posición
Herramientas requeridas
4- Marcador de posición
- Marcador de posición
- Marcador de posición
- Marcador de posición
Este plano hace
CC0 Dominio público
Este Blueprint se publica bajo CC0. Eres libre de copiar, modificar, distribuir y usar este trabajo para cualquier propósito, sin pedir permiso.
Apoya al Maker comprando productos a través de su Blueprint, donde gana una Comisión del Maker establecida por los vendedores, o crea una nueva iteración de este Blueprint e inclúyela como conexión en tu propio Blueprint para compartir ingresos.