ARTE
BELLEZA Y BIENESTAR
ARTESANÍA
CULTURA E HISTORIA
ENTRETENIMIENTO
MEDIO AMBIENTE
COMIDA Y BEBIDAS
INGENIERÍA INVERSA
CIENCIAS
DEPORTES
TECNOLOGÍA
TECNOLOGÍA VESTIBLE
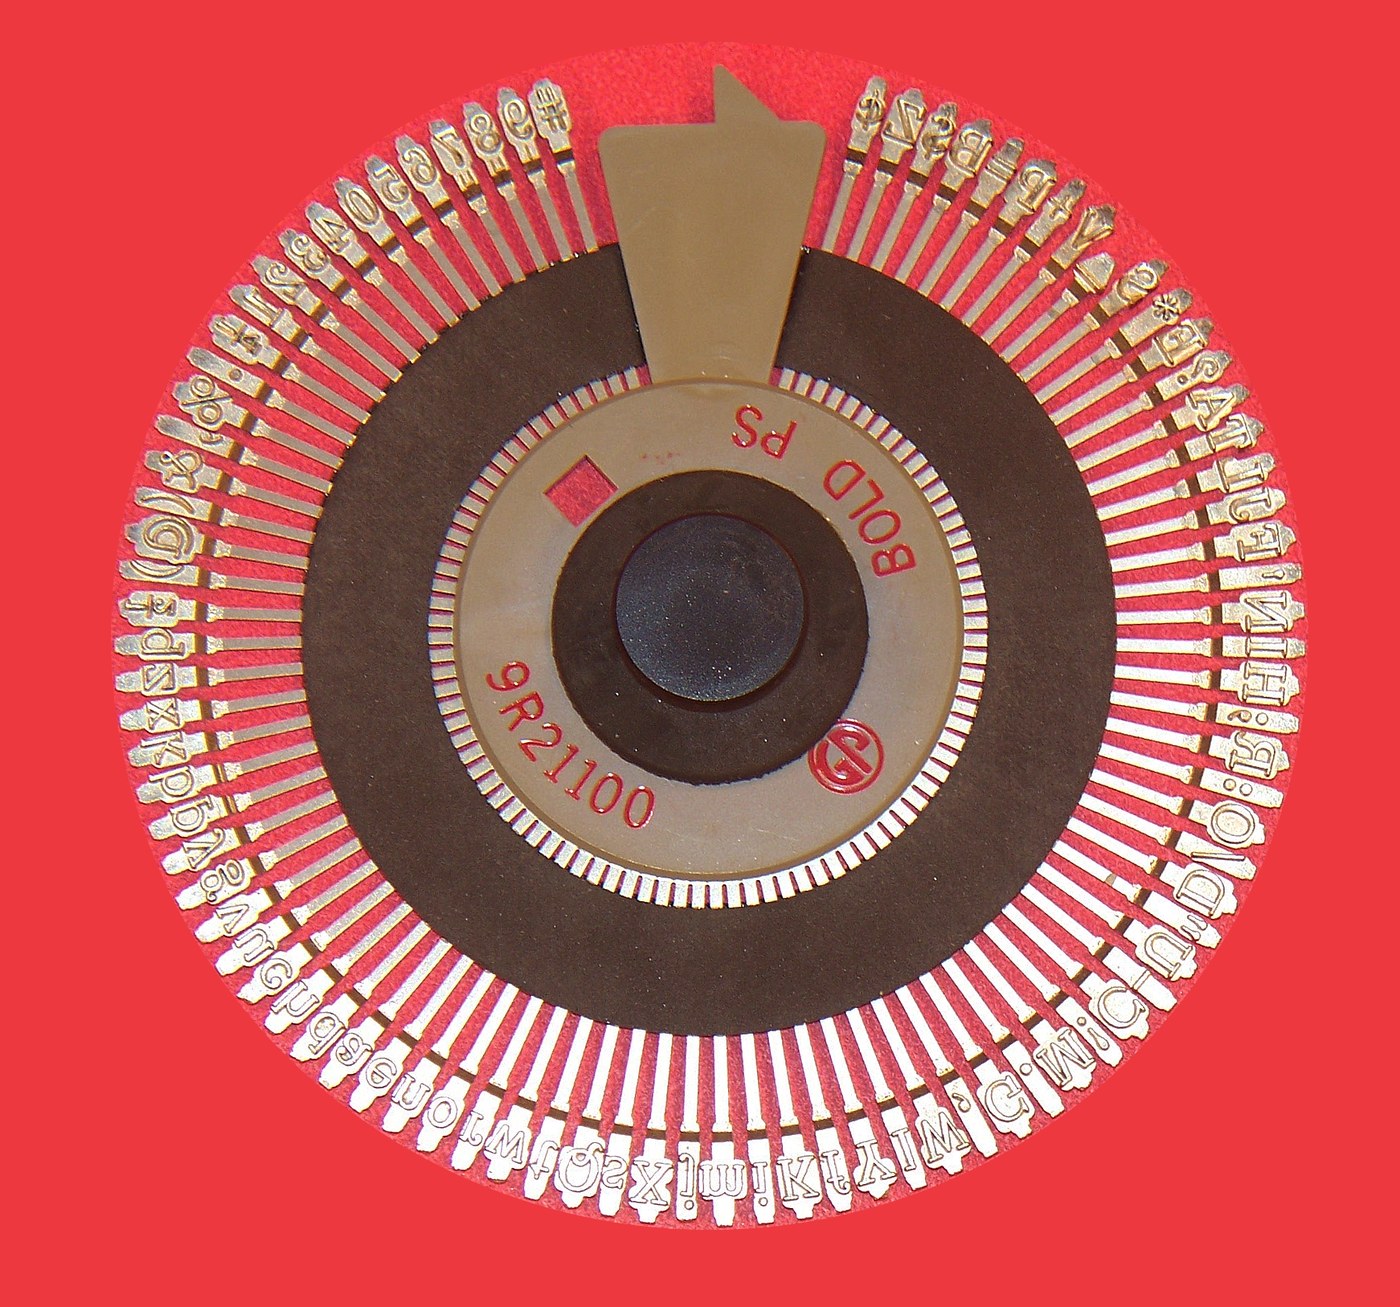


The Daisy Wheel
A typewriter carries its letters on forty-odd steel bars, each with its own linkage back to a key, and changing the typeface means rebuilding the machine. IBM's Selectric of 1961 shrank all of it onto one golfball that tilts and rotates - eighty-eight characters you could swap in seconds - at the price of a cam train that had to solve two axes at once.
David Lee at Diablo Systems asked in 1972 what happens if you use only ONE axis. Put the characters on the ends of ninety-six flexible spokes radiating from a hub, spin the right spoke into place, and hit it from behind with a solenoid hammer. The wheel is a moulded disc you can bend in your fingers, it costs almost nothing, and swapping a typeface takes about two seconds.
Everything about the machine then reduces to one number: how long to turn the wheel, stop it dead, and strike. Turning is quick. Stopping is not - a wheel still ringing prints a blurred letter, so settling eats nearly half the cycle, and that is what puts every daisy wheel printer ever built between thirty and fifty-five characters a second.
It is worth seeing what this machine gave up and what it kept. It cannot print a picture. It cannot print a character that is not moulded on the wheel. But because the letter is a solid shape struck through a carbon film ribbon, it prints sharper than any dot process of its day - which is exactly why the late 1970s office bought them, and exactly why they vanished the moment dots got small enough that nobody could see them.
Intermedio
3 hours
Instrucciones
1
1
Cut a wheel and mount it
Cut a wheel and mount it
Cut a 90 mm disc from 0.5 mm polypropylene sheet and slit it into 24 spokes with the craft knife, leaving a 20 mm hub. Glue a small raised letter - a punch, a bit of type, or a blob of cured epoxy filed to shape - on the end of each.
Press the hub onto the motor shaft and check it runs true with the dial indicator.
Materiales para este paso:
 Lámina de polipropileno (A4)1 hoja
 Epoxi de dos componentes1 tube
Herramientas necesarias:
 Cúter de precisión
 Motorreductor de corriente continua
 Comparador de cuadrante
 Calibre digital de 6 pulgadas
 Juego de limas de aguja
2
2
Strike it, and watch it ring
Strike it, and watch it ring
Mount the solenoid behind the wheel so its plunger hits a spoke square, with ribbon and paper against a hard backing in front.
Drive the motor to a new petal and fire the hammer at decreasing delays. Print a line at each delay: below about eight milliseconds the letters smear sideways. You have just measured the settling time that sets the whole machine's speed.
Materiales para este paso:
 Papel10 hojas
 Cinta entintada de tela para impresora1 pieza
Herramientas necesarias:
 Solenoide
 Fuente de alimentación de banco
 Generador de funciones
 Osciloscopio digital
 Lupa de relojero
3
3
Move, settle, strike - and four ways to carry a letter
Move, settle, strike - and four ways to carry a letter
Cargando el cuaderno de Jupyter…
Herramientas necesarias:
 Ordenador de sobremesa
4
4
Compendium: hammer energy and the multi-strike ribbon
Compendium: hammer energy and the multi-strike ribbon
A full stop and a capital W do not need the same blow. Strike them equally and the full stop punches a hole while the W prints grey, so the printer stores a hammer energy per character and varies the solenoid pulse to match the inked area. That table, not the wheel, is what makes the page look evenly weighted - and it is the same idea as varying pulse width on a thermal head, arrived at independently.
The ribbon is the other half of the sharpness. A fabric ribbon holds ink in a weave, so the weave prints too. Daisy wheels used a carbon film ribbon: a polyester tape with a thin carbon-wax layer that transfers ONCE, cleanly, leaving a letter-shaped hole in the tape. It gives a mark as sharp as the type, costs a fresh strip of ribbon for every character printed, and leaves a legible negative of everything you typed on the used spool - a security problem that fabric ribbons never had.
Materiales
4- Marcador de posición
- 1 tubeMarcador de posición
- 10 hojasMarcador de posición
- Marcador de posición
Herramientas requeridas
11- Marcador de posición
- 1 vendor sell this, none ship to you yetMarcador de posición
- Marcador de posición
- Marcador de posición
- Marcador de posición
- 2 vendors sell this, none ship to you yetMarcador de posición
- Marcador de posición
- Marcador de posición
- 1 vendor sell this, none ship to you yetMarcador de posición
- Marcador de posición
- Marcador de posición
Blueprints relacionados
Estos blueprints comparten conocimiento — técnicas, materiales o principios



CC0 Dominio público
Este Blueprint se publica bajo CC0. Eres libre de copiar, modificar, distribuir y usar este trabajo para cualquier propósito, sin pedir permiso.
Apoya al Maker comprando productos a través de su Blueprint, donde gana una Comisión del Maker establecida por los vendedores, o crea una nueva iteración de este Blueprint e inclúyela como conexión en tu propio Blueprint para compartir ingresos.