ARTE
BELLEZA Y BIENESTAR
ARTESANÍA
CULTURA E HISTORIA
ENTRETENIMIENTO
MEDIO AMBIENTE
COMIDA Y BEBIDAS
INGENIERÍA INVERSA
CIENCIAS
DEPORTES
TECNOLOGÍA
TECNOLOGÍA VESTIBLE
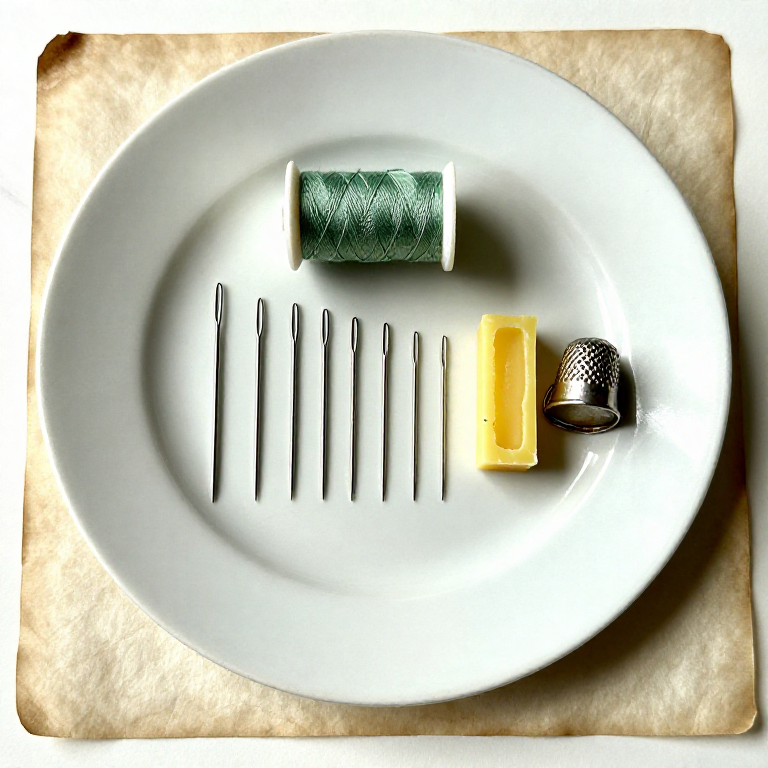


Needle and Thread: Getting Started Without Fighting the Tools
Most people who say they cannot sew are fighting the equipment rather than lacking the skill. A needle too fine for the thread, a thread twice as long as it should be, and no thimble, and the work is genuinely difficult.
Fix those three and hand sewing becomes straightforward almost immediately. The needle should suit the fabric, the thread should be about the length of your forearm, and a thimble should push.
277 published blueprints on Youblob use a needle, thread, seam or stitch. Knitting, crochet and nalbinding are covered here; hand sewing was not. This is the first of eight rungs.
Principiante
2 hours
Instrucciones
1
1
Match the needle to the fabric, not to your patience
Match the needle to the fabric, not to your patience
Needle sizes run backwards like wire gauge: a bigger number is a FINER needle. A size 9 sharp suits cotton shirting; a size 5 suits heavy twill; a leather needle has a triangular point that cuts rather than parting the fibres.
The needle has to be fine enough not to leave a visible hole and strong enough not to bend. Too fine and it bends or snaps and the eye is too small for the thread; too coarse and every stitch leaves a mark in the cloth that will not close.
The eye is the usual problem. A needle whose eye is too small for your thread will shred it on every stitch, and that fraying gets blamed on the thread. Try a larger-eyed needle before blaming anything else.
Materiales para este paso:
 Hilo de coser1 pieza
 Tejido de lino1 pieza
Herramientas necesarias:
 Juego de agujas de coser
 Lupa de relojero
2
2
Short thread, and wax it
Short thread, and wax it
Cut a length about from your hand to your elbow — roughly 45 to 50 cm. Longer feels efficient and is not: it tangles, knots on itself, and abrades against the fabric on every pull until it frays through.
Run the thread across a block of beeswax two or three times. Wax stops it twisting on itself, reduces the abrasion, and makes it noticeably stronger — which is why the traditional sewing kit has always contained a lump of it.
Cut the end at a slant with sharp scissors rather than biting it. A clean angled end goes through the eye; a chewed or frayed end has to be wetted, rolled and coaxed, which is most of what makes threading a needle frustrating.
Materiales para este paso:
Hilo de coser1 pieza Cera de abeja1 pieza
Herramientas necesarias:
 Tijeras de sastre
 Agujas de coser a mano
3
3
The knot that does not pull through
The knot that does not pull through
Wrap the thread end twice around your forefinger, roll the loops off between finger and thumb so they twist together, and pull them down the thread into a firm compact knot. This is the quilter's knot and it is much more reliable than a simple overhand.
Size it to the weave. A knot smaller than the gaps between the threads pulls straight through loose fabric, and the whole seam comes undone from the start.
For work that must not show a knot at all, take two tiny backstitches in the seam allowance instead and sew over them. That is how a knot is avoided on a visible surface, and it holds at least as well.
Materiales para este paso:
Hilo de coser1 piezaTejido de lino1 piezaHerramientas necesarias:
Agujas de coser a manoLupa de relojero4
4
The thimble is not optional on anything thick
The thimble is not optional on anything thick
A thimble goes on the middle finger of the sewing hand and PUSHES the needle through from behind, using the dimples on its side or end to stop the needle skidding.
It feels awkward for about an hour and then it is invisible. Without one, any fabric heavier than shirting will drive the needle's eye end into your fingertip repeatedly, and the usual result is that people conclude hand sewing is painful and stop.
Get one that fits: loose and it falls off mid-stitch, tight and it is unbearable. Metal for general work, leather for a softer feel. For very heavy material — canvas, sailcloth, leather — a sailmaker's palm replaces it entirely and lets you push with the whole hand.
Materiales para este paso:
Tejido de lino1 piezaHerramientas necesarias:
 Dedal (metálico)Agujas de coser a manoHilo de coser
Materiales
3- 3 piezasMarcador de posición
- 3 piezasMarcador de posición
- 1 piezaMarcador de posición
Herramientas requeridas
6- Marcador de posición
- Marcador de posición
- Marcador de posición
- Marcador de posición
- Marcador de posición
- Marcador de posición
Blueprints relacionados
Estos blueprints comparten conocimiento — técnicas, materiales o principios
CC0 Dominio público
Este Blueprint se publica bajo CC0. Eres libre de copiar, modificar, distribuir y usar este trabajo para cualquier propósito, sin pedir permiso.
Apoya al Maker comprando productos a través de su Blueprint, donde gana una Comisión del Maker establecida por los vendedores, o crea una nueva iteración de este Blueprint e inclúyela como conexión en tu propio Blueprint para compartir ingresos.