ARTE
BELLEZA Y BIENESTAR
ARTESANÍA
CULTURA E HISTORIA
ENTRETENIMIENTO
MEDIO AMBIENTE
COMIDA Y BEBIDAS
INGENIERÍA INVERSA
CIENCIAS
DEPORTES
TECNOLOGÍA
TECNOLOGÍA VESTIBLE
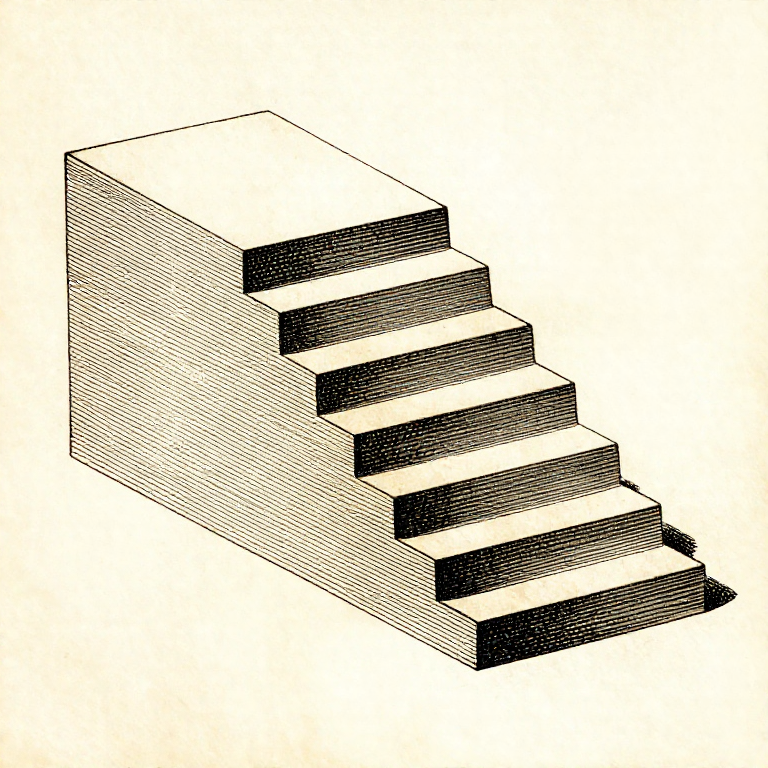


Overhangs, Bridges and Support: What the Machine Can Print Over Thin Air
Each layer is laid on the one below it. Where there is no layer below, the plastic has nothing to sit on — so the question for every sloping surface is how much of each line is still supported by the line under it.
The rule of thumb is 45 degrees, and it is not arbitrary: at 45 degrees each line overhangs the one below by exactly half its width, and half a line is enough to hold. Past that the overhang grows quickly and the plastic droops.
A BRIDGE is the other case: a flat span between two supported ends, printed as a stretched thread across the gap. Bridges work far better than most people expect, and designing to use them is how supports get avoided.
Intermedio
3 hours
Instrucciones
1
1
Why 45 degrees, in numbers
Why 45 degrees, in numbers
Cargando el cuaderno de Jupyter…
Materiales para este paso:
 Filamento de impresión 3D (PLA)1 pieza
Herramientas necesarias:
 Ordenador de sobremesa
 Software de laminado de archivos 3MF
 Juego de boquillas para impresora 3D
2
2
Bridges: flat spans print better than slopes
Bridges: flat spans print better than slopes
A bridge is printed as a single stretched line pulled tight between two anchored ends. Because it is in tension it stays straight, and a well-cooled bridge of 50 mm or more comes out flat.
The first bridging layer is printed FAST and with full cooling, so the line is drawn thin and sets before it can sag. Slicers detect bridges and do this automatically, which is why a bridge often succeeds where a gentler slope fails.
So a square hole printed with a flat top is often better than one with an arch, and a teardrop-shaped horizontal hole is better than a round one because it turns the unsupported top into a self-supporting point. Designing the shape to suit the process is the last rung of this batch.
Materiales para este paso:
Filamento de impresión 3D (PLA)1 piezaHerramientas necesarias:
 Impresora 3D de filamento (FDM)Software de laminado de archivos 3MF
 Calibre digital de 6 pulgadas
3
3
Support is a cost, so spend it deliberately
Support is a cost, so spend it deliberately
Support material is printed, then thrown away, and it leaves a rough scar on every surface it touched. So it costs time, filament and finish — three things at once.
Use SUPPORT ON BUILD PLATE ONLY where possible. Support that grows from the part itself marks the part; support that rises from the plate marks nothing except where it meets the overhang.
Increase the Z gap between support and part until it releases by hand. A gap of one layer height is usually right: smaller and it fuses on, larger and the overhang above it droops into the gap. It is worth finding your printer's number once and writing it down.
Materiales para este paso:
Filamento de impresión 3D (PLA)1 piezaHerramientas necesarias:
Software de laminado de archivos 3MF Desbarbador
 Juego de herramientas para impresora 3D
4
4
Print a test tower before trusting a part
Print a test tower before trusting a part
An overhang test is a small model with faces at a range of angles, printed once per filament and per layer height. Twenty minutes, and it tells you exactly where your machine stops coping.
Keep them, labelled with the filament and settings. A drawer of test prints is the same thing as a shelf of glaze test tiles: a physical record that answers questions faster than any table.
Re-test when anything changes — a new filament, a new nozzle, a different cooling duct. Overhang performance is one of the most machine-specific things in printing, and a number from somebody else's printer is a starting guess.
Materiales para este paso:
Filamento de impresión 3D (PLA)1 pieza Filamento ABS1 pieza
Herramientas necesarias:
Impresora 3D de filamento (FDM) Lupa de relojero
Materiales
2- 4 piezasMarcador de posición
- 1 piezaMarcador de posición
Herramientas requeridas
8- Marcador de posición
- Marcador de posición
- Marcador de posición
- Marcador de posición
- Marcador de posición
- Marcador de posición
- Juego de herramientas para impresora 3D10% de comisiónMarcador de posición
- Marcador de posición
Blueprints relacionados
Estos blueprints comparten conocimiento — técnicas, materiales o principios


CC0 Dominio público
Este Blueprint se publica bajo CC0. Eres libre de copiar, modificar, distribuir y usar este trabajo para cualquier propósito, sin pedir permiso.
Apoya al Maker comprando productos a través de su Blueprint, donde gana una Comisión del Maker establecida por los vendedores, o crea una nueva iteración de este Blueprint e inclúyela como conexión en tu propio Blueprint para compartir ingresos.